Simplify Dashboard Embedding With JWT Authentication
6 min read | Published

Summary
This article explains how JSON Web Token (JWT) authentication can simplify the process of embedding dashboards into custom applications. It introduces JWT as an alternative to OpenID Connect, highlighting its advantages such as being self-contained, stateless, and flexible while also noting challenges like token revocation and key management. The article provides a clear walkthrough of how to embed dashboards using JWT, including user creation, key generation, and integration with the GoodData platform. The goal is to help developers securely and seamlessly integrate analytics into their products without relying on existing identity infrastructures.
An Alternative Way to Embed Dashboards Without Using OIDC Authentication
Are you searching for a way to embed dashboards without using OIDC authentication? Look no further; we present an alternative authentication method via JWT. We previously shared community articles to help you understand the embedding scenario use case. The objective is to embed analytical dashboards and offer them within your platform. To achieve this, you traditionally need to use your OpenID Connect (OIDC) or a custom Identity Provider (IdP) solution to manage Gooddata Cloud authentication. This allows users to log in using their existing credentials from various IdPs, such as Okta or Auth0. Explore these articles for more insights:
This follow-up article is your comprehensive guide to achieving a successful embedded dashboard scenario using JWT (including creating a JWK and JWT) authentication instead of OIDC.
Why Choose JWT?
JWT is the go-to option if you lack an OpenID Connect (OIDC) infrastructure or prefer to avoid third-party solutions. Here's why:
Self-Contained & Stateless: JWTs are self-contained, meaning all necessary information is within the token itself. They are also stateless, which simplifies authentication.
Flexibility: JWTs offer flexibility in handling authentication without the complexities of a custom OIDC application or reliance on external OIDC providers.
Reliability: Whether you're developing APIs, implementing Single Sign-On (SSO), or handling distributed authentication, JWTs are reliable and adaptable.
Customization: JWTs allow you to set token expiration times, choose different signing algorithms, and eliminate the need for complex token exchange steps.
Why Not Choose JWT?
While JWTs offer advantages, they have limitations:
Statelessness: While statelessness can be an advantage, it can also be a drawback. Once a JWT is issued, you cannot change its content. If you need to revoke or modify access for a user, you'll have to rely on the token's expiration time or use a token revocation list. Alternatively, create another one.
Key Management: The security of JWTs relies heavily on key management. Safeguarding the JWTs and private key used to sign tokens is crucial, as a compromised key could lead to unauthorized access.
3 Steps To Embed a Dashboard in a Custom Application
Step 1: Create a user in GoodData organization metadata
PUT /api/v1/entities/users:
{
   "data":{
      "id":"john.doe",
      "type":"user",
      "attributes":{
         "authenticationId":"example",
         "email":"john.doe@example.com",
         "firstname":"John",
         "lastname":"Doe"
      },
      "relationships":{
         "userGroups":{
            "data":[
               {
                  "id":"adminGroup",
                  "type":"userGroup"
               }
            ]
         }
      }
   }
}
Note: authenticationId is optional.
To use a JWT token in GoodData, you must have an existing user ID within the GoodData organization. This is because the sub-claim (subject) is required. Additionally, it's necessary to prepare permissions and user scopes in advance. You can do this either during the user creation process, where you can directly assign the user to specific groups, or at a later stage by configuring individual user permissions.
Step 2: Create a JWK and JWT via Python Script
Generate an RSA Key Pair:
private_key = rsa.generate_private_key(
    public_exponent=65537,
    key_size=size,
)
Create a JSON Web Key (JWK) from the public key:
jwk_dict = make_jwk_from_public_key(public_key_data, kid=kid)
The code converts the public key (public_key_data) into a JWK format using our custom make_jwk_from_public_key function. The JWK is then stored in the jwk_dict variable.
Important: Kid (key identifier) and Alg (signing algorithm) in the JWK must match the corresponding values used in the JWT for proper functionality.
The output (JWK):
{
    "e": "AQAB",
    "kid": "doe_python",
    "kty": "RSA",
    "n": "uKbYnV1DQ0PfJPbvkmol9khnr7TX7TZCZKKbQjAwWzNEi5oq2V7xz5XIQ_9Fm-yTDFhAduBN9YBYdcdfFdR1FKYnKrXfssGVOR1q6hSseQ7AVPRFV12Ln7xao0gJSIVrABTOtBkh2crO0TNeTcU8eueqX_Th6bXbrfov75j…8XfqmHYDtYFkT4CYxfM8rvzCkZ8eC5S5zDZ9kOf1eYO97YufwBTWEthBL4rQ",
    "alg": "RS256"
}
Set JWK in your GoodData organization (PUT api/v1/entities/jwks/your_jwk_id):
{
   "data":{
      "id":"doe_python_id",
      "type":"jwk",
      "attributes":{
         "content":{
            "kty":"RSA",
            "alg":"RS256",
            "use":"sig",
            "n":"uKbYnV1DQ0PfJPbvkmol9khnr7TX7TZCZKKbQjAwWzNEi5oq2V7xz5XIQ_9Fm-yTDFhAduBN9YBYdcdfFdR1FKYnKrXfssGVOR1q6hSseQ7AVPRFV12Ln7xao0gJSIVrABTOtBkh2crO0TNeTcU8eueqX_Th6bXbrfov75j…8XfqmHYDtYFkT4CYxfM8rvzCkZ8eC5S5zDZ9kOf1eYO97YufwBTWEthBL4rQ",
            "e":"AQAB",
            "kid":"doe_python"
         }
      }
   }
}
Create a JWT Header and Payload:
header = {
    "alg": "RS256",
    "typ": "JWT",
    "kid": "doe_python"
}

payload = {
    "sub": "john.doe",
    "name": "John",
    "jti": jti,
    "iat": datetime.utcnow(),
    "exp": datetime.utcnow() + expiration
}
In this example, we define the JWT header and payload. The header specifies the signing algorithm ("RS256") and the type ("JWT"). The payload contains various claims, such as subject ("sub") = “userId”, name, JWT ID ("jti"), issued at ("iat"), and expiration ("exp").
Important: Kid (key identifier) and Alg (signing algorithm) in the JWK must match the corresponding values used in the JWT for proper functionality.
JWT Signature:
jwt_token = jwt.encode(payload, private_key, algorithm="RS256", headers=header)
This generates the JWT and signs it with the private key. It combines the header and the payload, applies the "RS256" algorithm, and creates the signature using the private_key. The JWT is then verified on GoodData's side using the public key provided by JWK (see the step Create a JSON Web Key)
At the end simple printing the JWT:
print("JWT valid from:", datetime.utcnow())
print("JWT valid to:", datetime.utcnow() + expiration)
print("JWT Token:", jwt_token)
Step 3: Combine iframe and JWT
Test if JWT is working:
curl --request GET \
  --header "Authorization:bearer eyJhbGciOiJSUzI1NiIsImtpZCI6ImhpbHNlX3B5dGhvbiIsInR5cCI6IkpXVCJ9.eyJzdWIiOiJsdWJvcy5oaWxzZSIsIm5hbWUiOiJMdWJvcyIsImp0aSI6ImthY2VyZG9uYWxkMjIiLCJpYXQiOjE2OTcxODU0MDksImV4cCI6MTcwMDc4NTQwOX0.bKfCd58MJTudQMVVbemaHhP5fMMHIcnZL9kAFvGFoOWpWRiekvCZlqehbCijK4SGtlH_nerTPTe9YLAaHNZ9SD-szD2HHOAXmmkfcq66J6O2jB1Zlb_ZOtiQ8kN9yKV4kYRDgmlkPR2UmkIah80sJKaa…KjYdW5Md0UMCnmXGPwVSzUpl8DiO6_Dr2xnvr4HuHX7hu9DS3Q" \
  --header 'Content-Type: application/vnd.gooddata.api+json' \
  https://jdoe.gooddata.com/api/v1/profile
Expected output (200 OK):
{
   "organizationId":”jdoe”,
   "organizationName":"jdoe",
   "name":"John",
   "userId":"john.doe",
   "permissions":[
      "MANAGE",
      "SELF_CREATE_TOKEN"
   ],
  ………..
……………
     }
   }
}
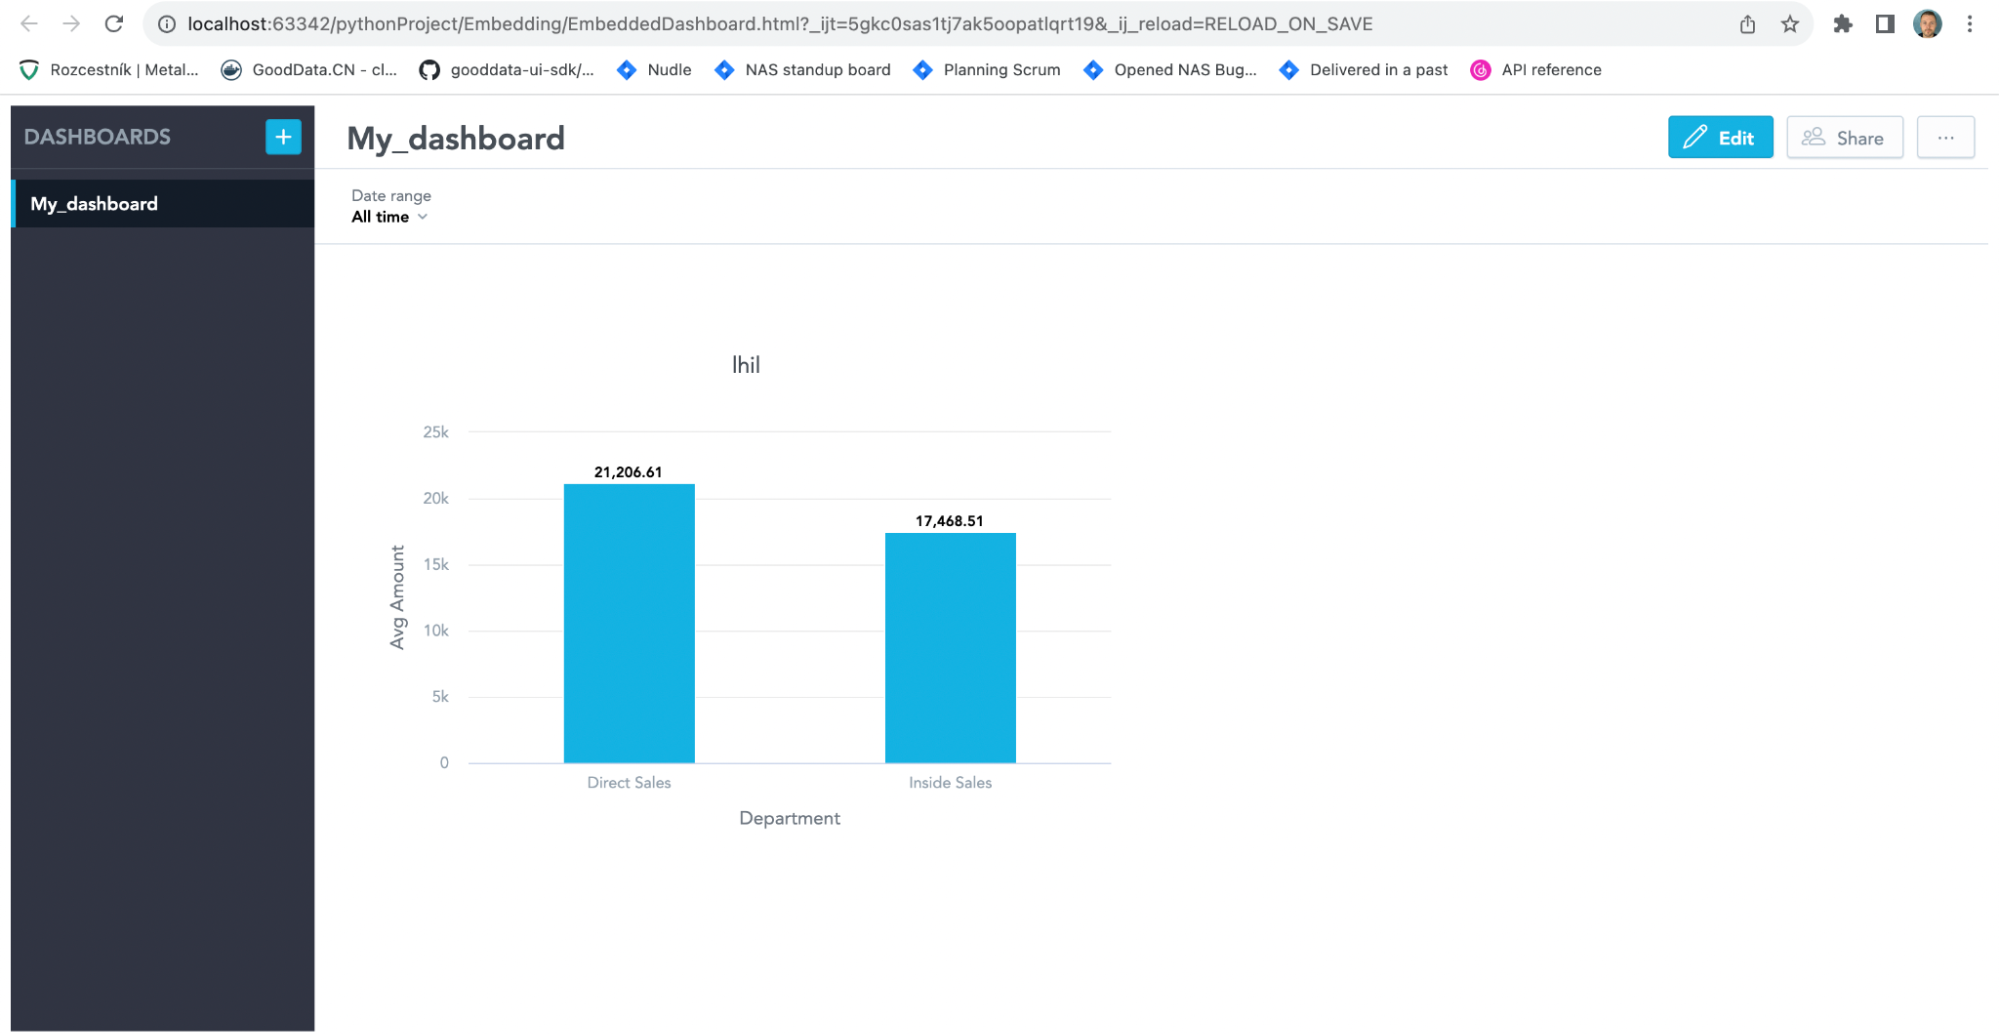
JWT token is being sent in the header here. Prepare the dashboard which you want to embed into your localhost application. In this example, we created a simple dashboard and copied the iframe from GoodData embed dashboard dialog.
For more information about iframe, check our public documentation.
In the following script, we've directly included the JWT as a constant within the code. Remember that this is just a demonstration and isn't suitable for production use.
<iframe src="https://jdoe.gooddata.com/dashboards/embedded/#/workspace/c98c4e4ef6054101ba92a2ebb8c404ee/dashboard/28bcd3b9-5595-4336-9cec-60a2aad4546f?showNavigation=true&setHeight=700&apiTokenAuthentication=true" height="700px" width="100%" frameborder="0" id="embedded-app-frame"></iframe>
<script>
   console.log("Setup parent frame message listener");

   window.addEventListener(
       "message",
       function (event) {
           console.log("Post message received", event);

           const eventName = event.data.gdc?.event.name;

           // Assuming you already have an existing JWT, store it in 'existingJwt'
           const existingJwt = "eyJhbGciOiJSUzI1NiIsImtpZCI6ImhpbHNlX3B5dGhvbiIsInR5cCI6IkpXVCJ9.eyJzdWIiOiJsdWJvcy5oaWxzZSIsIm5hbWUiOiJMdWJvcyIsImp0aSI6ImthY2VyZG9uYWxkMjIiLCJpYXQiOjE2OTcxODU0MDksImV4cCI6MTcwMDc4NTQwOX0.bKfCd58MJTudQMVVbemaHhP5fMMHIcnZL9kAFvGFoOWpWRiekvCZlqehbCijK4SGtlH_nerTPTe9YLAaHNZ9SD-szD2HHOAXmmkfcq66J6O2jB1Zlb_ZOtiQ8kN9yKV4kYRDgmlkPR2UmkIah80sJKaa…KjYdW5Md0UMCnmXGPwVSzUpl8DiO6_Dr2xnvr4HuHX7hu9DS3Q"; // Replace with your actual JWT

           if (eventName === "listeningForApiToken" || eventName === "apiTokenIsAboutToExpire") {
               const postMessageStructure = {
                   gdc: {
                       product: "dashboard",
                       event: {
                           name: "setApiToken",
                           data: {
                               token: "eyJhbGciOiJSUzI1NiIsImtpZCI6ImhpbHNlX3B5dGhvbiIsInR5cCI6IkpXVCJ9.eyJzdWIiOiJsdWJvcy5oaWxzZSIsIm5hbWUiOiJMdWJvcyIsImp0aSI6ImthY2VyZG9uYWxkMjIiLCJpYXQiOjE2OTcxODU0MDksImV4cCI6MTcwMDc4NTQwOX0.bKfCd58MJTudQMVVbemaHhP5fMMHIcnZL9kAFvGFoOWpWRiekvCZlqehbCijK4SGtlH_nerTPTe9YLAaHNZ9SD-szD2HHOAXmmkfcq66J6O2jB1Zlb_ZOtiQ8kN9yKV4kYRDgmlkPR2UmkIah80sJKaa…KjYdW5Md0UMCnmXGPwVSzUpl8DiO6_Dr2xnvr4HuHX7hu9DS3Q"",
                               type: "jwt",
                               secondsBeforeTokenExpirationToEmitReminder: 60,
                           }
                       }
                   }
               };

               console.log("Sending existing JWT to embedded window");

               const origin = "*";
               const iframe = document.getElementById("embedded-app-frame").contentWindow;
               iframe.postMessage(postMessageStructure, origin);
           }
       },
       false
   );
</script>
Please notice that apiTokenAuthentication=true must be added into the iframe src url. This allows the use of injected token for authentication**.** If you access the application dashboard, you'll find yourself with an authenticated user and a fully functional embedded dashboard. See the screenshot below for reference.
Additional Resources and Useful Links
X.509 Certificate
We provide two scripts for your consideration. The first, "example_without_X509," does not utilize an X.509 certificate. Conversely, the second, "example_with_X509," includes this additional security feature. It's worth noting that the script using the X.509 certificate provides a more robust security solution.
X.509 certificates play an essential role in digital security by facilitating secure communication and maintaining data integrity across various applications. They are instrumental in verifying the authenticity of the parties involved and ensuring the confidentiality and integrity of the data exchanged. The X.509 certificate contributes to a robust and secure authentication process, particularly when dealing with potential security threats.
The X.509 certificate adds an additional layer of security to the JWT-based authentication, reinforcing its reliability and trustworthiness.
JWT in JavaScript
The Create JWK and JWT in JavaScript article describes how you can create and deploy a JSON Web Key (JWK) and generate a JSON Web Token (JWT) purely in JavaScript. You may want to use this method when embedding GoodData using iframes or React SDK. However the JWK generation should always run on the backend (nodejs service) separated from the frontend. This is a rather alternative test or demonstration example and suggestion, how to create a JWT also in a different language. We do not recommend using such examples on production.
Debugging
We are constantly improving responses to help you if you face any issues during the authentication process for embedded dashboards. For instance, here's a glimpse into debugging tools, illustrating a scenario where an expired JWT token is served or when invalid claims are provided in the JWT. Please share your feedback if you need any help. We're here to assist.

Debugging of iFrame
Feature Follow-up
We are actively exploring the option of supporting custom JWKS retrieval endpoints to cater to your automation needs. This includes making key rotation a seamless process, thereby enhancing your overall control and flexibility.
You'd have the ability to specify your custom HTTPS endpoint in the GoodData application settings. Once configured, the communication between the GoodData backend and your endpoint would ensure that keys are automatically retrieved and updated, aligning with the latest security standards.
Wrapping Up
JWT authentication simplifies the process of embedding GoodData dashboards into your platform. It offers flexibility, self-containment, and reliability without the need for a custom OIDC infrastructure or reliance on third-party solutions.
In this article, we've outlined the required steps for working with JWT authentication in the GoodData organization. We've covered creating a user, setting up a JWK, associating the user with JWT, and using the JWT within an embedded application. Feel free to explore the attached files and don't hesitate to reach out if you have any feedback or questions.
You can also find files in the open-source repository and try it for yourself in our free trial.
Experience GoodData in Action
Discover how our platform brings data, analytics, and AI together — through interactive product walkthroughs.
Explore product toursFAQs About Dashboard Embedding With JWT Authentication
JWT is often chosen when a business does not have an existing identity provider or wants a simple, self-contained solution. It eliminates the need for server-side session tracking and makes embedding more straightforward.
Since JWTs are stateless, they cannot be changed once issued. To maintain control, organizations rely on short token expiration times or use a revocation list to block specific tokens.
Secure storage and rotation of keys are essential. If private keys are lost or exposed, the entire embedding setup could be compromised, so key management must be handled carefully.
First, create a user in your environment. Then generate a JWK as the public key and a JWT signed with the private key. Upload the JWK, embed the dashboard through an iframe, and use the postMessage API to pass the token securely.
JWT authentication does not depend on cookies. By passing the token directly, JWT ensures embedded dashboards remain accessible even as browsers restrict third-party cookie usage.