NetBox Deployment To AWS in One Click
9 min read | Published

Summary
This article shows how to quickly set up NetBox, a popular tool for managing data centers and IP addresses, on Amazon Web Services with just one click. Instead of manually installing and configuring everything, the guide uses automation to create a ready-to-use environment that is both cost-effective and easy to expand later. It is designed for teams who want a fast way to get started with NetBox in the cloud while leaving room to scale the setup into a more robust production system when needed.
Introducing Netbox
In the quest for operational excellence at GoodData, finding a tool that could provide a comprehensive view of our infrastructure was critical. My role requires a birds-eye view of our entire infrastructure landscape. That's where NetBox came into play — it offered an efficient solution for DCIM and IPAM, paired with a robust API that ticked all the right boxes for us. Despite NetBox's promise, charting a course for a scalable, production-ready deployment was a venture that had yet to be fully explored.
The story could have ended here with the choice of NetBox Cloud, a fully managed service; however, its expense — surpassing $450 per month — steered the decision toward a self-hosted solution. Choosing a self-hosted NetBox ensures a simple start-up and cost-saving strategy supported by a skilled infrastructure team that manages its deployment and upkeep.
The mainstream guidance available pointed toward deployment methodologies that involved pip or Docker. These are sound starting points but not robust enough for production-grade deployment. The real problem lay in scaling up to a production-ready setup, a topic I found conspicuously absent in online resources. So, I embarked on a mission to bridge this gap, leading to many experiments and, ultimately, innovation.
It didn't take long for the cloud's potential to shine through. I conceived a blueprint that intertwined AWS services and Terraform to support a high-performance NetBox setup. The plan was simple yet elegant: ECS for the NetBox container, RDS for PostgreSQL, ElastiCache for Redis, and ELB for load balancing — all managed and deployed using Terraform, our tool of choice for infrastructure as code.
Note to Readers: The example I’ll present here is a single-zone, single-point-of-failure (SPOF) setup intended to demonstrate the basic deployment of NetBox on AWS. While it does not cover monitoring, alerting, or a multi-zone high availability (HA) configuration, AWS services such as RDS and ElastiCache support scaling and HA. As such, this article serves as a foundational blueprint. You're encouraged to build upon this example to create a resilient HA setup tailored to your organization's needs.
In the following article, I'll take you through a Terraform approach that establishes a fully operational NetBox environment on AWS, step by step.
The Blueprint
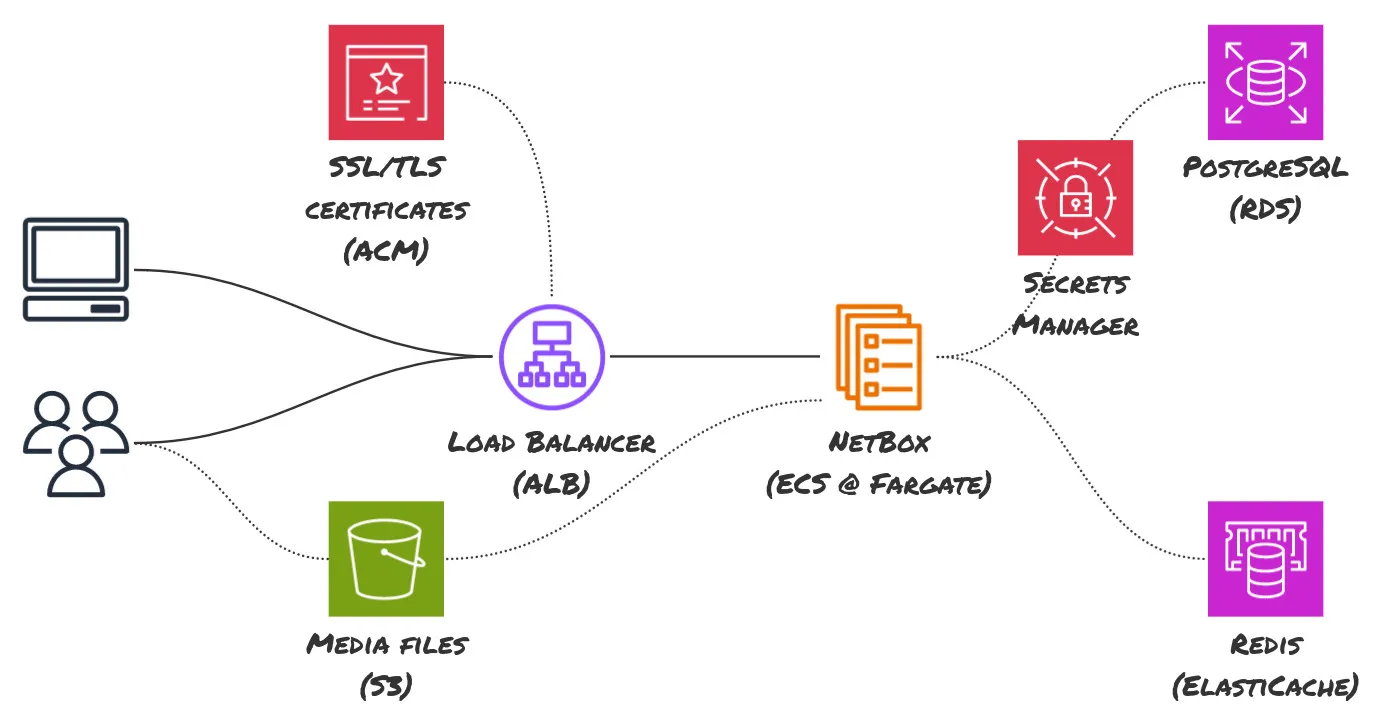
The architecture diagram above represents the end state of what we will be building. It’s a fully managed, highly available (if configured that way) NetBox deployment on AWS. Each AWS service has a role to play in this architecture:
- VPC: The foundational network within which all resources reside.
- RDS: The managed relational database service hosting the NetBox database.
- ElastiCache: The managed caching service to speed up NetBox operations.
- ACM: The AWS Certificate Manager manages SSL certificates for secure communications.
- ALB: The Application Load Balancer distributes incoming application traffic.
- ECS: The Elastic Container Service hosts our NetBox Docker containers.
- S3: The Simple Storage Service stores user-uploaded media files in NetBox.
For the scope of this article, we will exclude S3 and ACM to avoid additional complexity related to domain verification and persistent storage, which are not critical for initial setup.
The Deployment
Prerequisites
Before we dive into the step-by-step guide for deploying NetBox on AWS with Terraform, ensuring that you have the right foundation is crucial. This section outlines the knowledge and tools you’ll need to successfully follow along with the article and execute the provided code.
Technical Toolset
AWS Account: An active AWS account with sufficient permissions to create and manage VPCs, ECS clusters, RDS instances, ElastiCache clusters, and other related services.
AWS CLI: The AWS Command Line Interface should be installed and configured for your AWS account to interact with AWS services from your terminal.
Terraform: You must have Terraform installed and configured on your local machine. Familiarity with writing and applying Terraform configurations is a prerequisite.
Containerization Knowledge: Understanding Docker containers is helpful since NetBox will be deployed as a containerized application on ECS.
Code Editor: A reliable code editor (like Visual Studio Code, Atom, etc.) to edit Terraform files and potentially review JSON or YAML configurations.
Administrative Considerations
AWS Permissions: Ensure that your AWS user account has the necessary permissions to create and manage the resources that Terraform will be provisioning.
Billing Awareness: Familiarize yourself with the cost structure of AWS services to avoid unexpected charges. Use the AWS Pricing Calculator if needed.
In this article, the costs will roughly be as follows (monthly):
- RDS (PostgreSQL): $11.68
- Storage (for RDS): $2.30
- ALB (Load Balancer): $19.71
- ElastiCache (Redis): $11.68
- Fargate (NetBox): $28.84
- Secrets: $0.80
The estimated monthly cost for continuously running this setup is approximately $75. However, services like the Load Balancer, RDS, and ElastiCache may serve multiple aspects of your infrastructure, allowing for cost-sharing possibilities. Additionally, investing in a Compute Savings Plan could significantly reduce your expenses on Fargate — potentially by up to 51% for a 3-year commitment paid upfront in the us-east-1 region.
By ensuring you're equipped with the knowledge and tools mentioned above, you'll be set up for success in deploying NetBox to AWS using Terraform. Now, let's get ready to harness the power of infrastructure as code to streamline your network management!
VPC
Our NetBox deployment will be anchored within an Amazon VPC, creating a private network space for our resources on AWS. This VPC forms the bedrock of our NetBox infrastructure, providing a secure, isolated environment. It's a key component in guaranteeing that our setup is primed for operational efficiency and scalability. While we start with a configuration optimized for simplicity and ease of deployment, the VPC is designed to support future growth into a more complex, high-availability network setup.
module "vpc" {
  source  = "terraform-aws-modules/vpc/aws"
  version = "~> 5.1"

  name                = "netbox"
  cidr                = "10.254.0.0/24"
  azs                 = ["us-east-1a", "us-east-1b"]
  private_subnets     = ["10.254.0.0/27", "10.254.0.32/27"]
  public_subnets      = ["10.254.0.64/27", "10.254.0.96/27"]
  elasticache_subnets = ["10.254.0.128/27", "10.254.0.160/27"]
  database_subnets    = ["10.254.0.192/27", "10.254.0.224/27"]

  single_nat_gateway = true

  default_security_group_ingress = [{ self = true }]
  default_security_group_egress = [{ self = true }]
}
This Terraform module will initialize a dedicated NetBox VPC, including two availability zones, and proceed to set up NAT and Internet gateways. It will also meticulously configure an array of subnets, establish route tables for effective network traffic management, and implement security group rules to govern the default security group, creating a foundational network infrastructure tailored for the NetBox deployment.
The default security group in our single-purpose VPC is configured to permit all internal traffic, streamlining connectivity for the resources that will be subsequently deployed within it. Given the VPC's singular focus, stringent security measures are less critical, allowing for a more open network environment that facilitates ease of setup and operation.
Opting for a single NAT gateway in our VPC setup offers a cost-efficient way to enable outbound internet access for private subnets without the complexity of multiple gateways.
While the VPC is provisioned with multi-AZ support, this doesn't reflect an immediate application of high availability for NetBox but rather complies with AWS's requirements for ElastiCache and RDS, which necessitate multi-AZ configurations even if they are not initially utilized in a highly available manner. This approach provides a foundational setup accommodating scalability and future enhancements toward a fully resilient infrastructure.
PostgreSQL (RDS)
Amazon RDS will serve as the data storage solution for NetBox, catering to its PostgreSQL needs. RDS streamlines database management, automating routine tasks like patching, backups, and recovery while being built for easy scaling. It's vital for ensuring data integrity and availability in NetBox. Initially set with a single instance, RDS is equipped to scale and can transition to a multi-zone setup for enhanced availability in line with evolving requirements.
We will also generate a user password with Terraform rather than relying on RDS to do so¹ or using IAM authentication².
¹ RDS managed password will be automatically rotated weekly, but we have no simple way of notifying NetBox containers about that out of the box.
² NetBox docker image does not have a configuration option to use IAM authentication as it requires fetching new credentials occasionally and re-establishing the connection. This would definitely be the best option as it is passwordless.
module "db_password" {
  source  = "terraform-aws-modules/secrets-manager/aws"
  version = "~> 1.1"

  name_prefix = "netbox-db-password-"

  create_random_password           = true
  random_password_override_special = ""
}

data "aws_secretsmanager_secret_version" "db_password" {
  secret_id  = module.db_password.secret_id
  version_id = module.db_password.secret_version_id
}

module "db" {
  source  = "terraform-aws-modules/rds/aws"
  version = "~> 6.2"

  identifier = "netbox"

  engine            = "postgres"
  family            = "postgres15"
  instance_class    = "db.t4g.micro"
  storage_type      = "gp3"
  allocated_storage = 20

  availability_zone  = module.vpc.azs[0]

  username                            = "netbox"
  password                            = data.aws_secretsmanager_secret_version.db_password.secret_string
  db_name                             = "netbox"
  manage_master_user_password         = false
  iam_database_authentication_enabled = false

  skip_final_snapshot    = true
  create_db_option_group = false

  parameters = [
    {
      name  = "rds.force_ssl"
      value = "0" # Netbox in App mode can't access /root/.postgresql/postgresql.crt so it disables SSL
    },
  ]

  db_subnet_group_name   = module.vpc.database_subnet_group
  vpc_security_group_ids = [module.vpc.default_security_group_id]
}
The configuration pragmatically bypasses the creation of a final snapshot and an option group, indicating a setup more suited for development or testing environments where immediate data persistence is not critical.
Note: Disabling SSL enforcement was needed due to the bug in the NetBox Docker image.
Redis (ElastiCache)
Amazon ElastiCache, leveraging Redis, will be implemented to handle NetBox's caching and queuing needs. Essential for the application's performance, ElastiCache is a key component, not just an upgrade, providing fast data processing and access. Beginning with a basic configuration, ElastiCache is designed to scale and protect data as demands increase.
resource "aws_elasticache_cluster" "redis" {
  cluster_id           = "netbox"
  engine               = "redis"
  node_type            = "cache.t4g.micro"
  num_cache_nodes      = 1
  parameter_group_name = "default.redis7"

  availability_zone  = module.vpc.azs[0]

  subnet_group_name  = module.vpc.elasticache_subnet_group_name
  security_group_ids = [module.vpc.default_security_group_id]
}
Load balancer (ALB)
Our NetBox deployment strategy includes an Application Load Balancer (ALB) within AWS to route incoming traffic to our containerized NetBox instances efficiently. This setup enhances reliability and performance and forms a scalable backbone for our network infrastructure. Initially, while we haven't set up SSL/TLS termination, the ALB is poised to handle secure traffic, allowing for encrypted communication integration when necessary.
module "lb" {
  source  = "terraform-aws-modules/alb/aws"
  version = "~> 9.0"

  name    = "netbox"
  vpc_id  = module.vpc.vpc_id
  subnets = module.vpc.public_subnets

  enable_deletion_protection = false

  security_groups = [module.vpc.default_security_group_id]
  security_group_ingress_rules = {
    "allow-http" = {
      ip_protocol = "tcp"
      cidr_ipv4   = "0.0.0.0/0"
      from_port   = 80
      to_port     = 80
    }
  }

  listeners = {
    http = {
      port     = 80
      protocol = "HTTP"

      forward = {
        target_group_key = "netbox"
      }
    }
  }

  target_groups = {
    netbox = {
      create_attachment = false
      target_type       = "ip"
      backend_protocol  = "HTTP"
      backend_port      = 80
    }
  }
}
NetBox (ECS)
We chose Amazon Elastic Container Service (ECS) with AWS Fargate to run our NetBox application, initially using a single-container model that prioritizes simplicity and ease of maintenance. While our current system doesn't incorporate High Availability (HA), it's designed with adaptability in mind. The integration with a load balancer ensures zero-downtime deployments because ECS introduces new container instances before gracefully retiring the old, enabling seamless updates without service interruption, which sets the stage for scaling up to a robust HA configuration in the future.
module "secret_key" {
  source  = "terraform-aws-modules/secrets-manager/aws"
  version = "~> 1.1"

  name_prefix = "netbox-secret-key-"

  create_random_password           = true
  random_password_override_special = "!@#$%^&*(-_=+)"
  random_password_length           = 50
}

module "ecs_cluster" {
  source  = "terraform-aws-modules/ecs/aws//modules/cluster"
  version = "~> 5.2"

  cluster_name = "netbox"

  cloudwatch_log_group_retention_in_days = 1
}

locals {
  nb_version = "v3.6.4-2.7.0"
}

module "app" {
  source  = "terraform-aws-modules/ecs/aws//modules/service"
  version = "~> 5.2"

  cluster_arn = module.ecs_cluster.arn
  name        = "netbox"

  runtime_platform = {
    operating_system_family = "LINUX"
    cpu_architecture        = "ARM64"
  }
  assign_public_ip   = true
  enable_autoscaling = false
  security_group_ids = [module.vpc.default_security_group_id]
  security_group_rules = {
    "allow-internet" = { # to fetch image
        type        = "egress"
        protocol    = "all"
        cidr_blocks = ["0.0.0.0/0"]
        from_port   = 0
        to_port     = 0
    }
  }
  subnet_ids = [module.vpc.public_subnets[0]]
  container_definitions = {
    netbox = {
      readonly_root_filesystem = false
      essential                 = true
      image                     = "docker.io/netboxcommunity/netbox:${local.nb_version}"
      port_mappings = [
        { name = "http", containerPort = 8080, protocol = "tcp" },
      ]
      environment = [
        {
          name = "DB_HOST"
          value = module.db.db_instance_address
        },
        {
          name = "DB_USER"
          value = "netbox"
        },
        {
          name = "DB_NAME"
          value = "netbox"
        },
        {
          name = "REDIS_HOST"
          value = aws_elasticache_cluster.redis.cache_nodes[0].address
        },
      ]
      secrets = [
        {
          name = "DB_PASSWORD"
          valueFrom = module.db_password.secret_arn
        },
        {
          name = "SECRET_KEY"
          valueFrom = module.secret_key.secret_arn
        },
      ]
    }
  }
  load_balancer = {
    service = {
      container_name   = "netbox"
      container_port   = 8080
      target_group_arn = module.lb.target_groups["netbox"].arn
    }
  }
}
Bringing It All Together: Execution and Launch
This section guides you through the final steps of combining all the components — VPC, RDS, ElastiCache, ALB, ECS — into a cohesive deployment process. It's the crescendo of the guide, where the execution of Terraform scripts brings the architecture to life.
Create a new folder and main.tf file with the following code:
terraform {
  required_providers {
    aws = {
      source  = "hashicorp/aws"
      version = "~> 5.24"
    }
  }
}

# All the code from previous sections
# …

output "lb_dns_name" {
  value = module.lb.dns_name
}
Export your AWS credentials, run terraform apply, wait until all resources are deployed, and finally, run terraform output lb_dns_name to get a URL to access your copy of the NetBox.
Simply open it in your favorite browser and use the admin username (the password is the same: admin).
Later, if and when you want to clean it up, simply run terraform destroy, and everything previously created will be deleted.
Next Steps
For businesses exploring robust DCIM and IPAM solutions, this guide paves the way for seamless integration of NetBox using the cloud's expansive capabilities. Embrace this Terraform-facilitated pathway on AWS to elevate your network management, transforming a once-complex undertaking into an efficient, scalable infrastructure strategy.
While this article lays a solid foundation for deploying NetBox on AWS, it's just the beginning. The current setup, though yet to be high-availability, offers a blueprint that your company can build upon and customize. It's an initial step toward a more resilient and fail-safe environment, providing the groundwork for future enhancement and expansion as your infrastructure needs evolve. It is crucial to understand that this guide doesn't cover a setup that's meant to handle millions of requests per second or provide the kind of robustness a fully-fledged cloud service would offer; it’s a fundamental starting point, an ideal inspiration for crafting a robust production solution tailored to your specific operational demands.
Reach out via the GoodData community Slack channel with your comments and insights. Your feedback enriches this conversation and sparks innovation and improvements that benefit us all. If there are particular aspects you'd like to delve deeper into or additional configurations you’re curious about, don't hesitate to let us know.
Experience GoodData in Action
Discover how our platform brings data, analytics, and AI together — through interactive product walkthroughs.
Explore product toursFAQs About Netbox Deployment to AWS
Deploying on AWS provides scalability, managed services, and easier integration with existing cloud infrastructure. It also reduces the overhead of maintaining local servers.
Terraform automates the provisioning of AWS resources, ensuring consistent deployments. It allows you to manage the full NetBox stack as code and makes updates or rollbacks easier.
Yes, the setup can be extended with multi-AZ RDS, scalable ECS tasks, and additional networking rules. This makes it possible to adapt the same framework for high-availability or enterprise workloads.
The deployment relies on RDS for PostgreSQL, ElastiCache for Redis, ECS with Fargate for container management, and an Application Load Balancer for traffic distribution. These form the backbone of the deployment.
It works as a functional production deployment, but since it is single-zone and not highly available, it is best suited for development or light production workloads until further hardened.
You can optimize costs by choosing smaller instance sizes, applying Compute Savings Plans, and disabling unused environments with Terraform when they are not needed.