The GoodData Slack Integration
8 min read | Published


The best analytic solution is the one that is being actively used. The best way of driving the adoption of an analytic solution is by bringing the right numbers at the right time to the right users’ fingertips.
GoodData’s notification services enable easy integration with many messaging systems. In this article, we are going to describe how to deliver data-driven notification via Slack channels.
Something like this:

How do you do it?
At a high level, the process requires you to do some setup in your Slack workspace and your GoodData workspace.
On the Slack end, you will use Slack’s web UI to create an application (no coding is required, just pick a name). Once the application is created, you will define a so-called “incoming webhook,” which is basically a URL with a service that will route incoming messages sent via the HTTPS POST method to the specific Slack channel.
The second step is configuring your GoodData workspace so certain conditions will trigger firing an HTTPS POST message to the incoming webhook URL defined in the previous step.
That’s it! Let’s dive into the details. During this tutorial, you will need to find or create various resources by IDs or URLs. It is recommended that you open a text editor to keep track of these IDs or URLs as they may be required in further steps.
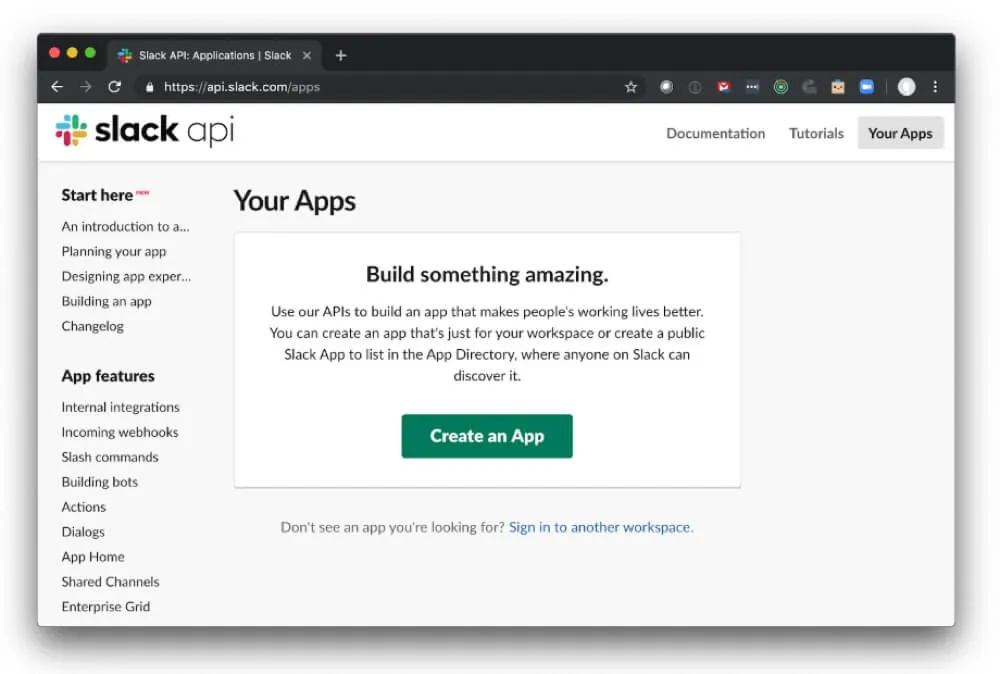
Step 1: Create a Slack App
You already have a Slack account, so sign into your Slack workspace and go to https://api.slack.com/apps to create a new Slack app.
I named my Slack app “GoodData App.” I’m brave enough to use our company’s internal Slack workspace (named “GoodData”) as my developer Slack workspace.
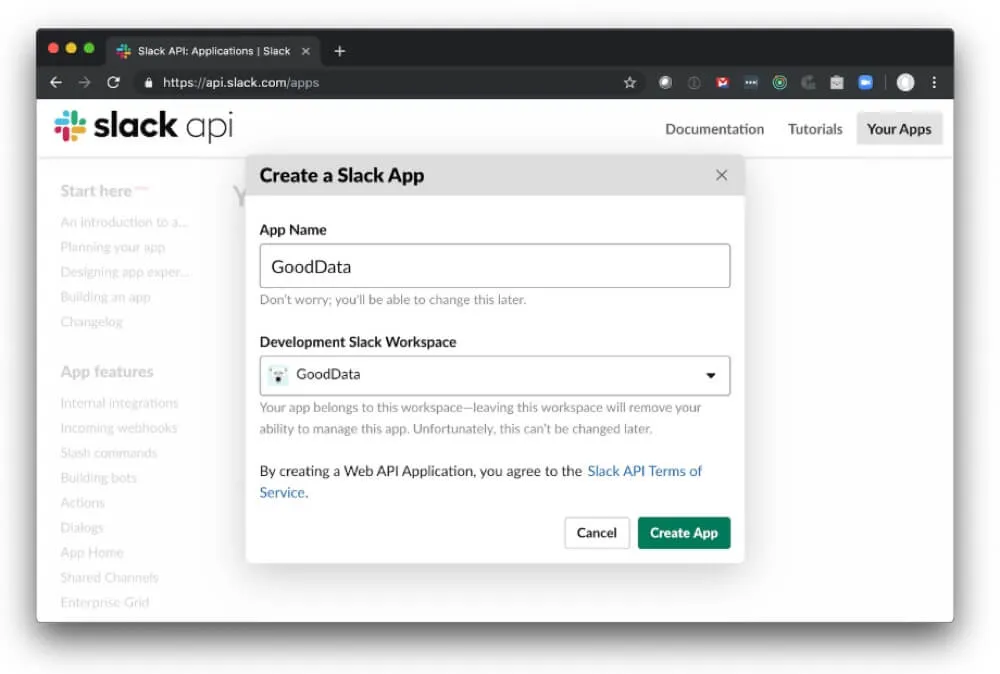
Hit “Create App” and your app is ready. Your browser should redirect to a URL that looks like https://api.slack.com/apps/{App_ID}?created=1. We will be referring to the App_ID in further steps of the tutorial.
Step 2: Enable incoming webhooks
To be able to post messages from external sources into Slack, you need to enable incoming webhooks.
Navigate to the “Incoming Webhooks” section via the left menu or by clicking the “Incoming Webhooks” box in the “Add features and functionality” section.
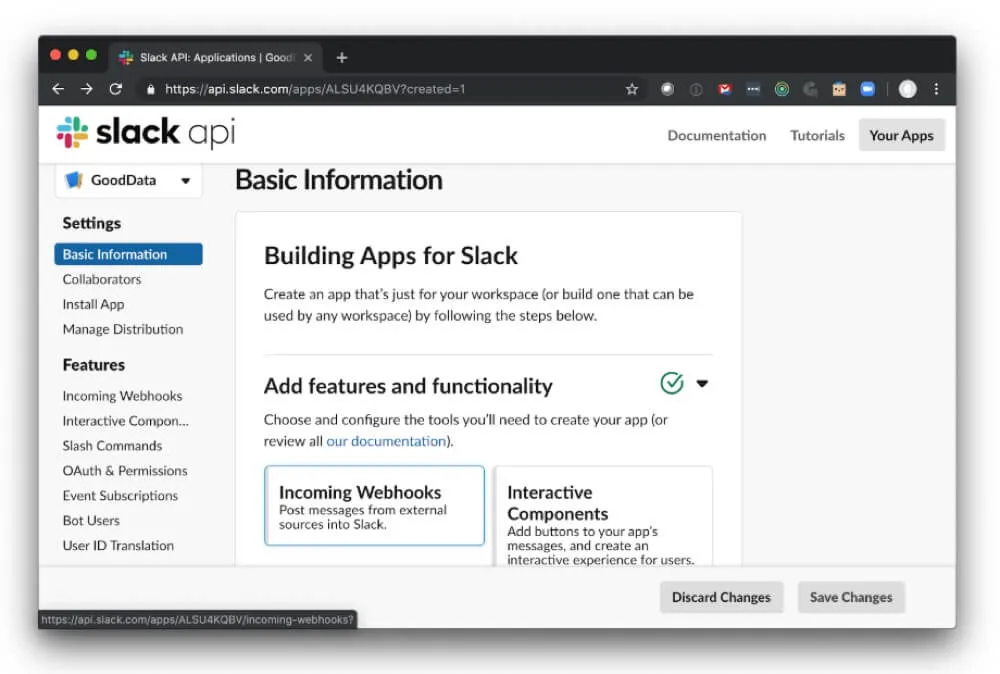
The link should take you to https://api.slack.com/apps/{App_ID}/incoming-webhooks?
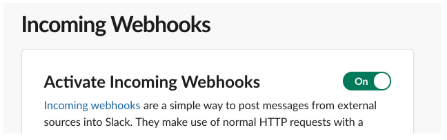
On this screen, turn the switch to the “On” position:
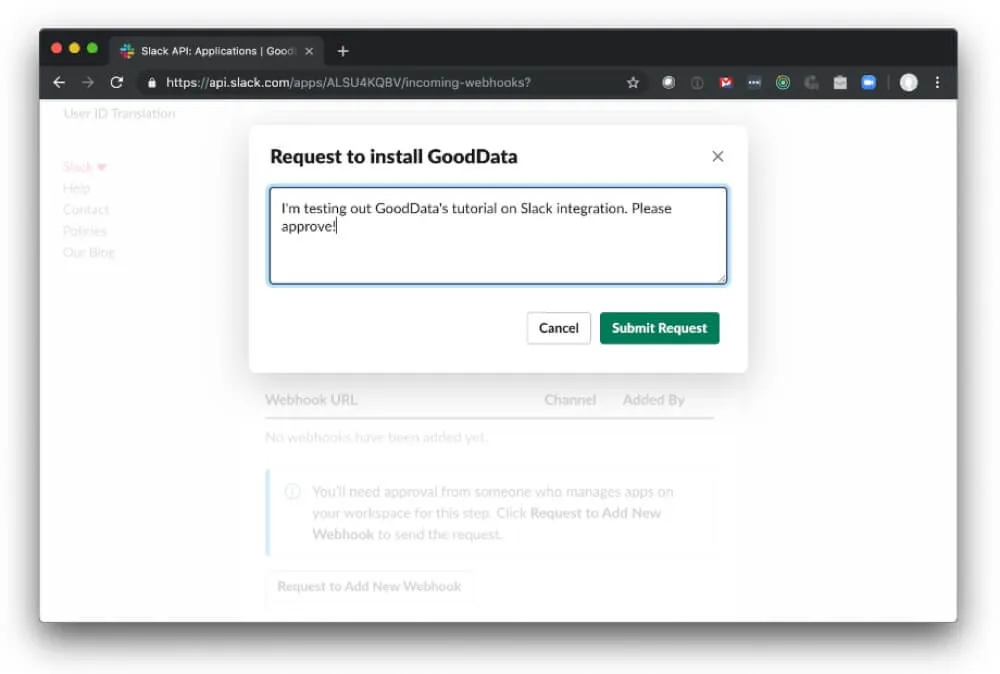
The page will refresh and show additional information. Scroll down to click the “Request to Add New Webhook” button.
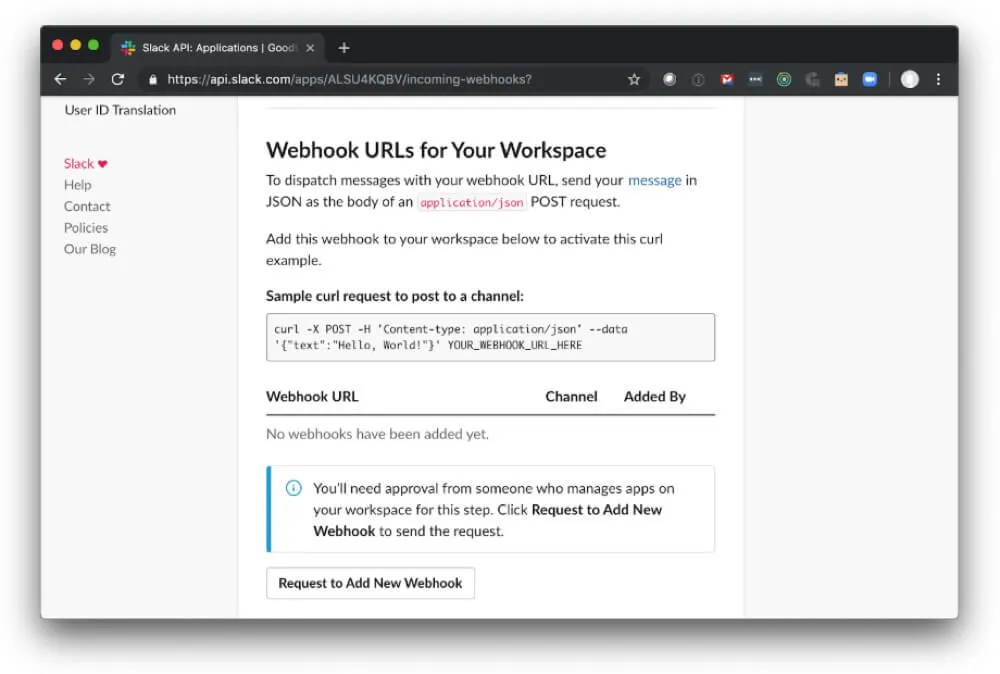
This button will create an approval request for your Slack administrators. Before Slack sends that request, you will get a chance to add some clarification. I’m sure your Slack admins will appreciate it if you spend a few seconds explaining your request in this step!
It may take a while for your admins to respond. Feel free to ping them over Slack!
Once they approve your request, a notification message like the one below arrives via (unsurprisingly) Slack:

Webhook request approved
We took the liberty of inserting this extra headline to make it easier for you to find out where you stopped reading before sending the webhook request to your admins.
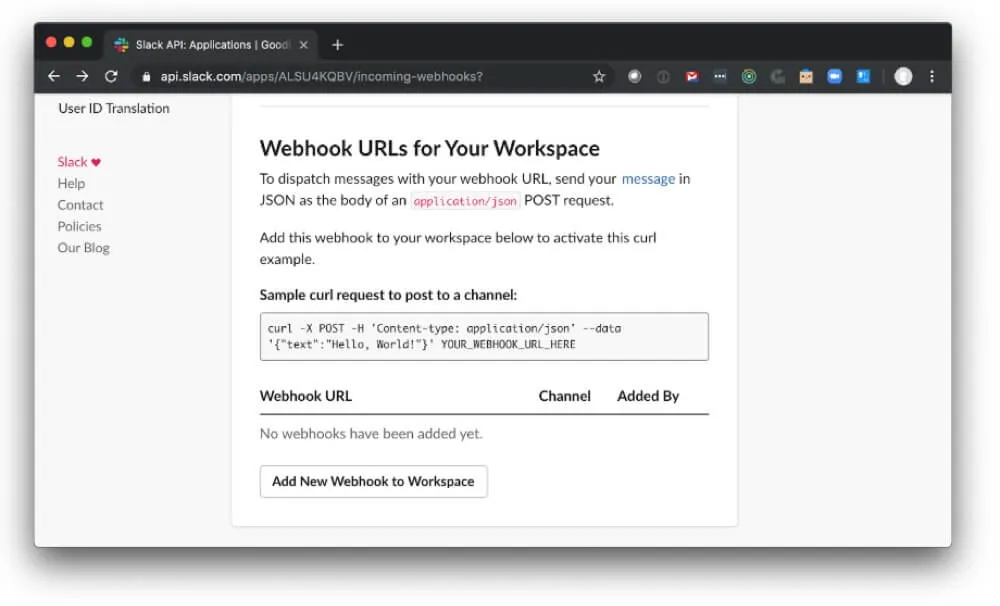
Now it’s time to create the actual webhook.
Again, navigate to the Incoming Webhook section of your Slack app UI: https://api.slack.com/apps/{App_ID}/incoming-webhooks. The button at the bottom of the page reads “Add New Webhook to Workspace”:
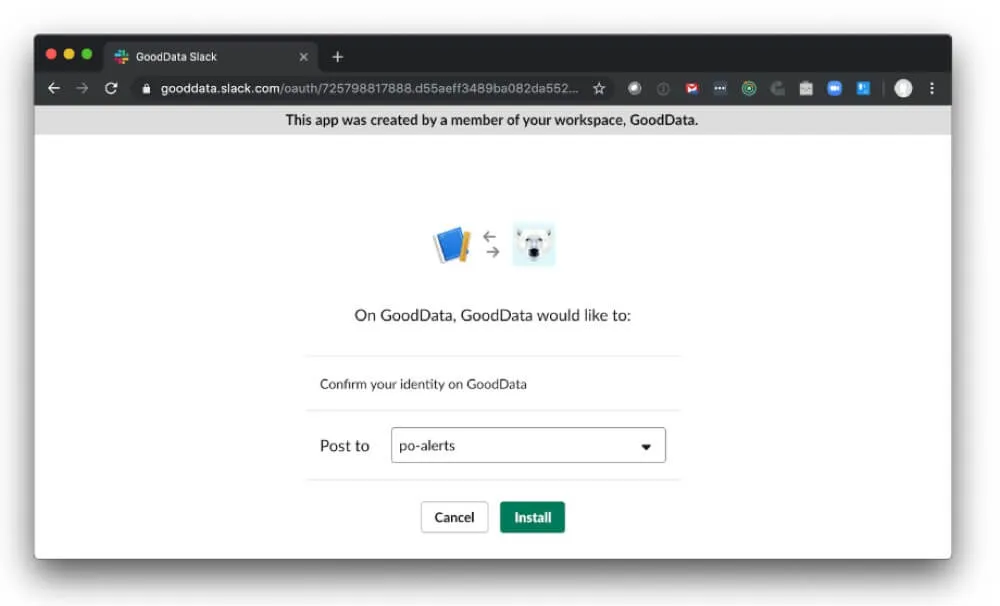
Once you click the button, you will be asked to select a target channel for your webhook to post to. I’m using my test channel called “#po-alerts”:
Once you click the “Install” button, your incoming webhook is created and you will be redirected back to the “Incoming webhooks” page of your Slack app with a list of created webhooks and their URLs at the bottom:
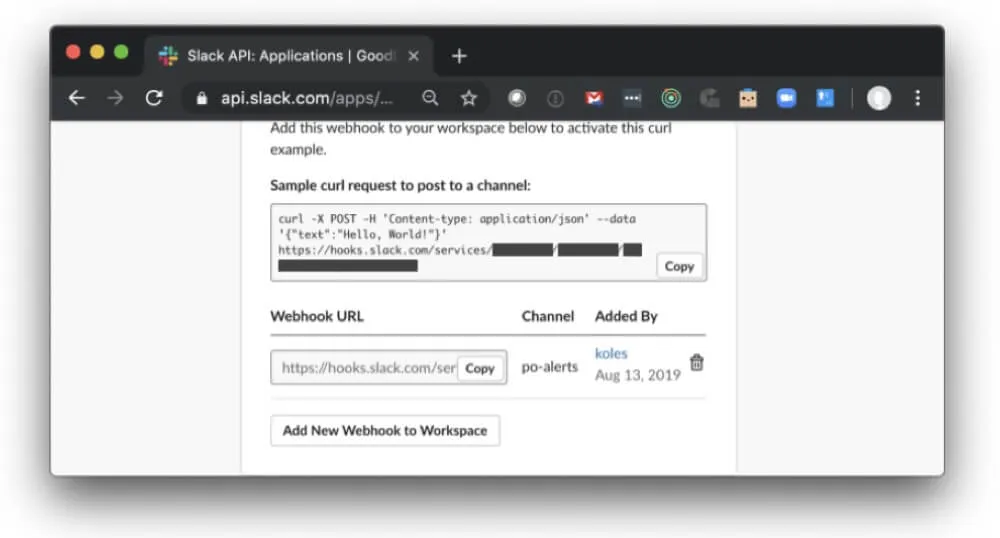
The incoming webhook’s URL will be used later when setting up automated notifications in the GoodData workspace.
Note: Sending HTTPS POST messages to the webhook URL will result in sending messages to the target Slack channel without any additional authentication. It is a good idea to keep the webhook URL private (which is also why we have pixelated it in the screenshot above).
Experience GoodData in Action
Discover how our platform brings data, analytics, and AI together — through interactive product walkthroughs.
Explore product toursStep 3: Create Slack communication channel in GoodData
First, a little clarification: GoodData APIs allow you to set up automated notifications. The destination for such a notification is called a “channel.” Please don’t confuse this concept with Slack channels. The GoodData notification channel can be an email, it can be a text message, and it can be any REST service—which is the one we are going to use.
So what does it take to create a GoodData notification channel?
Start by opening your GoodData workspace in your browser and make sure you are logged in.
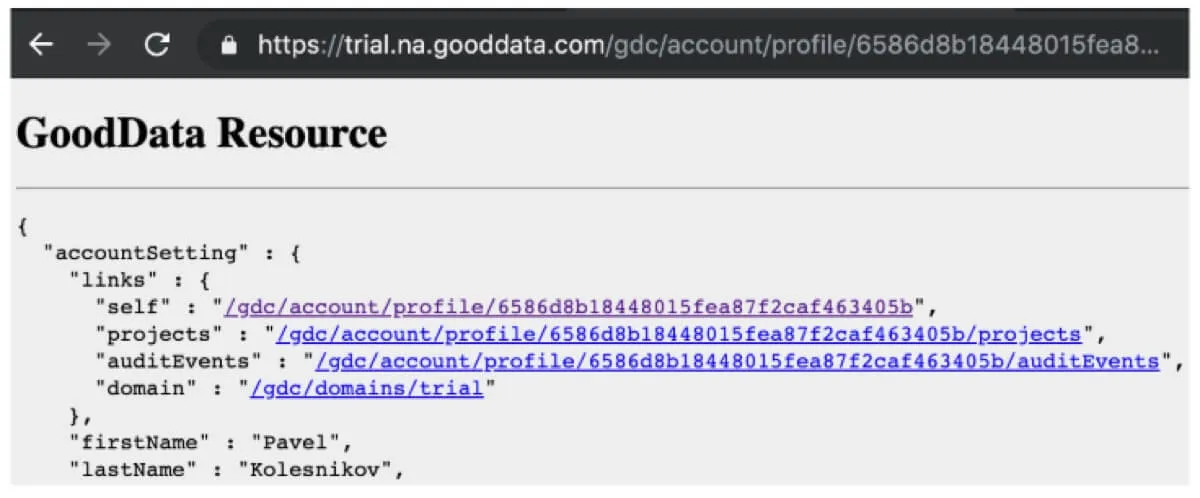
After you are logged into the GoodData workspace, edit the URL and open https://trial.na.gooddata.com/gdc/account/profile/current to see an API representation of your user account. You will be redirected to your actual user account API resource, such as https://trial.na.gooddata.com/gdc/account/profile/<a long hash which is your user_id>.
The top of your screen may look like this:
To create your notification channel, add /channelConfigurations to your URL so it will actually look like https://trial.na.gooddata.com/gdc/account/profile/<user_id>/channelConfigurations.
This page includes three forms with four possible payloads accepted by the channelConfiguration API: Salesforce Chatter, Twilio SMS, email, and a generic REST service. Scroll down to the last form (titled “REST”):
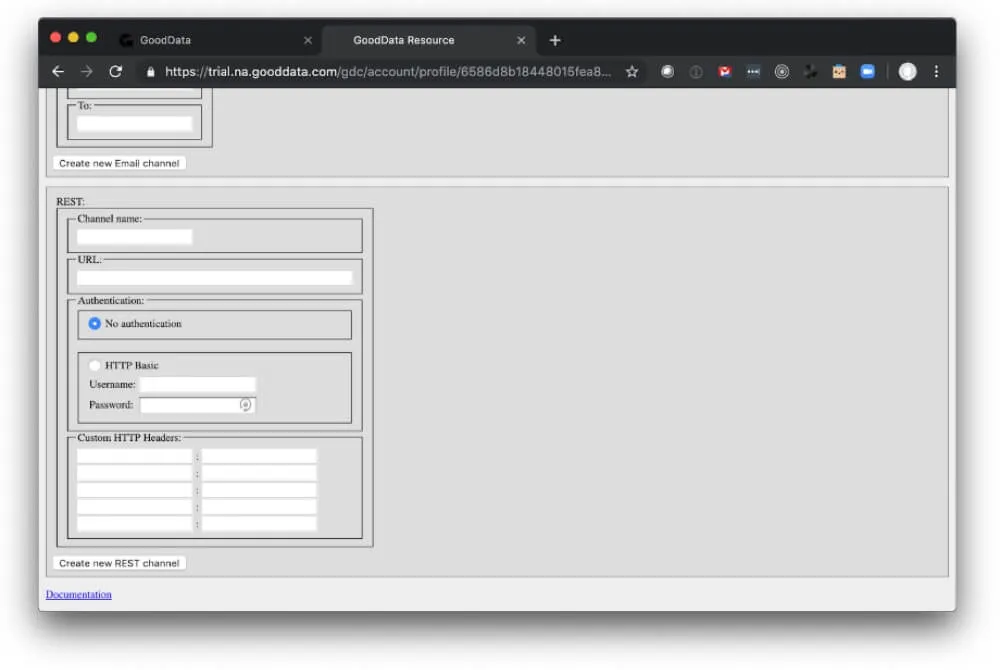
We are so close!
Enter the following values:
- Name: The name can be anything, let’s just call it “My Slack Notification App.”
- Webhook URL: Use the webhook URL from step 2 for the URL field.
- Headers: Fill in the first row of custom HTTP headers. Type “Content-type” into the first field and “application/json” into the second one.

Now click “Create new REST channel,” and you’re almost done.

After your Slack notification channel is created, you should see a page for which the JSON representation looks like this:
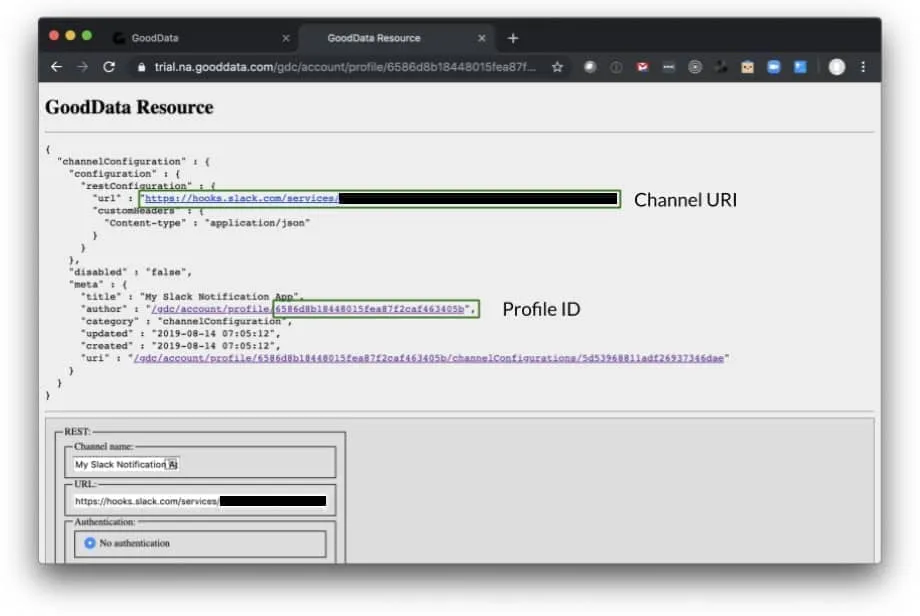
You will need the following pieces of information in the next step:
- The URI of the newly created communication channel (only the path, meaning the part starting with /gdc/ without the protocol and the host name)
- Your profile ID, which is the long, ugly string in the URL right after /gdc/account/profile
Please copy it for future reference somewhere—like into a text editor—or just keep this browser tab open when going to step 5.
Step 4: Set up GoodData subscription
So far, we have the following:
- The target Slack channel
- The Slack app with an incoming webhook that will route incoming messages to the target Slack channel
- The GoodData channel pointing to the Slack app’s incoming webhook
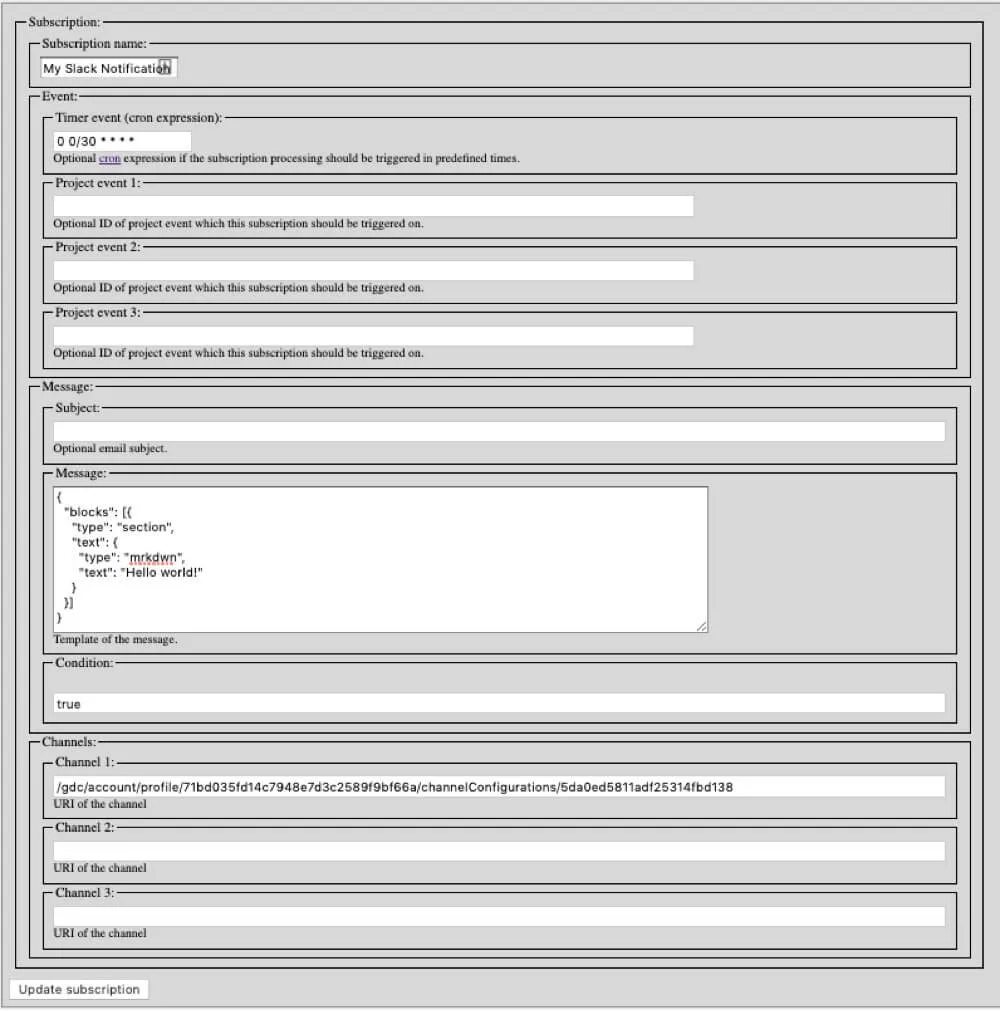
The very last step to close the loop is setting up a GoodData subscription. A GoodData subscription is defined in the scope of your GoodData workspace, and it includes three key components:
- A trigger (which can be event-based or time-based)
- Target GoodData communication channel (as set up in the step 4)
- A message template
Similarly to setting up the communication channel, the subscription can be defined using the API or the gray pages web UI API console. For the sake of simplicity, let’s stick with the latter.
First, log in to the GoodData web user interface and open your workspace. The workspace URL may look like this: https://trial.na.gooddata.com/#s=/gdc/projects/w4d4ufvk1ueglnatfqkps36h6gbtzfo0|projectDashboardPage|ember1386|b250b5f9a7ca
Again, I’m using the trial.na.gooddata.com domain. If you are a GoodData customer, you may want to replace it with your domain’s hostname.
Create a new URL including only the parts highlighted in red (i.e, the protocol, hostname, and the part between “=” and “|”). Append /users/ and then your profile ID from the end of the previous step. Finally, append /subscriptions.
In my case, I’m opening the following URL: https://trial.na.gooddata.com/gdc/projects/w4d4ufvk1ueglnatfqkps36h6gbtzfo0/users/6586d8b18448015fea87f2caf463405b/subscriptions (the profile ID is highlighted in green). The screen should look like this:
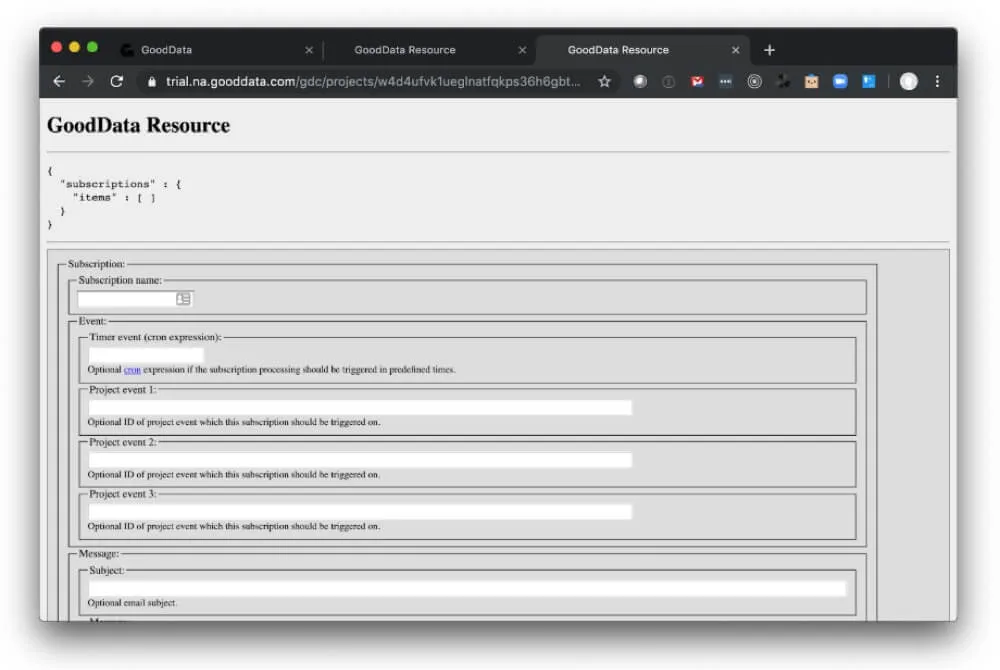
Scheduled notifications
Let’s start with scheduled notifications. Put “My scheduled subscription” into the subscription name field.
The notification API uses cron expressions (follow the link for an explanation and additional examples).
Since we want to see the notifications in action as soon as possible, let’s use the 0 0/30 * * * * cron expression to trigger a notification every 30 minutes. (Note: More frequent notifications than this are not supported.) If you want to specify a particular hour of day, keep in mind that the expressions assume the Pacific time zone.
Let’s keep the subject field empty and put the following simplistic payload into the message:
{
 "blocks": [{
   "type": "section",
   "text": {
     "type": "mrkdwn",
     "text": "Hello world!"
   }
 }]
}
Click here if you want to see what the filled form should look like.
That’s it. Click “Update Subscription.” In no more than 30 minutes, the “Hello world” message arrives to your channel:

For more fancy messages with rich formatting, buttons, and more, check out Slack’s Block Kit Builder web app at https://api.slack.com/tools/block-kit-builder.
Dynamic messages
You may want to include the result of a computation in your message instead of just static text.
In this part of the tutorial, we already assume you have some metrics created in your workspace. If you don’t and you are using the Order Lines data model from our free trial, you can follow this tutorial to create your first metric named “Order Amount.”
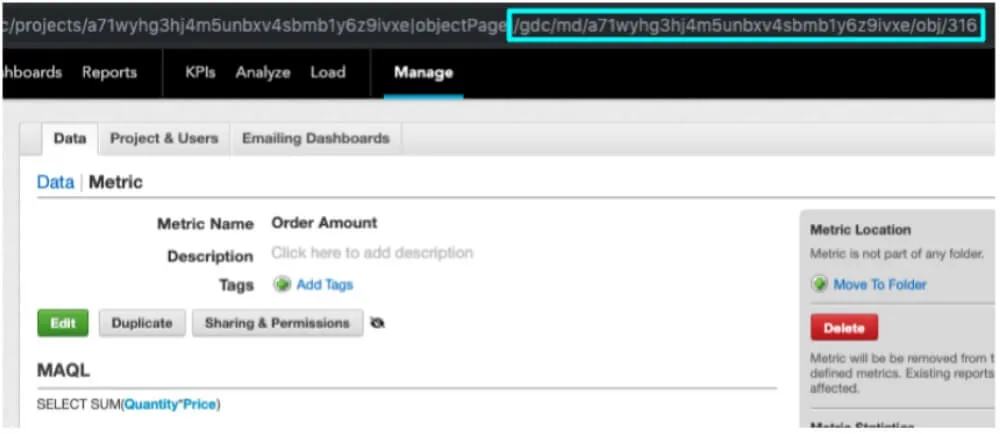
To be able to reference the metric value in your message, you need to get the metric URI. It can be easily derived from the URL in the web UI. Open your metric definition by going to the “Manage” section in the main menu and click “Metrics” in the left menu.
The metric URI is the last portion of the metric page URL that starts with /gdc and ends with a number.
For example, the URI of my metric, shown on the screenshot below, is: /gdc/md/a71wyhg3hj4m5unbxv4sbmb1y6z9ivxe/obj/316.
Once you have the metric URL, the ${f:format($f:executeMetric(<metric URI>))} in the message will be replaced with the actual metric value.
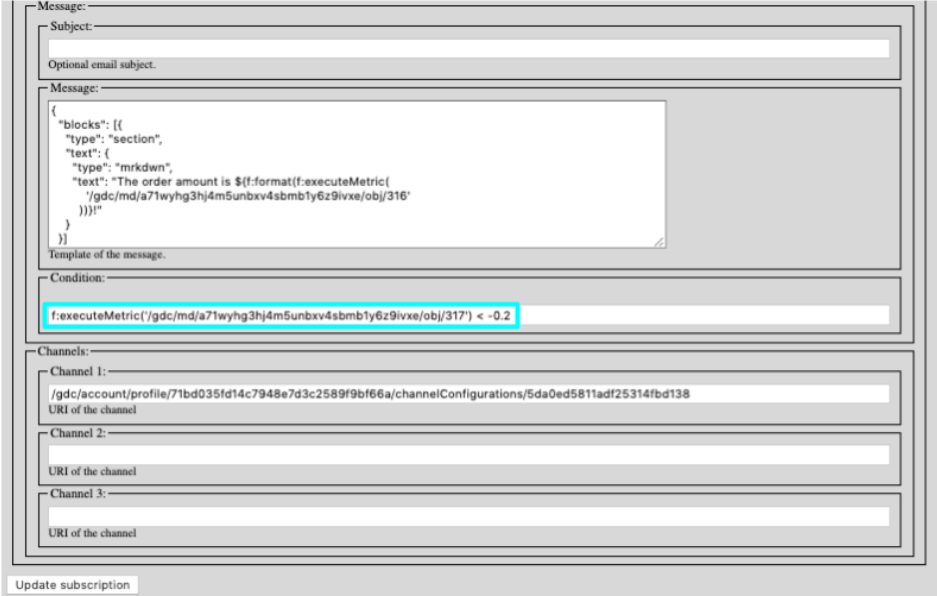
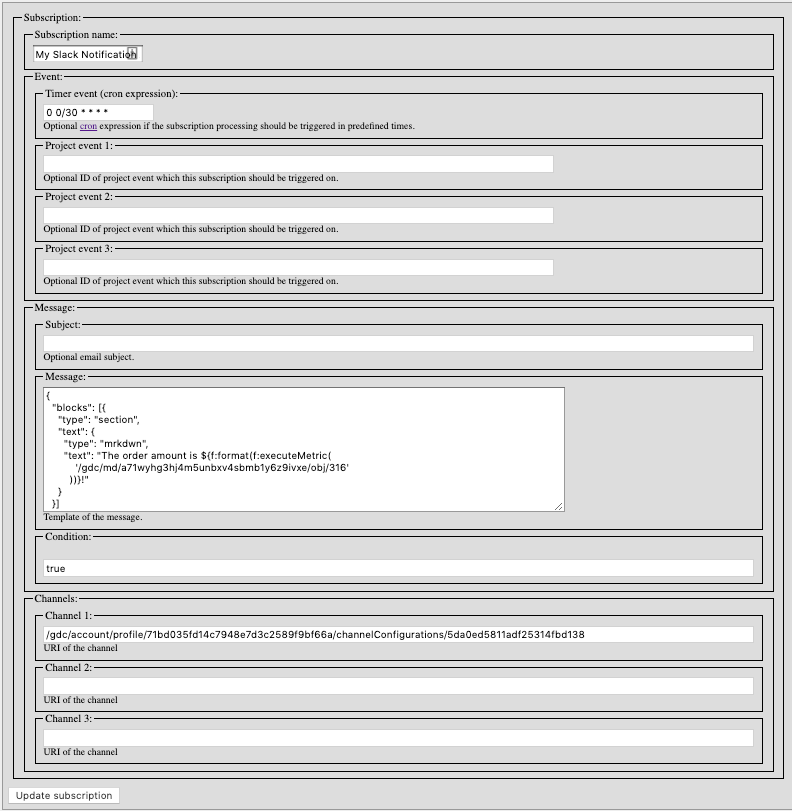
So let’s navigate back to our subscription detail gray page (see the beginning of step 4) and update the message to include the metric URI (screenshot here).
Please do not forget to replace the metric URI in the example below with your metric!
{
 "blocks": [{
   "type": "section",
   "text": {
     "type": "mrkdwn",
     "text": "The order amount is ${f:format(f:executeMetric(
         '/gdc/md/a71wyhg3hj4m5unbxv4sbmb1y6z9ivxe/obj/316'
       ))}!"
   }
 }]
}
If you get an error message with terms like “InvalidSubscriptionException” and “failed to parse…”, please double-check the parentheses and apostrophes in the ${f:format(...)} expression.
Once the scheduler triggers a notification, a message like this should arrive to your Slack channel:

Conditional notifications
In the real world, we don’t want to receive the same message every 30 minutes. You don’t want to be bugged by a notification unless something interesting happens.
This is why the subscription definition allows you to specify additional options on how to trigger a notification:
Event-based notification (typically triggered by a data load). The following events are currently supported; you will most likely need the last two of them:
- dataload.process.schedule
- dataload.process.start
- dataload.process.finish.ok
- dataload.process.finish.error
Metric conditions (to make sure notifications are triggered only if something interesting has been detected in data)
Typically, you want to combine both approaches so the notifications are sent only if an interesting condition is detected in newly updated data.
For example, I may want to trigger a notification in my trial project only when the order amount is noticeably lower than a week ago.
In order to do that, I can create a special metric to detect this situation:
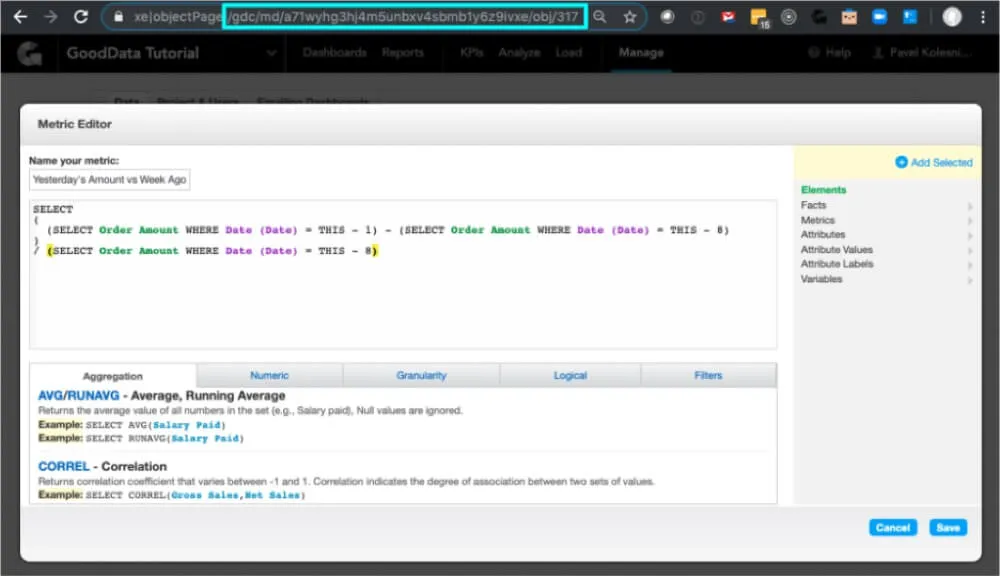
This metric computes how the order amount changed from eight days ago to yesterday relative to the original amount. For the next step, we will need the metric URI, which is again the last part of the URL after the last pipe character (“|”) starting with /gdc/ and ending with a number. (On the screenshot above, it’s /gdc/md/a71wyhg3hj4m5unbxv4sbmb1y6z9ivxe/obj/317.)
Once we have the metric URI, if we want to send a notification only if sales dropped 20%, we can set it up to do so through the subscription gray page.
Just locate the “Condition” field and change true to an expression based on your metric URI such as f:executeMetric('{metric_id}') <comparison> <number>. For example, if I want to trigger messages only if my “Yesterday’s amount vs Week Ago” metric is below -20%, I would do
f:executeMetric('/gdc/md/a71wyhg3hj4m5unbxv4sbmb1y6z9ivxe/obj/317') < -0.2
… as shown on the following screenshot:
Conclusion
That's it! Now you know how you can bring GoodData's notification services to your Slack channels. If you're looking for more help with Slack, check out the resources below. Have a question about GoodData and Slack or other messaging services? Reach out to our team. We'd be happy to help.
Did reading this article make you want to see GoodData in action? You can get started today with the free version of our platform! With it, you get all the great features of GoodData for up to five customers and 100 MB of data per customer.
Links
Setting up the Notifications Using API
Scheduling and Notifications - API Reference
Experience GoodData in Action
Discover how our platform brings data, analytics, and AI together — through interactive product walkthroughs.
Explore product tours
