Manage Dashboard Permissions
Dashboard permissions dictate who can view, share, and edit a specific dashboard. When a user creates a new dashboard, by default, the only users who can view, share, and edit it are:
- The user who created the dashboard is automatically assigned the
EDITpermission to this particular dashboard. - Users with the
Workspace.MANAGEpermission to the workspace the dashboard is native to. - Users who have the
Workspace.MANAGEhierarchyPermission to the workspace the dashboard is native to or its parent workspace if it is part of a workspace hierarchy. - Users with the
Organization.MANAGEpermission.
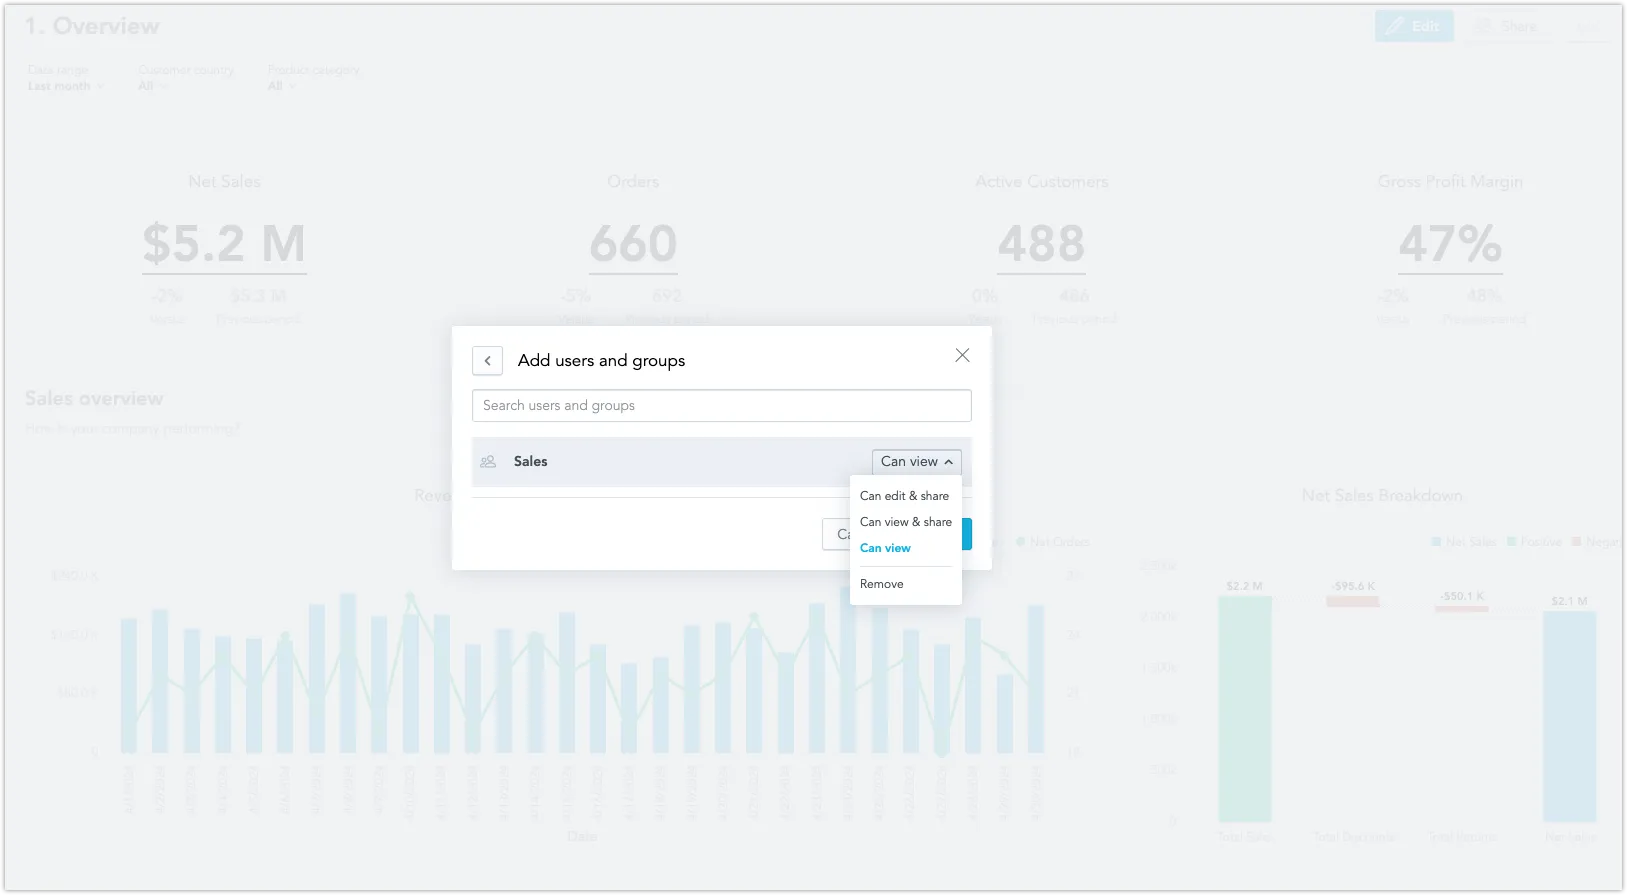
Grant Access to a Dashboard
In a typical workflow, dashboard permissions can be managed using the Share button in the dashboard’s web user interface. See the Share Dashboards section for details. This article describes how to manage these permissions using the API in case you want to automate the process, or if you have to deal with an edge case scenario.
To enable other users to access the dashboard, you need to fulfill the following two criteria:
Ensure the user or user group has a
Workspace.VIEWor higher level permission to the workspace the dashboard is a part of. This can mean direct permission to the workspace or at least a hierarchyPermission to a parent workspace. To update the workspace permissions, see the Manage Workspace Permissions section.Assign one of the supported dashboard permissions to the user or user group in the particular dashboard. See the Set Permissions For a Dashboard section for details.
Not a Data Security Feature
Dashboard permissions are not a data security feature. Users cannot access the dashboard layout, but they can still access the data the dashboard is using via API. For security, consider using user data filters or workspace data filters.
Supported Dashboard Permissions
The following permissions are applicable to the analyticalDashboard object:
VIEW- corresponds to the View sharing option in the web UI.SHARE- corresponds to the View & Share sharing option in the web UI.EDIT- corresponds to the Edit & Share sharing option in the web UI.
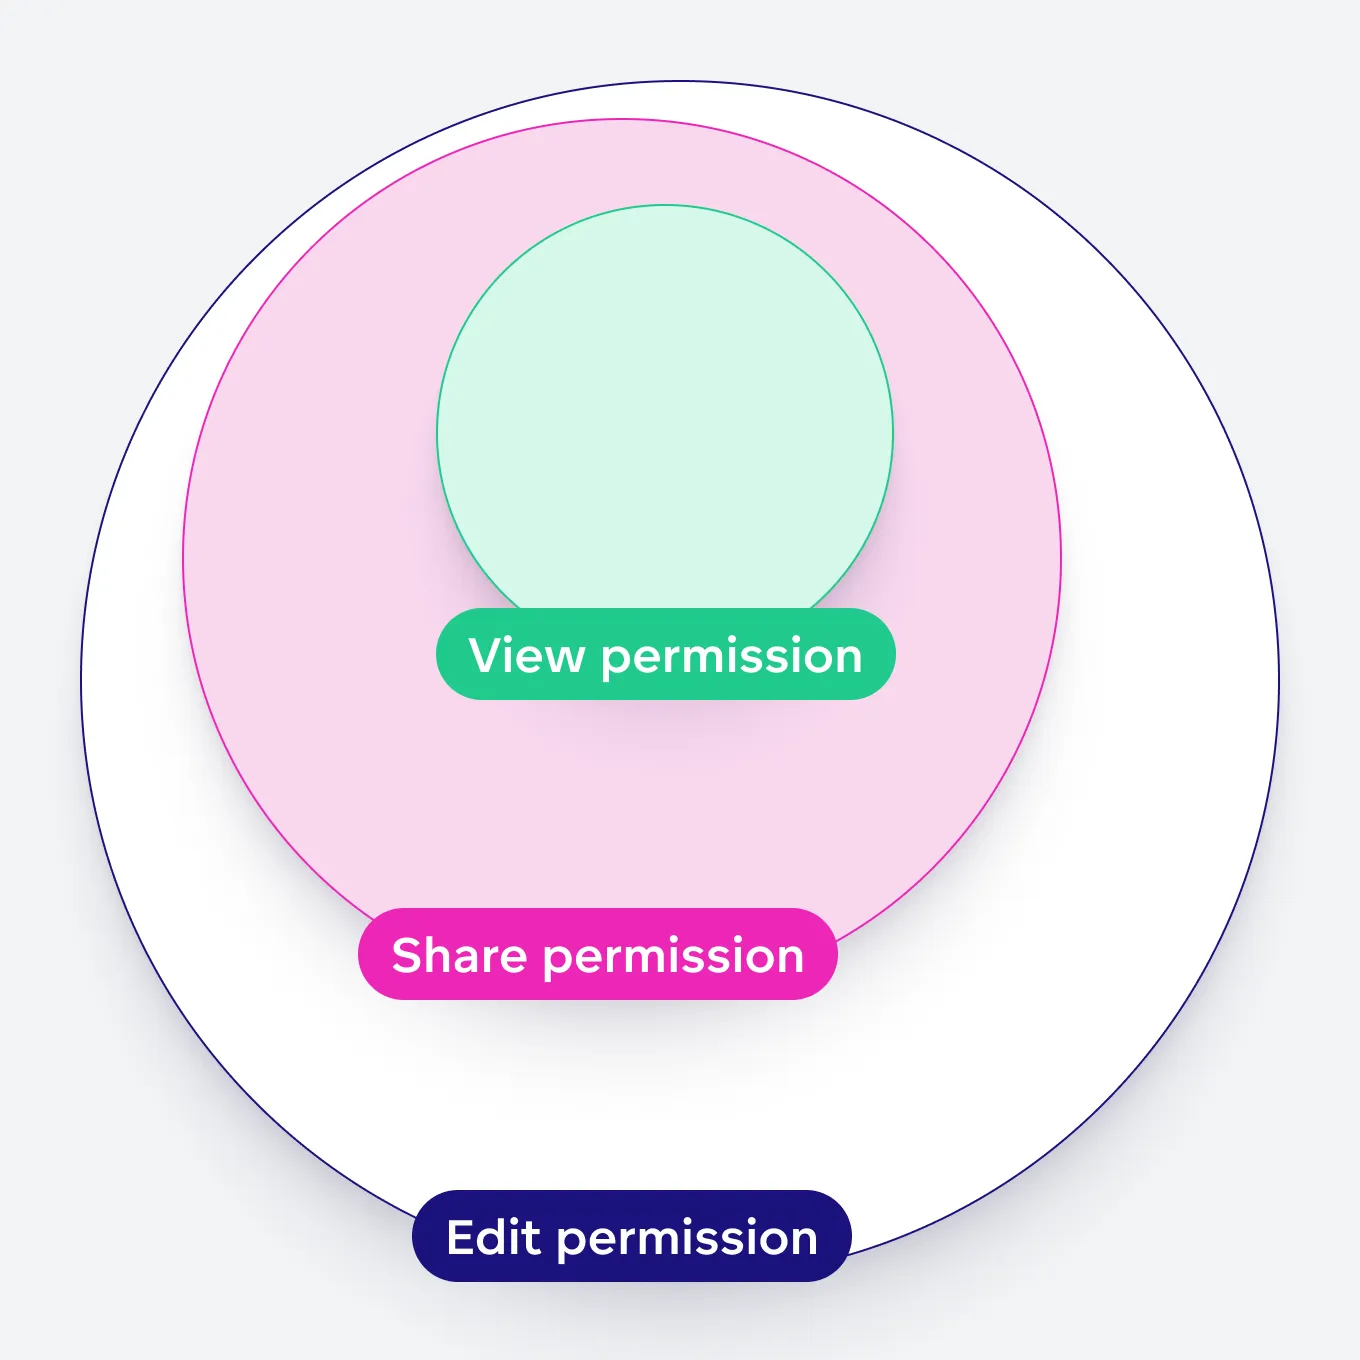
The level of access each dashboard permission level gives the user depends on the user’s permission level to the workspace the dashboard is in. The following table shows all possible combinations of workspace and dashboard permissions a user or user group can have:
| Workspace Permission Level | Dashboard.VIEW | Dashboard.SHARE | Dashboard.EDIT |
|---|---|---|---|
| No Workspace Permission | The dashboard remains inaccessible to the user. | ||
Workspace.VIEW | The user can view the dashboard. | The user can assign* Dashboard.SHARE or lower level permission to other users. | The user can edit the dashboard with certain limitations:
Dashboard.EDIT (or lower-level) permission to other users. |
Workspace.ANALYZE or higher | They can edit and delete the dashboard. The user can assign* other users the Dashboard.EDIT permission. | ||
* Users with the Dashboard.SHARE or Dashboard.EDIT permissions can also unassign permissions from other users, unless those users have higher-level permissions than Dashboard.SHARE or Dashboard.EDIT.
Note
Dashboards inherit permissions from the parent workspace, and you can expand upon these permissions in the child workspace. However, it’s important to note that you cannot retract inherited permissions in the child workspace. For instance, in a child workspace, you cannot reduce a user’s permission to VIEW if they have inherited the permission to EDIT from the parent workspace.
Available Assignees
Before you add new users to the dashboard’s permissions, you should use the /api/v1/actions/workspaces/<workspaceId>/analyticalDashboards/<dashboardId>/availableAssignees API endpoint to list users and user groups that are eligible.
If the user or user group are not listed as being eligible, it is because of one of the following reasons:
- The user or user group does not have the required workspace permission, so even if you assigned them a permission to access the dashboard, it will remain inaccessible to them. Assign a
Workspace.VIEWorWorkspace.ANALYZEpermission to the user or user group first. - The user or user group already has a permission assigned to them to this particular dashboard.
- The user or user group already has full access to the dashboard, because they have the
Workspace.MANAGEorOrganization.MANAGEpermission.
You can add users and user groups to the dashboard’s permissions using the API even if they are not listed as eligible.
The list produced by the /availableAssignees API endpoint is what the web user interface users see when they click the Share button and then the Add button to add a new user or user group.
User and User Group SEE Permission
There may be some edge case scenarios where a user or user group is not listed as an available assignee, even though you might want them to be there.
Example Scenario
Imagine a workspace hierarchy where a dashboard created in the parent workspace is inherited by the child workspace. The user who created the dashboard in the parent workspace (Parent User) wants to share the dashboard with a user of the child workspace (Child User).
The Child User does not have access to the parent workspace and the Parent User does not have access to the child workspace. This means that the Parent User cannot open the child workspace and share the dashboard with the Child User from there; Nor can the Parent User share the dashboard directly from the parent workspace, because the Child User is not going to be listed as an available assignee there.
What do you do in such a situation?
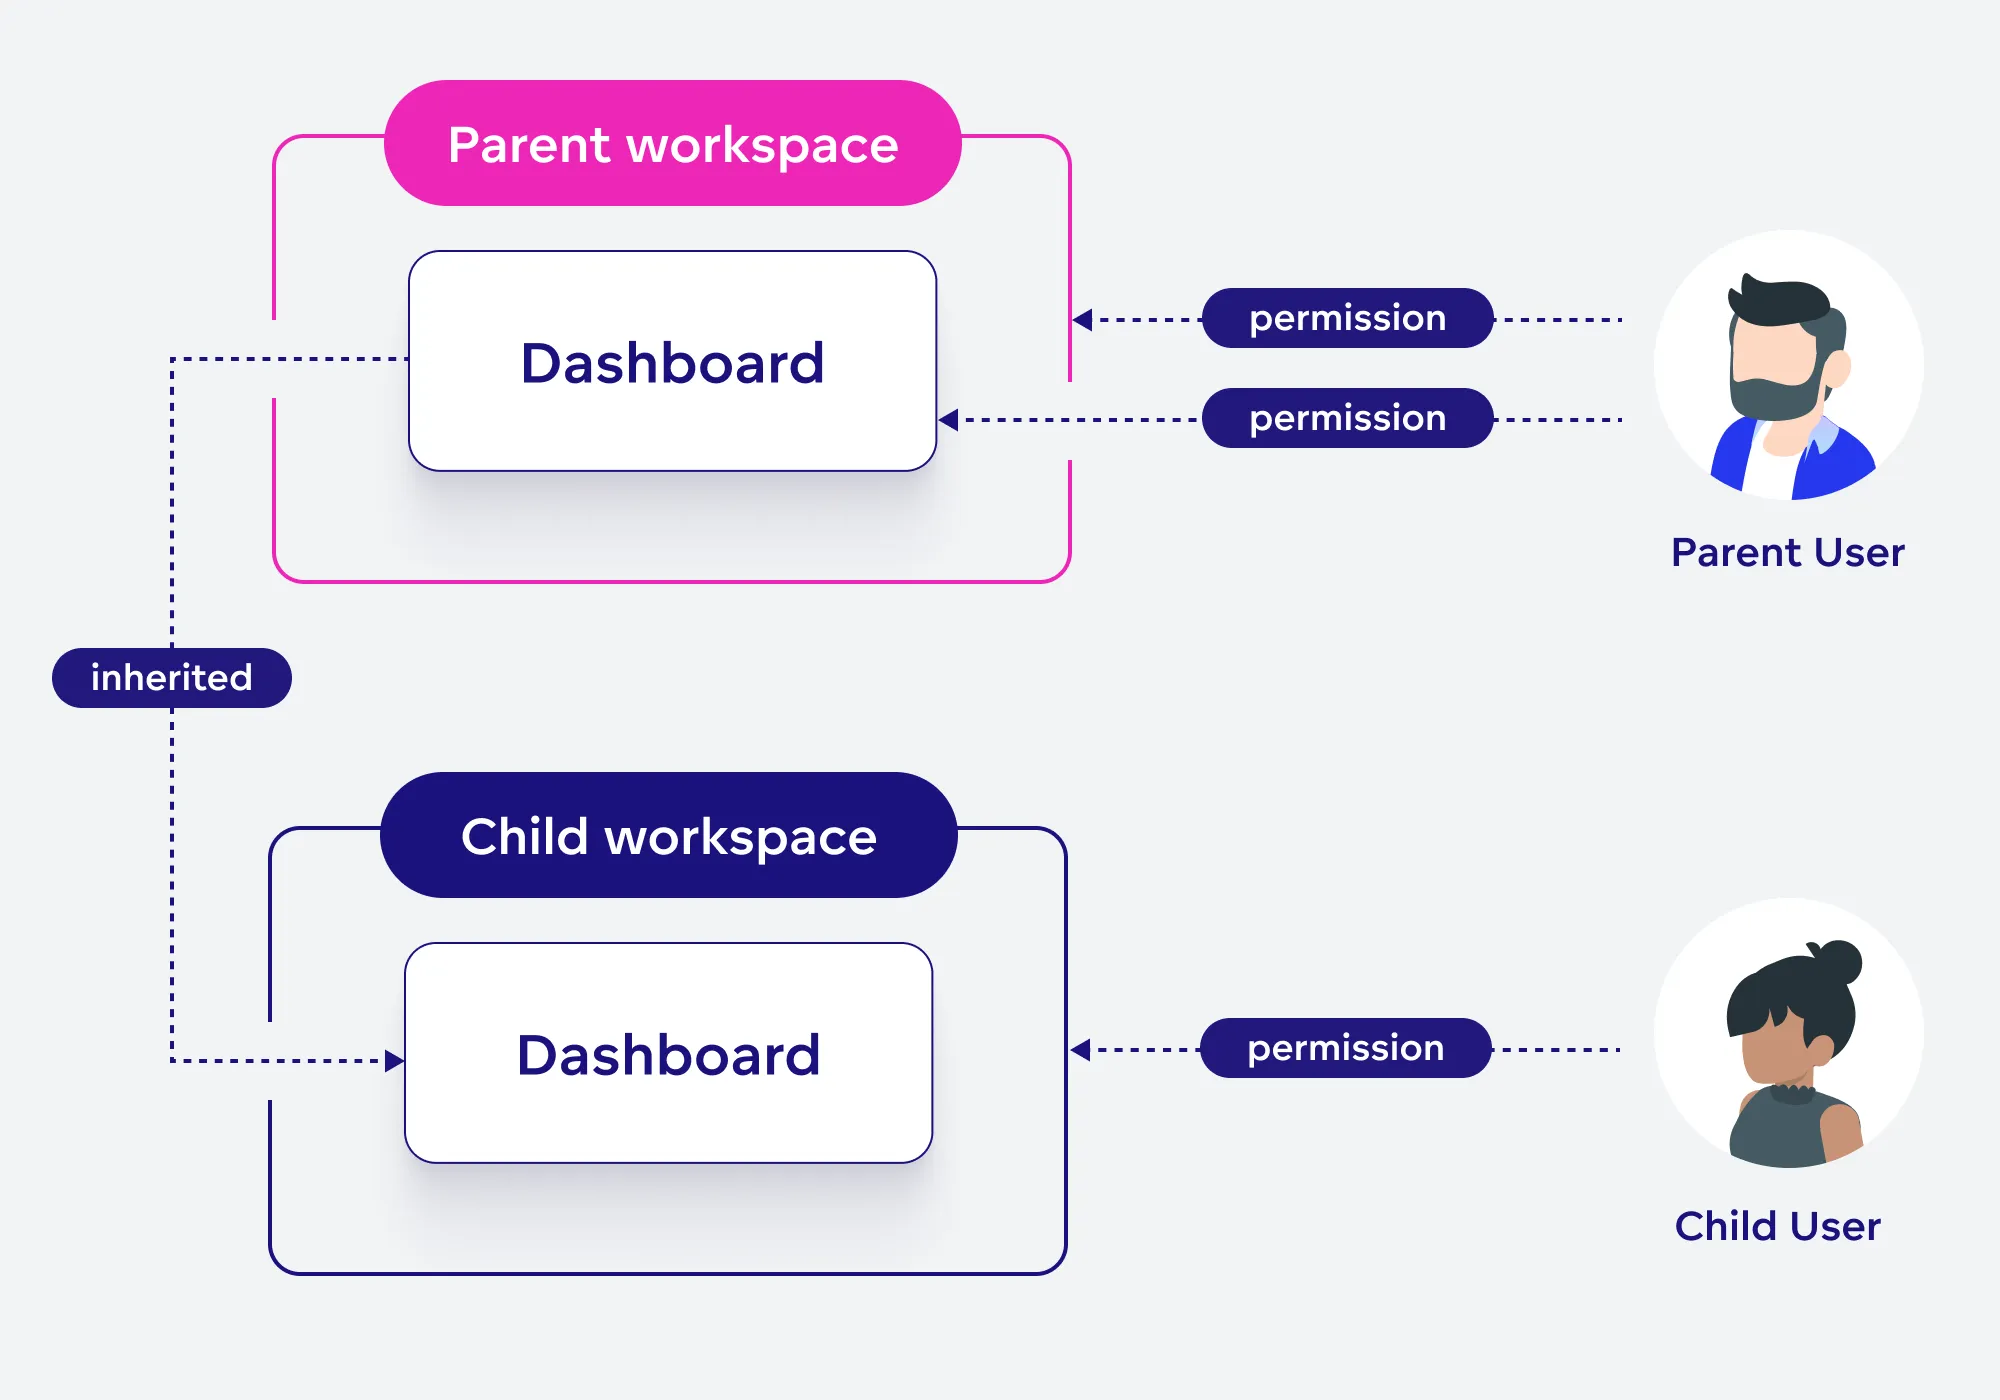
One solution would be to use the managePermissions API to manually update the dashboard’s permission definition to allow the Child User to access the dashboard.
Another solution would be to set up a SEE permission.
Introducing the SEE Permission
The SEE permission lets you see other users and user groups listed as eligible users when using the availableAssignees API or the share web user interface functionality, irrespective of user’s or user group’s workspace membership.
The SEE permission is defined in the User or UserGroup declarative object. You can access these permissions via the API endpoints:
/api/v1/layout/users/<userId>/permissions/api/v1/layout/userGroups/<userGroupId>/permissions/api/v1/layout/usersAndUserGroups/<userOrUserGroupId>/permissions
The User or UserGroup object you are updating is the user object that will be seen by other users, as defined in the object’s permission definition.
Building on the previous example scenario; To let the Parent User see the Child User as an eligible user to share the dashboard with, the Child User object can be updated with the user.SEE permission which is assigned to the Parent User.
{
    "users": [
        {
            "authId": "<child-user-auth-id>",
            "id": "<child-user-id>",
            "permissions": [
                {
                    "assignee": {
                        "id": "<parent-user-id>",
                        "type": "user"
                    },
                    "name": "SEE"
                }
            ]
        }
    ]
}
This allows the Parent User to see the Child User any time they try to share a dashboard.
Note that:
In general, it is preferable to assign these permissions to entire user groups, rather than individual users.
Just because you see someone as an eligible user as a result of them having the
SEEpermission assigned to you, this does not mean that sharing a dashboard with them will guarantee that they will be able to access it. The workspace permission requirement still has to be met.
Set SEE Permissions
To assign the SEE permission to a user or user group, use the following declarative API endpoints:
/api/v1/layout/users/<userId>/permissions/api/v1/layout/userGroups/<userGroupId>/permissions/api/v1/layout/usersAndUserGroups/<userOrUserGroupId>/permissions
Note that you need to have the Organization.MANAGE permission to be able to update user and userGroup objects.
Steps:
Fetch the latest permissions definition for a user group with this API call:
curl -H "Authorization: Bearer $API_TOKEN" \
    -H "Content-Type: application/json" \
    -X GET \
    $HOST_URL/api/v1/layout/userGroups/<userGroupId>/permissions
Edit the permissions definition in the JSON file as needed.
[
    {
        "assignee": {
            "id": "<user-group-id>",
            "type": "userGroup"
        },
        "name": "SEE"
    },
    {
        "assignee": {
            "id": "<user-group2-id>",
            "type": "userGroup"
        },
        "name": "SEE"
    },
    {
        "assignee": {
            "id": "<user-id>",
            "type": "user"
        },
        "name": "SEE"
    }
]
Use the following command to update the user group’s permissions with your new definition:
curl -H "Authorization: Bearer $API_TOKEN" \
    -H "Content-Type: application/json" \
    -X POST \
    $HOST_URL/api/v1/layout/userGroups/<userGroupId>/permissions \
    -d @<updated_permissions_definition>.json
You should get back a
204 No Contentresponse.
Set Permissions For a Dashboard
Create and Set Up Users and User Groups
To start, you need to create and set up users and user groups. For detailed instructions, see the following resources:
Assign Permissions to User Groups
Permissions need to be assigned individually for each dashboard and data source. More details can be found here:

Grant Dashboard-Specific Permissions
Currently, permissions on a dashboard level need to be managed individually and cannot be set across the entire workspace.
Use the following API endpoints to manage dashboard permissions:
/api/v1/actions/workspaces/<workspaceId>/analyticalDashboards/<dashboardId>/permissionsLists the dashboard’s existing permissions.
/api/v1/actions/workspaces/<workspaceId>/analyticalDashboards/<dashboardId>/managePermissionsUpdates the dashboard’s permissions.
Create and Set Up Users and User Groups
To start, you need to create and set up users and user groups. For detailed instructions, see the following resources:
To create a user and assign them to a group, use this API request:
POST {{host}}/api/v1/entities/users
Content-Type: application/vnd.gooddata.api+json
Authorization: Bearer {{token}}

{
  "data": {
    "id": "{{user_id}}",
    "type": "user",
    "attributes": {
      "firstname": "John",
      "lastname": "Doe",
      "email": ""
    },
    "relationships": {
      "userGroups": {
        "data": [{
          "id": "{{group_id}}",
          "type": "userGroup"
        }]
      }
    }
  }
}
Assign Permissions to User Groups
Permissions need to be assigned individually for each dashboard and data source. More details can be found here:
For example, to assign permissions to a user group, use the following API request:
POST {{host}}/api/v1/actions/userManagement/assignPermissions
Content-Type: application/vnd.gooddata.api+json
Authorization: Bearer {{token}}

{
 "assignees": [
    {
      "id": "{{user_id}}",
      "type": "user"
    }
  ],
  "dataSources": [
    {
      "id": "string",
      "permissions": ["MANAGE | USE"]
    }
  ],
  "workspaces": [
    {
      "id": "string",
      "hierarchyPermissions": ["MANAGE | ANALYZE | EXPORT | EXPORT_TABULAR | EXPORT_PDF | VIEW"],
      "permissions": ["MANAGE | ANALYZE | EXPORT | EXPORT_TABULAR | EXPORT_PDF | VIEW"]
    }
  ]
}
Grant Dashboard-Specific Permissions
Currently, permissions on a dashboard level need to be managed individually and cannot be set across the entire workspace.
Use the following API request to assign permissions to a specific dashboard:
POST {{host}}/api/v1/actions/workspaces/{{workspaceId}}/analyticalDashboards/{{dashboardId}}/managePermissions
Content-Type: application/vnd.gooddata.api+json
Authorization: Bearer {{token}}

[
  {
    "permissions": ["EDIT | SHARE | VIEW"],
    "assigneeIdentifier": {
      "id": "{{user_id}}",
      "type": "user"
    }
  }
]
Create and Set Up Users and User Groups
To start, you need to create and set up users and user groups. For detailed instructions, see the following resources:
To create a user and assign them to a user group, use the following Python script:
from gooddata_sdk import GoodDataSdk, CatalogUser, CatalogUserGroup

# Initialize SDK
sdk = GoodDataSdk.create("GOODDATA_HOST", "GOODDATA_TOKEN")

# Optional: Create a user group
sdk.catalog_user.create_or_update_user_group(
    CatalogUserGroup.init(
        user_group_id="group_id"
    )
)

# Create a user and assign to the group
sdk.catalog_user.create_or_update_user(
   CatalogUser.init(
        user_id="john.doe",
        firstname="John",
        lastname="Doe",
        email="",
        authentication_id="xyz",
        user_group_ids=["group_id"]
    )
)
Assign Permissions to User Groups
Permissions need to be assigned individually for each dashboard and data source. More details can be found here:
Use the following Python code to assign permissions:
from gooddata_sdk import GoodDataSdk, CatalogPermissionAssignments, CatalogDataSourcePermissionAssignment, CatalogWorkspacePermissionAssignment

# Initialize SDK
sdk = GoodDataSdk.create("GOODDATA_HOST", "GOODDATA_TOKEN")

# Retrieve and prepare permissions
group_permissions = sdk.catalog_user.get_user_group_permissions("group_id")
user_permissions = sdk.catalog_user.get_user_permissions("user_id")

permission_assignment = CatalogPermissionAssignments(
    workspaces=[CatalogWorkspacePermissionAssignment(
       id='workspace_id',
        permissions=['VIEW | ANALYZE | EXPORT | MANAGE']
    )],
    data_sources=[CatalogDataSourcePermissionAssignment(
       id='datasource_id',
       permissions=['USE | MANAGE']
    )]
)

# Apply permissions
sdk.catalog_user.manage_user_group_permissions('group_id', permission_assignment)
sdk.catalog_user.manage_user_permissions('user_id', permission_assignment)
Grant Dashboard-Specific Permissions
Currently, permissions on a dashboard level need to be managed individually and cannot be set across the entire workspace.
Use the following Python script to assign permissions to a dashboard:
from gooddata_sdk import GoodDataSdk, CatalogAssigneeRule, CatalogPermissionsForAssigneeIdentifier, CatalogPermissionsForAssigneeRule

# Initialize SDK
sdk = GoodDataSdk.create("GOODDATA_HOST", "GOODDATA_TOKEN")

# Manage dashboard permissions
sdk.catalog_permission.manage_dashboard_permissions(
    workspace_id="workspace_id",
    dashboard_id="dashboard_id",
    permissions_for_assignee=[
        CatalogPermissionsForAssigneeIdentifier(
            assignee_identifier=CatalogAssigneeIdentifier(id="group_id", type="userGroup"),
            permissions=["EDIT | SHARE | VIEW"]
        ),
        CatalogPermissionsForAssigneeRule(
           assignee_rule=CatalogAssigneeRule(type="allWorkspaceUsers"),
           permissions=["EDIT | SHARE | VIEW"]
       ),
   ],
)
Share with All Users
You can share a dashboard with all workspace users at once by including the assigneeRule object in an HTTP request for permission assignment. This object has a single property called type, which indicates the type of the rule, with only one possible value: allWorkspaceUsers.
The following example shows a POST request body calling the /managePermissions API endpoint. It grants allWorkspaceUsers the SHARE permission and the EDIT permission to the user example_user:
[
  {
    "assigneeRule": {
      "type": "allWorkspaceUsers"
    },
    "permissions": [
      "VIEW"
    ]
  },
  {
    "assigneeIdentifier": {
      "id": "example_ID",
      "type": "example_user"
    },
    "permissions": [
      "EDIT"
    ]
  }
]
If necessary, you can retrieve a list of permissions granted to a dashboard by making a request to the /permissions API endpoint. The response will include rule-based permissions, such as those granted to allWorkspaceUsers, and indicate whether they are inherited from the workspace hierarchy ("source": "indirect") or assigned directly in the current workspace ("source": "direct"). An example of such a response is as follows:
{
  "rules": [
    {
      "type": "allWorkspaceUsers",
      "permissions": [
        {
          "level": "VIEW",
          "source": "direct"
        }
      ]
    }
  ],
  "users": [ ... ],
  "userGroups": [ ... ]
}
Automate User Provisioning and Assign Content
Imagine we have the following record in our database, and we want to automatically provision the user:
| user_id | name | surname | wks_id | wks_right | all_content | content | |
|---|---|---|---|---|---|---|---|
| john.doe | John | Doe | example@example.com | parent–content | VIEW | FALSE | db_1, db_2, db_5 |
There is existing analytical content, and we can decide which of the available dashboards will be shared with the user we are about to introduce to the Workspace.
To automate the user setup based on records from a database, follow these steps:
Create a User and a Group
Using the Python SDK, you can create a user and optionally a user group.
from gooddata_sdk import GoodDataSdk, CatalogUser, CatalogUserGroup

# Initialize SDK
 sdk = GoodDataSdk.create("GOODDATA_HOST", "GOODDATA_TOKEN")

# Optional: Create a user group
sdk.catalog_user.create_or_update_user_group(
    CatalogUserGroup.init(
        user_group_id="group_id"
   )
)

# Create a user
sdk.catalog_user.create_or_update_user(
    CatalogUser.init(
        user_id="john.doe",
        firstname="John",
        lastname="Doe",
        email="",
        authentication_id="",
         user_group_ids=["group_id"]
   )
)

# List users
users = sdk.catalog_user.list_users()
Validate Permissions for Users and Groups
Configure and validate permissions for data sources and workspaces using the Python SDK.
 from gooddata_sdk import GoodDataSdk, CatalogPermissionAssignments, CatalogDataSourcePermissionAssignment, CatalogWorkspacePermissionAssignment

 # Initialize SDK
sdk = GoodDataSdk.create("GOODDATA_HOST", "GOODDATA_TOKEN")

# Retrieve permissions
group_permissions = sdk.catalog_user.get_user_group_permissions("group_id")
user_permissions = sdk.catalog_user.get_user_permissions("user_id")

# Prepare permissions
permission_assignment = CatalogPermissionAssignments(
    workspaces=[CatalogWorkspacePermissionAssignment(
        id='workspace_id',
        permissions=['VIEW | ANALYZE | EXPORT | MANAGE']
    )],
    data_sources=[CatalogDataSourcePermissionAssignment(
        id='datasource_id',
        permissions=['USE | MANAGE']
    )]
)

# Apply permissions
sdk.catalog_user.manage_user_group_permissions('group_id', permission_assignment)
sdk.catalog_user.manage_user_permissions('user_id', permission_assignment)
Assign Content to Users
Assign users and groups to dashboards within a workspace. Permissions include View, Share, and Edit.
from gooddata_sdk import GoodDataSdk, CatalogAssigneeRule, CatalogPermissionsForAssigneeIdentifier, CatalogPermissionsForAssigneeRule

# Initialize SDK
sdk = GoodDataSdk.create("GOODDATA_HOST", "GOODDATA_TOKEN")

# Manage dashboard permissions
sdk.catalog_permission.manage_dashboard_permissions(
   workspace_id="workspace_id",
   dashboard_id="dashboard_id",
   permissions_for_assignee=[
        CatalogPermissionsForAssigneeIdentifier(
            assignee_identifier=CatalogAssigneeIdentifier(id="group_id", type="userGroup"),
            permissions=["EDIT | SHARE | VIEW"]
        ),
        CatalogPermissionsForAssigneeRule(
            assignee_rule=CatalogAssigneeRule(type="allWorkspaceUsers"),
            permissions=["EDIT | SHARE | VIEW"]
        ),
    ],
)
Dashboard Inheritance in Workspace Hierarchies
A dashboard is inherited from a parent workspace together with its permissions. In the child workspace, you can extend the inherited permissions by adding new ones. However, you cannot take away inherited permissions in the child workspace.
Note that Dashboard.EDIT permission in an inherited dashboard will not let the user edit the dashboard. The dashboard remains editable only in its native parent workspace. In the child workspace, the Dashboard.EDIT permission behaves as a Dashboard.SHARE permission.
Identify Private Dashboards
Newly created dashboards, where only the user that created the dashboard has a dashboard permission assigned to the dashboard, are labelled as private. You can find out whether a dashboard is private using the API.
Call one of the following dashboard API endpoints with a GET request and an URI parameter metaInclude=accessInfo:
/api/v1/entities/workspaces/{workspaceId}/analyticalDashboards?metaInclude=accessInfo- or
/api/v1/entities/workspaces/{workspaceId}/analyticalDashboards/{objectId}?metaInclude=accessInfo
The response will contain meta: { "accessInfo": { "private": "true|false" } } telling you whether a particular dashboard is private or not.
Backward Compatibility
Dashboard permissions were introduced in GoodData.CN version 2.3 and its GoodData Cloud release equivalent.
If you are updating your GoodData from an older version, note that the following permissions are automatically assigned for all existing dashboards:
Dashboard.VIEWpermission is assigned to all users who have aWorkspace.VIEWpermission to the workspace the dashboard is in.Dashboard.EDITpermission is assigned to all users who have aWorkspace.ANALYZEpermission to the workspace the dashboard is in.
If you are restoring from a backup made in an older version, the only users able to access these dashboards will be those with Workspace.ANALYZE or Organization.MANAGE permissions. Permissions to the individual dashboards will have to be reinstated manually by updating the Dashboard API layout objects.