1. Connect Data
To perform analytics with GoodData, you must first establish a connection to a database. This process involves creating a data source object in GoodData, which represents the external database containing your source data. We query your database in real time to compute analytics, and only cache the results.
This tutorial uses our sample Snowflake database. However, you are welcome to connect to any of the supported databases or upload a CSV file. For the best learning experience, we recommend completing this tutorial with the sample Snowflake database before using your own data.
Steps:
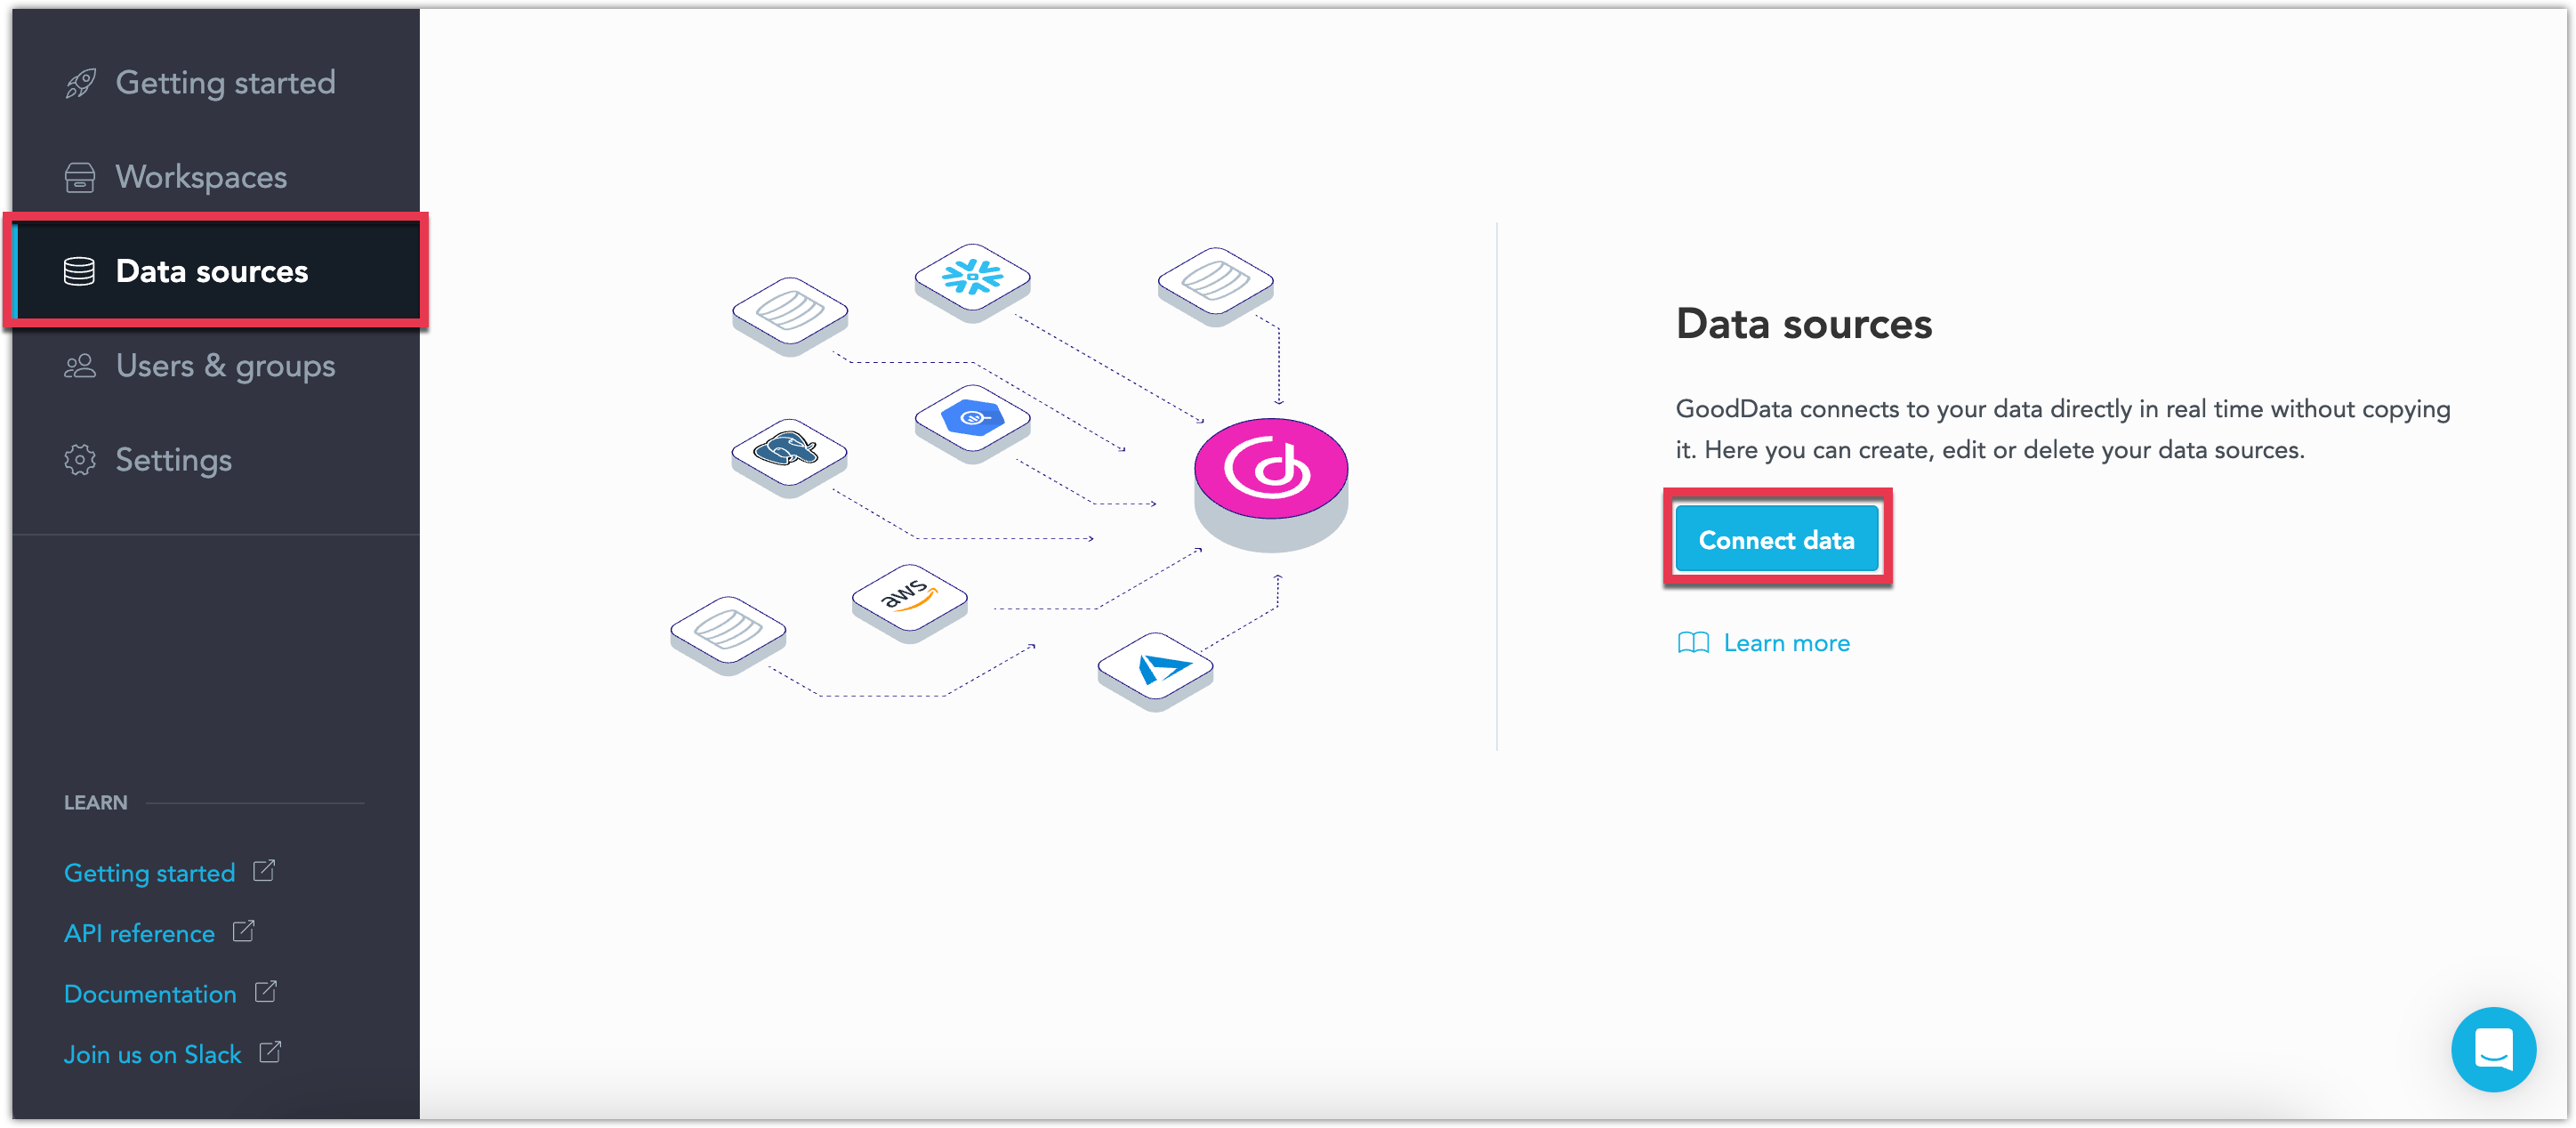
Go to Data sources and click Connect data.
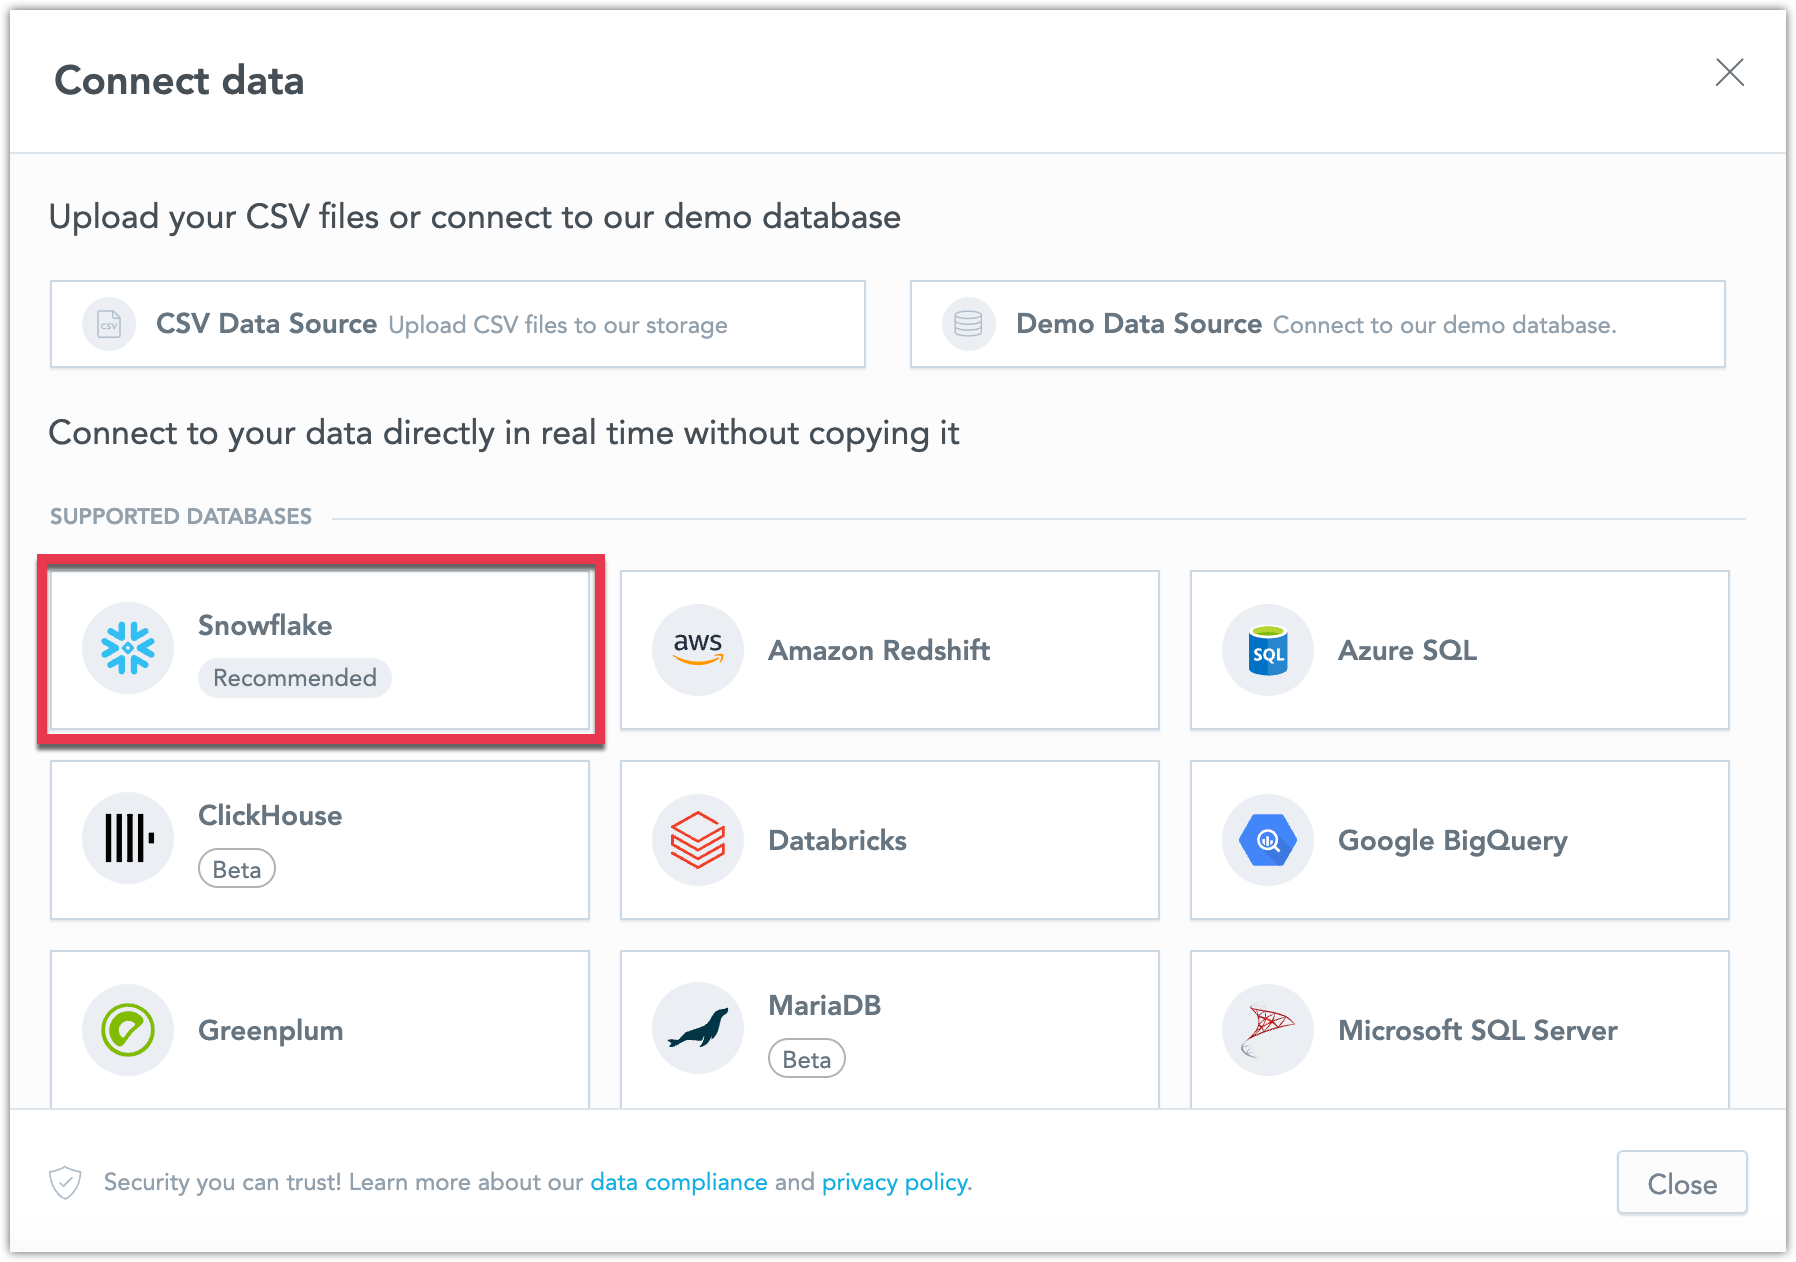
Select the type of database you are using, we recommend connecting to our sample Snowflake database.
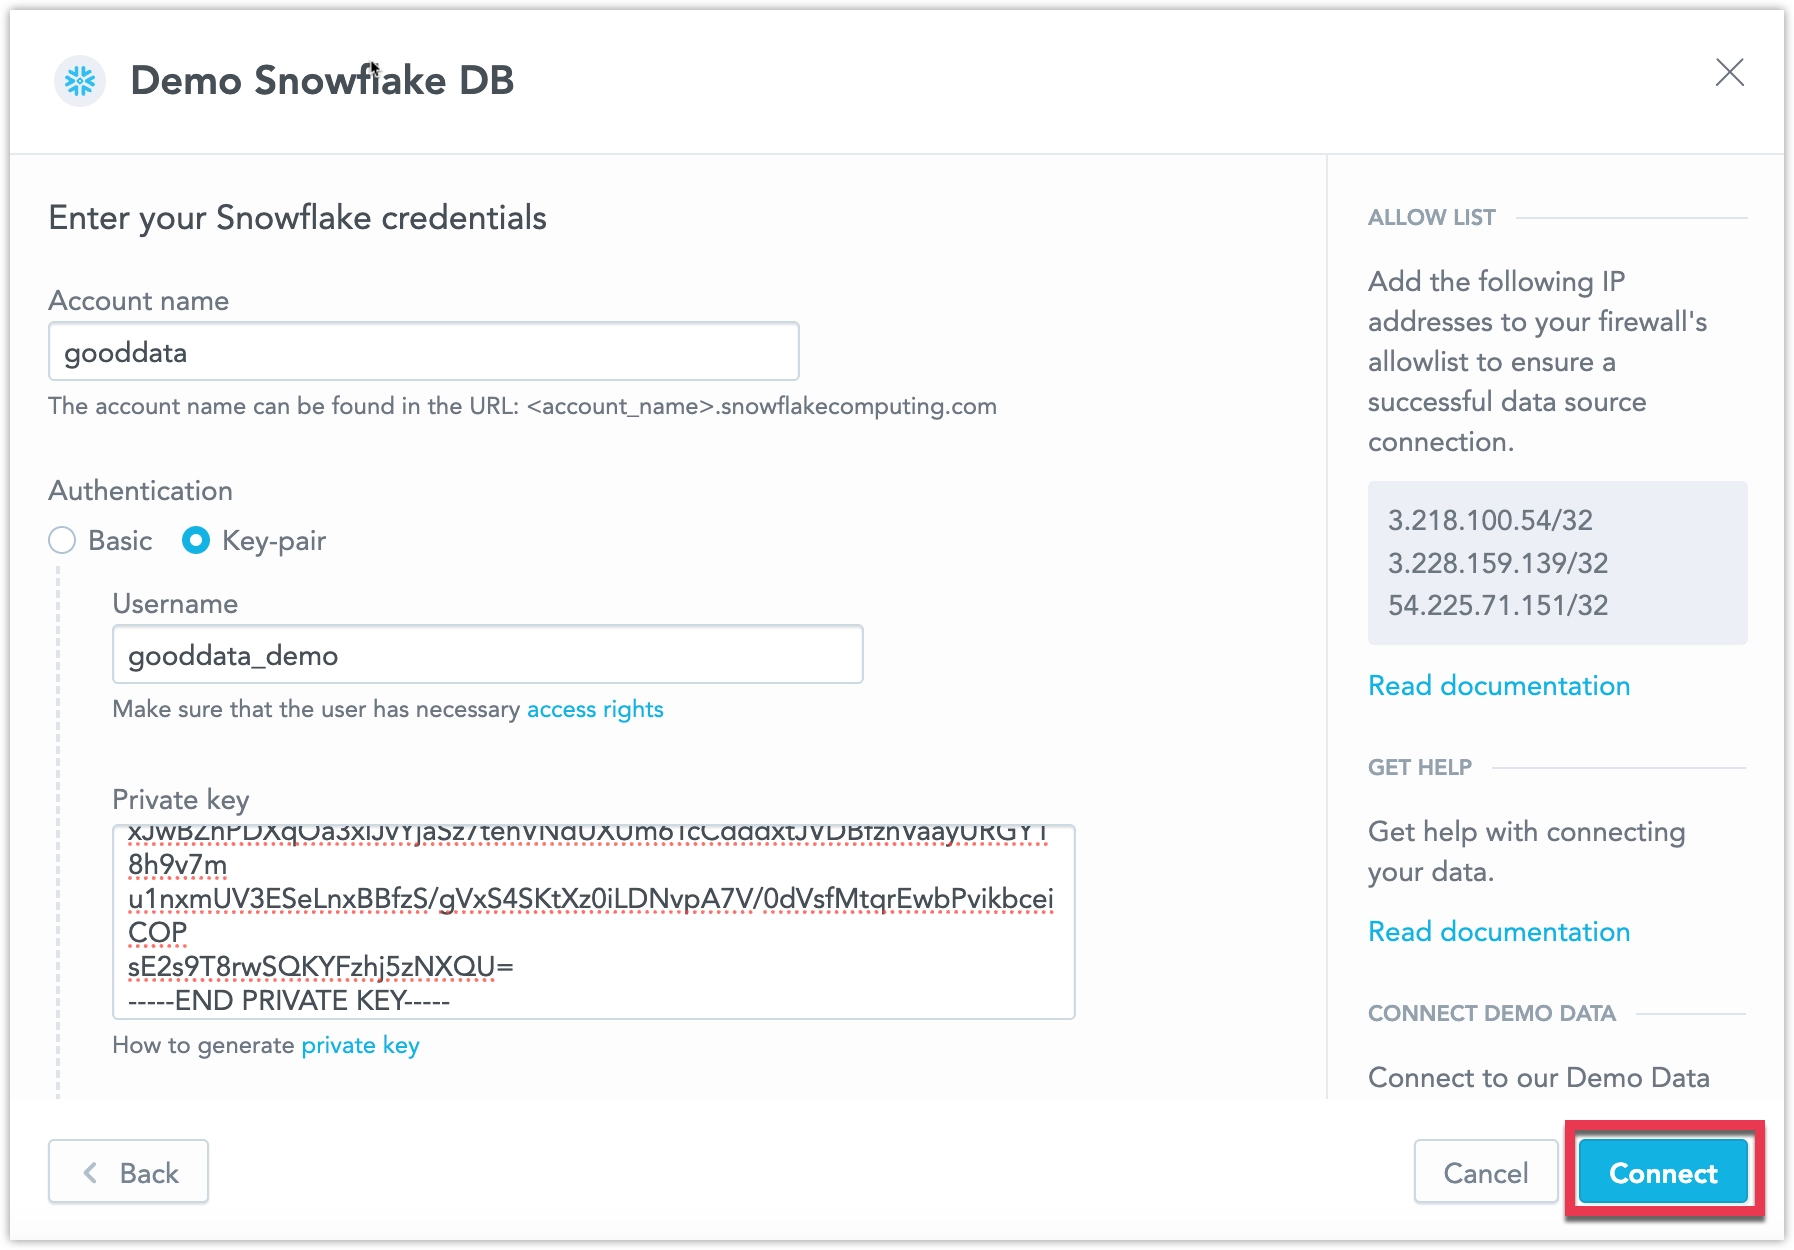
Name your data source, switch to Key-pair authentication and fill in the connection credentials:
- Account Name:
gooddata - Username:
gooddata_demo - Database name:
GOODDATA_DEMO_DATABASE - Warehouse:
GOODDATA_DEMO_WAREHOUSE - For the Private key, copy the string below
-----BEGIN PRIVATE KEY-----
MIIEvQIBADANBgkqhkiG9w0BAQEFAASCBKcwggSjAgEAAoIBAQDsNYAzu98GmDDI
aMitsBR6qPDcIONnaA1sPMwirypLLomklqgS070WDRIKZMQ8Njja4ZQWnJ+YTj6m
NOSL2unMVG2J0DWevCj0/bu4sxja0gm/Xcqux1XQRpYZZOBRUxgmO3L6WnORa07c
xaCzD8wqLVkx5+3CmXFFN00zW9U+MHdkngdkVf0ad1HyDN1K6h1rpEa4eykPrvky
NAva9iOLX0xjjOSwmDPJHx67qEYlI53qaBVJTp0yS3MI9BY4PE8XlYFOyajwneh/
HTtgBQXQZugb4mEfSTjcJBDcksD3uDhTqsKjngbCdPivRzk+ZaaQnMCW71j3aypA
nXYftjjFAgMBAAECggEAHi4JxtJiwQ9x8DE/Lr34J+HtAFstYvlu+ZzdAjN6RmfY
S1C6gclO+AHMg8pzLjRJWGIJD0iMtaONqqPIbbwXMjW5Vynkp/bnjsHamdM8Qj0i
5LIBowoyAy35oJ38cTeaNsxSuP0UlghtZ5TSnv5OOjdYFaHKBZqgV9UkhoLdwJem
0LlT0yBjk3Q0Kx1ux2qg2YkY3e874usa6M91Hl82kRowe3YzrVPg7S0T0FBahBgU
wR9HbZN365rluSBuEpvixIwzxv7h63AmwBrmldzbYKYDdmqFqP3LhLww1dhCT97N
7s5umJ+RZzu6igF6sshNB+vnMnQojfb3LKUGhy3jswKBgQD+01DB1Dgye6VSkw7C
ovzgPjPVitV+YeZRR4Kb11RrdM7C8GiUavybBQQ1F6SlNGRFNIDvATG1UXV0ZwYn
3CfjR2SGfGxHVsMRl93TW9ZHB0m/92DBui1Wv+q1/yuiuWt4ADCeY3hgSGdpUudN
j6JCjaWkAa7P817JqgU2Nep1lwKBgQDtTDf2C4BCgCHRp7yye/s7rKdSrl7CSqMS
dwp3neA2ISZygBlZWeAxqHuNlvwwfvAVfYqPCxPq4y4n90yAX5jN8CvVaPnax/i0
AxhAkc/mzhXUzcHG6ODcyikiTewqXIhX5t83vSs6n2DNDJwwN/FU7raCDtgJpXyP
MWC9YIroAwKBgBgyWpW9IATzJrSbkCg9L8PfRC6/uxwAEc2f+6/ul26IreVmzJdj
PU8+/7JG53RkcCz+GkwXke/Ep2GBMt1wEz2KluoKQIHZpDY0dHTQYJ1n/MHErKRY
mFuHZ7MWYr9V2fWQFw3DJjgGSAOBQsNjoyWsq5DSNBY85sBBa7NFFVlLAoGAdxA+
J+sfYL6PuXVTPa7toMSBc//ftdbjOZmXG+uQGzjI5LyXe3iX//KMg7+VK/QVHINQ
KXOie8GfYBg6P1M4BWSTadHxQ7AAfrnqykMfMKyI0aynpNkmMkIRH5A/hgXFt200
5O+6qABd/qRsHdmD8lyQIHO4PCbXd7WL15mAOOcCgYEA9T1KV2BcD3eidmMq4WiB
xJwBZhPDXqOa3xlJvYjaSz7tehVNdUXUm6TcCdddxtJVDBfznVaayURGY18h9v7m
u1nxmUV3ESeLnxBBfzS/gVxS4SKtXz0iLDNvpA7V/0dVsfMtqrEwbPvikbceiCOP
sE2s9T8rwSQKYFzhj5zNXQU=
-----END PRIVATE KEY-----
and click Connect.
- Account Name:
Fill in the schema name
ECOMMERCE_DEMO_SCHEMAand click Save.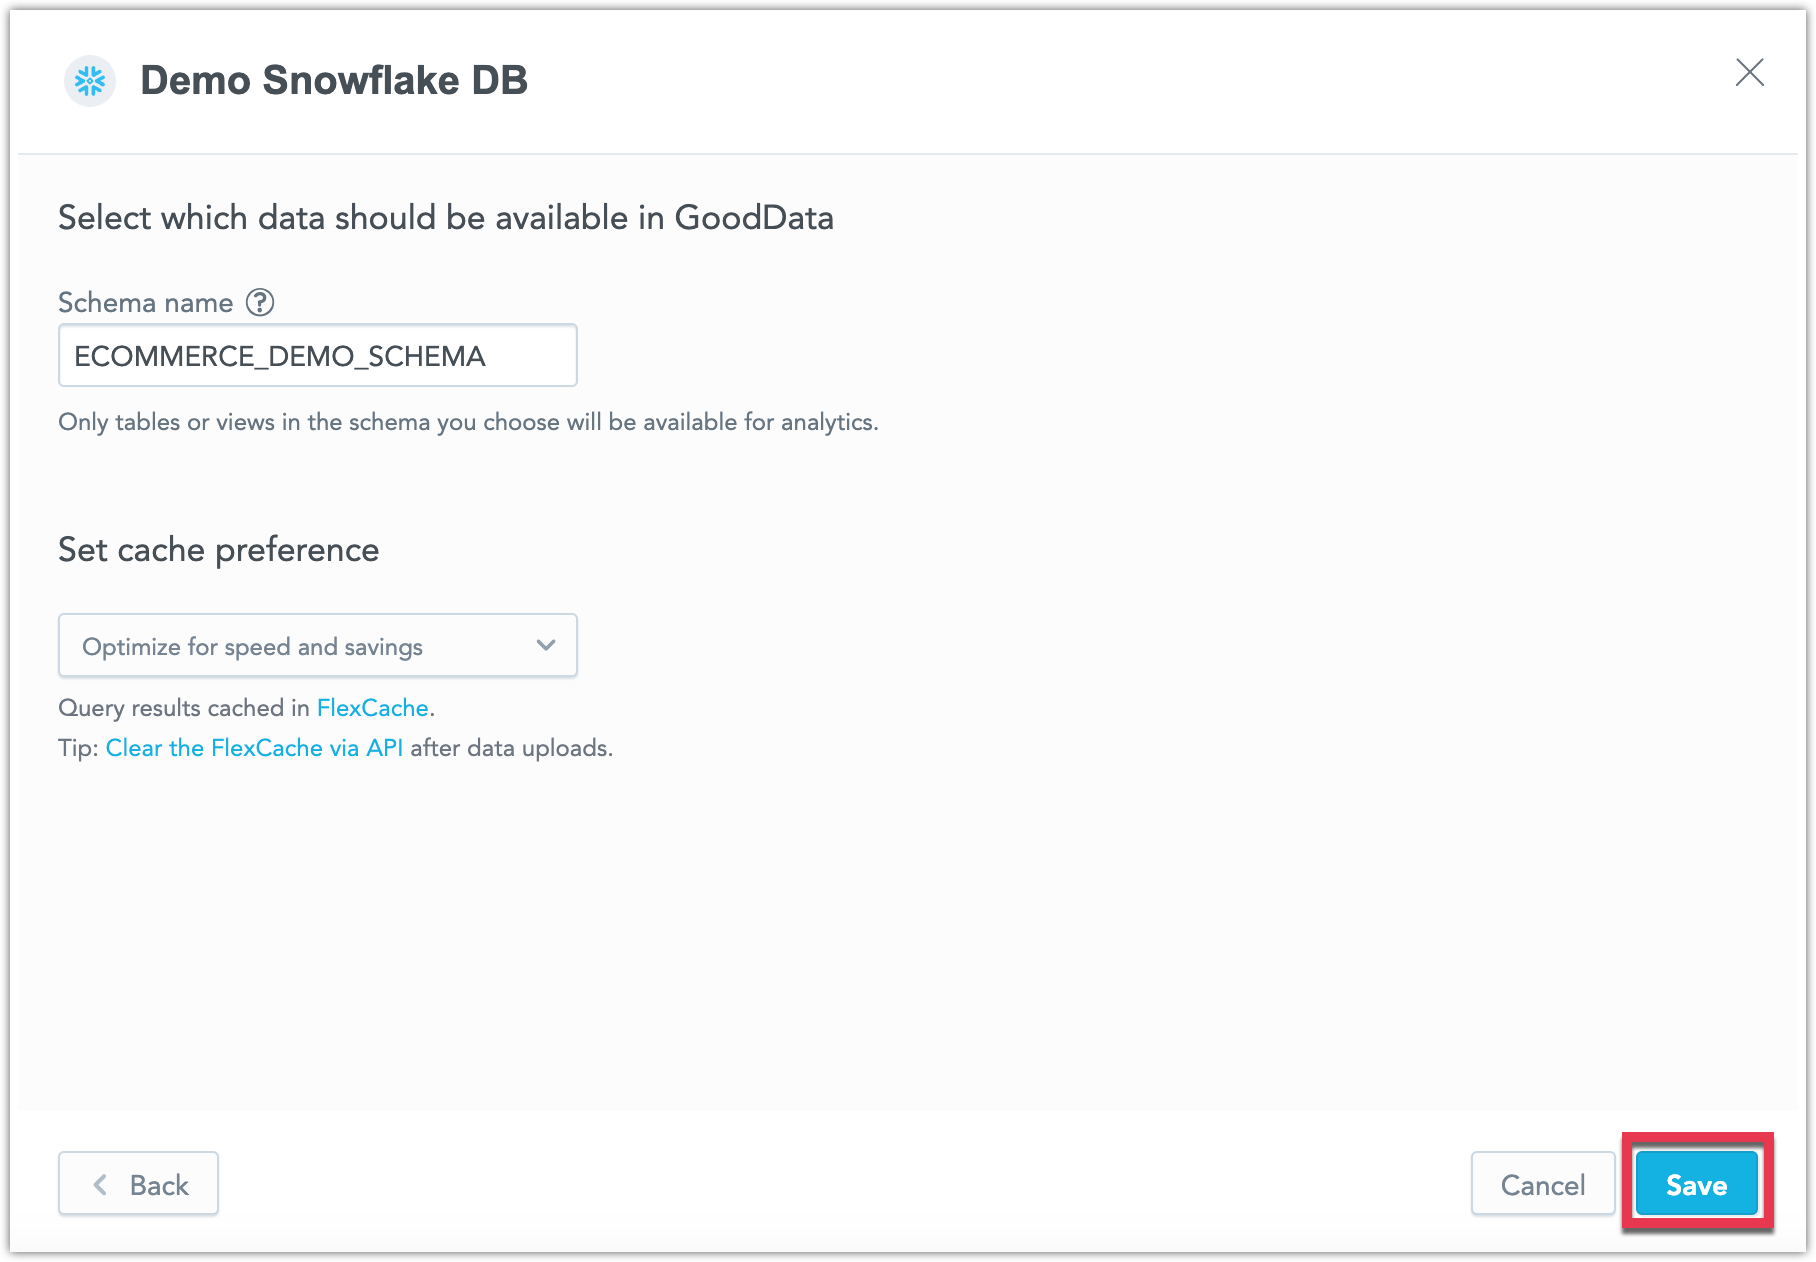
The data source is created and appears in the list of data sources.

You can connect to our sample Snowflake database using the following API call:
curl $HOST_URL/api/v1/entities/dataSources \
  -H "Content-Type: application/vnd.gooddata.api+json" \
  -H "Accept: application/vnd.gooddata.api+json" \
  -H "Authorization: Bearer <API_TOKEN>" \
  -X POST \
  -d '{
      "data": {
          "attributes": {
              "name": "Demo Snowflake DB",
              "url": "jdbc:snowflake://gooddata.snowflakecomputing.com?warehouse=GOODDATA_DEMO_WAREHOUSE&db=GOODDATA_DEMO_DATABASE",
              "schema": "ECOMMERCE_DEMO_SCHEMA",
              "type": "SNOWFLAKE",
              "username": "<SNOWFLAKE_USER>",
              "privateKey": "<SNOWFLAKE_PRIVATE_KEY>",
              "privateKeyPassphrase": "<SNOWFLAKE_PRIVATE_KEY_PASSPHRASE>"
          },
          "id": "demo-ds",
          "type": "dataSource"
      }
  }' | jq .
To confirm that the database has been connected, the server returns the following response:
{
  "data": {
    "id": "demo-ds",
    "type": "dataSource",
    "attributes": {
      "name": "Demo Snowflake DB",
      "type": "SNOWFLAKE",
      "url": "jdbc:snowflake://gooddata.snowflakecomputing.com?warehouse=GOODDATA_DEMO_WAREHOUSE&db=GOODDATA_DEMO_DATABASE",
      "schema": "ECOMMERCE_DEMO_SCHEMA",
      "username": "gooddata_demo"
    }
  },
  "links": {
    "self": "$HOST_URL/api/v1/entities/dataSources/demo-ds"
  }
}
About the Sample Database
The data represent a simple scenario of an e-commerce system that tracks customers, how they order certain products, and how much money was spent on various marketing campaigns in different campaign channels.
The data is stored and organized according to the following physical schema of tables and their relationships:
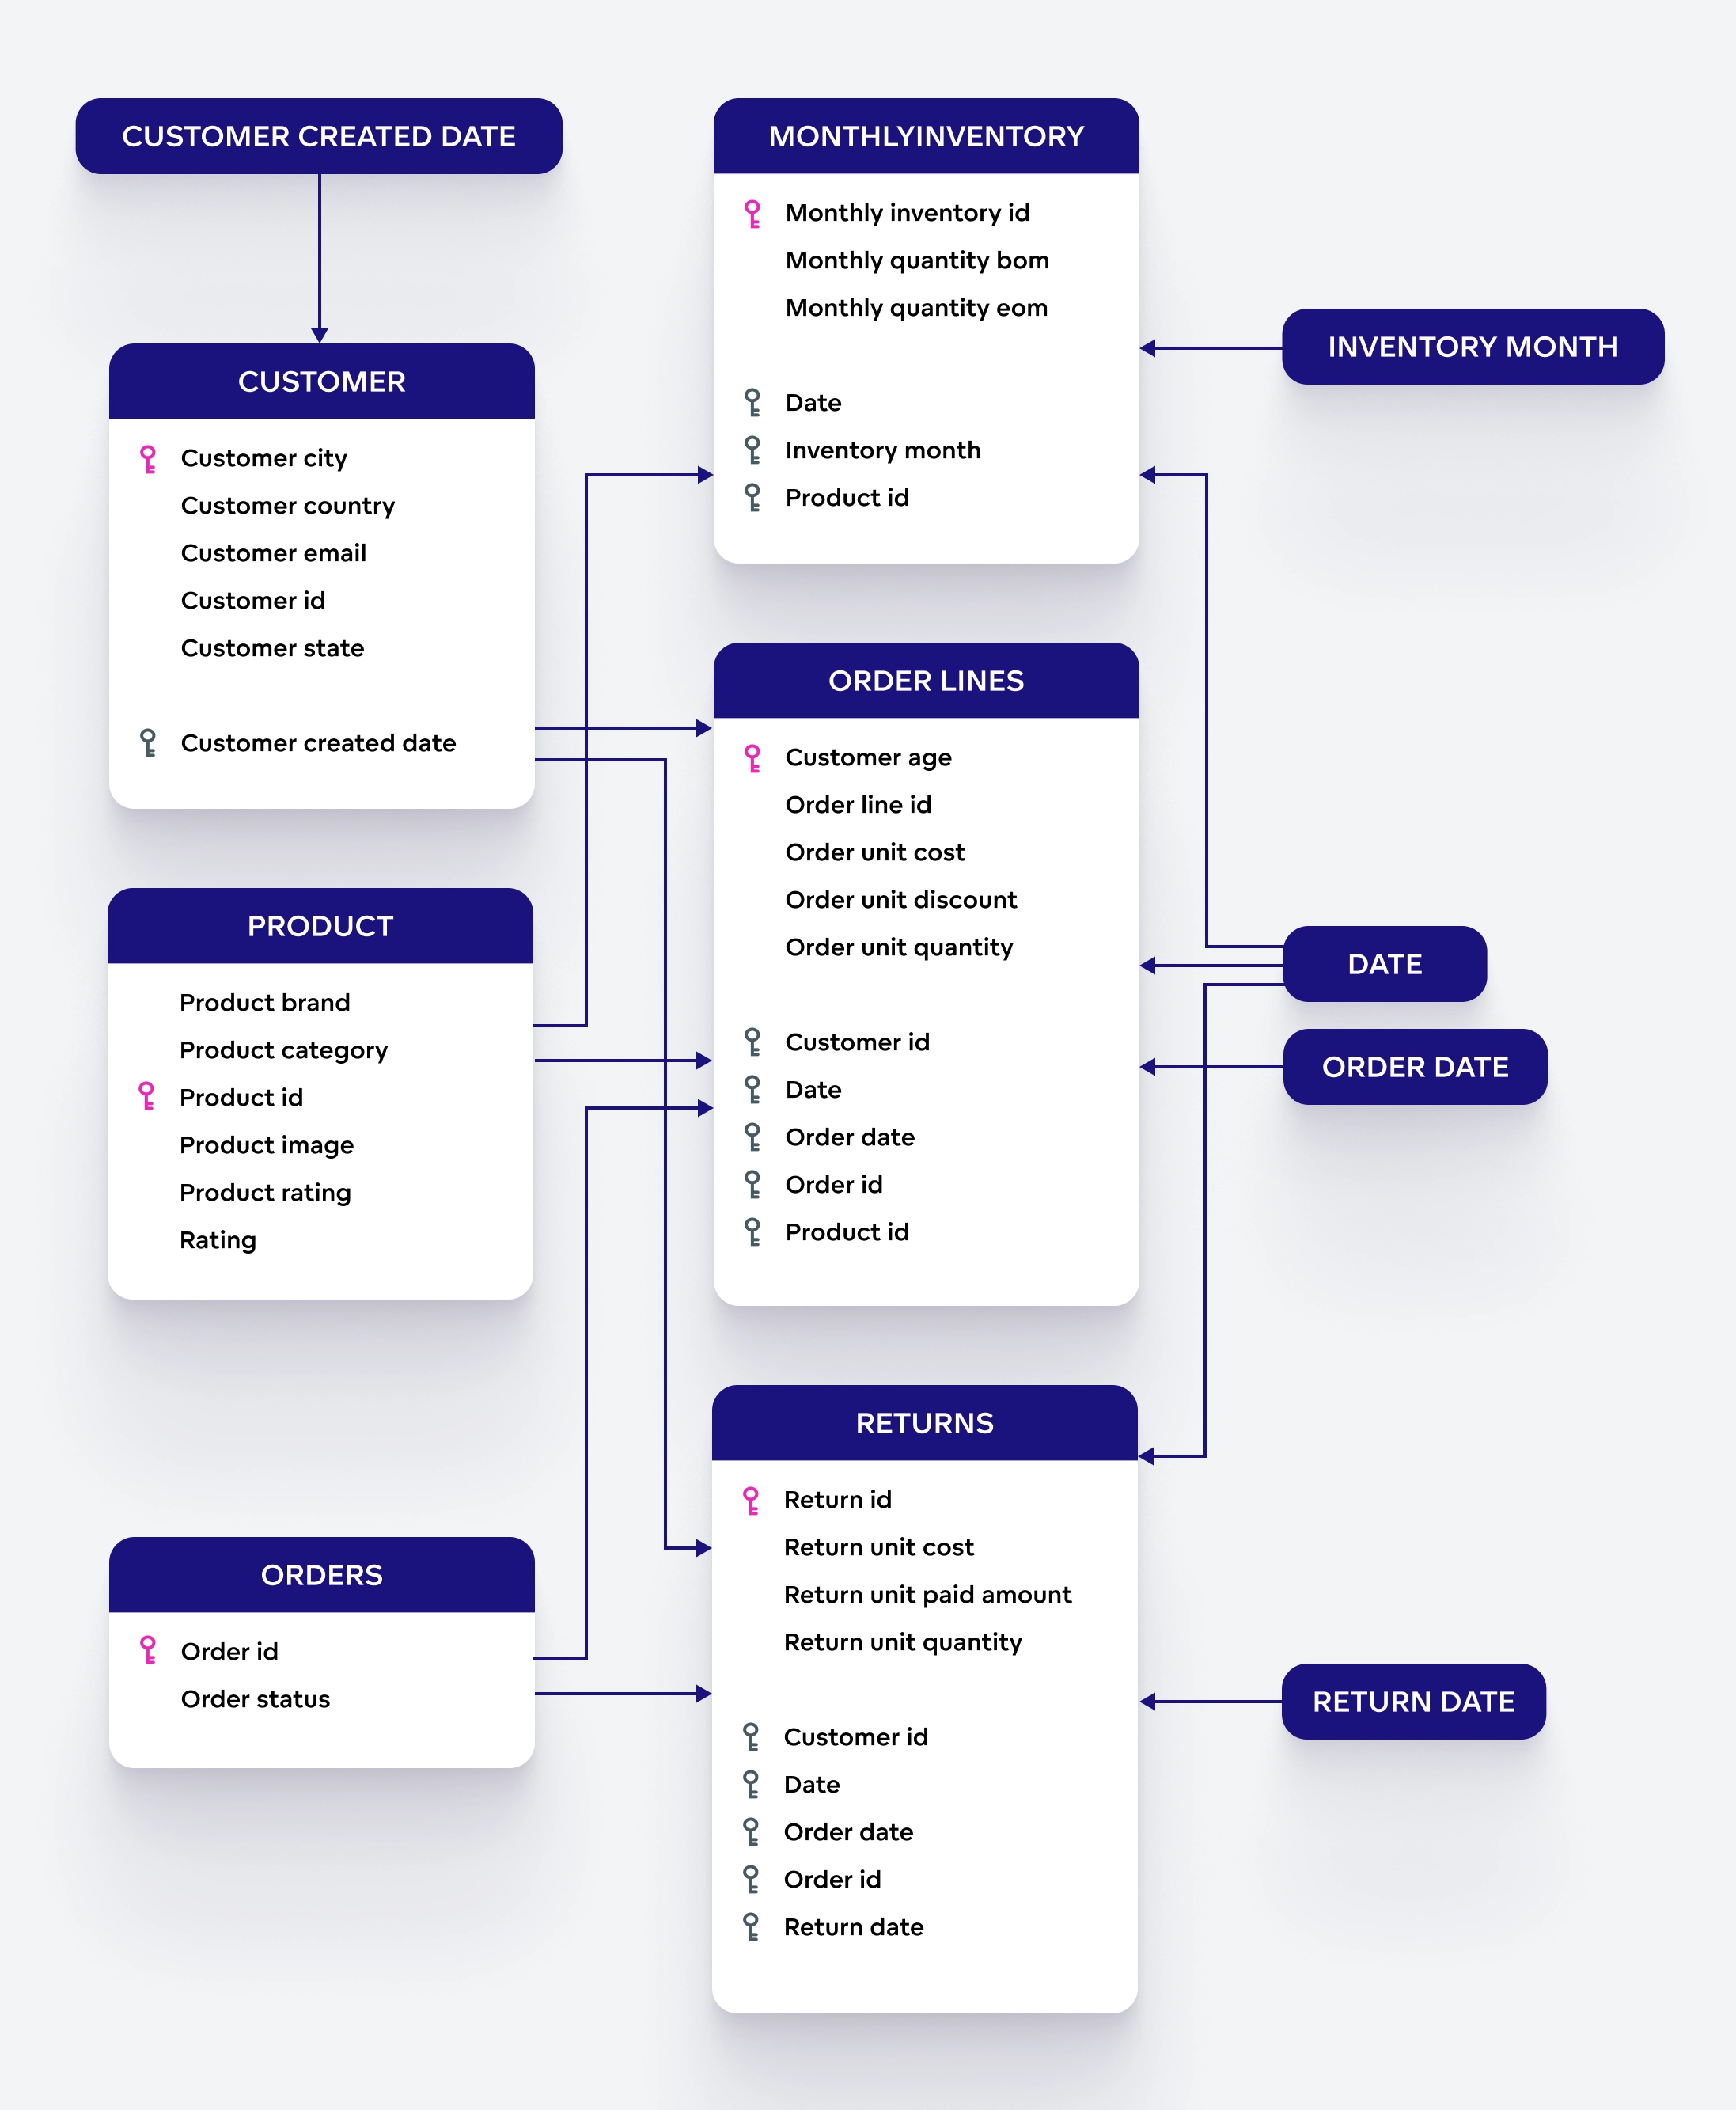
The database schema describes the structure of the physical tables in the sample database, forming the foundation for building your LDM. The relationships between the sample datasets are structured as follows:
Customer Table
- Contains details such as customer city, country, email, ID, and state.
- Can be connected to the Order lines and Returns tables through the
Customer IDprimary key. - Includes
Customer created datewhich can be mapped to a corresponding date dimension dataset in the LDM.
Product Table
- Contains product-related information such as product brand, category, image, rating, and ID.
- Can be connected to the Monthly Inventory and Order Lines tables via
Product IDas the primary key to track which products are included in orders.
Orders Table
- Stores order information, including order ID and order status.
- Can be connected to the Order Lines and Customer tables via the
Order IDprimary key.
Monthly Inventory Table
- Tracks inventory levels over time, including inventory ID, quantity at beginning (BOM) and end (EOM) of the month.
- Can be connected to the Product table via the
Product IDforeign key to track inventory per product.
Order Lines Table
- Central table that stores details about each item within an order, such as customer age, order line ID, unit cost, discount, unit price, and unit quantity.
- Can be connected to the Customer, Product, and Order tables using the
Order ID,Product ID, andOrder IDforeign keys. - Connected to the Date and Order Date date dimension datasets.
Returns Table
- Tracks returned items, including return ID, unit cost, paid amount, and unit quantity.
- Can be connected to the Customer and Orders via the
Customer IDandOrder IDforeign keys to associate returns with specific orders. - Connected to the Date and Return Date date dimension datasets.
Date Tables
Several Date dimension tables are used to track various time-related aspects, including Date, Order Date, Inventory Month, Return Date, and Customer Created Date. These tables function as date entities and do not physically exist in the database schema. Instead, data fields in the database tables are mapped to date dimension datasets within GoodData. Since the date dimension is handled virtually, there is no need to create physical tables in the database.