Schedule Exports in Dashboards
You can schedule exports at regular intervals for dashboards and individual widgets. Supported types:
- Dashboard: snapshot (.pdf), slide deck (.pdf, .pptx), data (.xlsx)
- Widget: snapshot (.png), single slide (.pptx, .pdf), formatted data (.pdf, .xlsx, .csv), raw data (.csv)
Admin Setup Required
Before you can schedule exports, your administrator must configure one or more destinations and ensure you have the necessary workspace permissions, as described in Automation in Dashboards.
SDK and Embedding
Scheduled Exports work with SDK version 10.12.0 or newer. Using these features with SDK version older than 10.12.0 may cause problems with embedding.
Supported Export Types
- Dashboard:
- Snapshot: PDF
- Slide deck: PDF, PPTX
- Data: XLSX
- Widget:
- Snapshot: PNG
- Single slide: PPTX, PDF
- Formatted data: PDF, XLSX, CSV
- Raw data: CSV
Delivery Methods
When a scheduled export is triggered, the exported file will be delivered based on the selected destination.
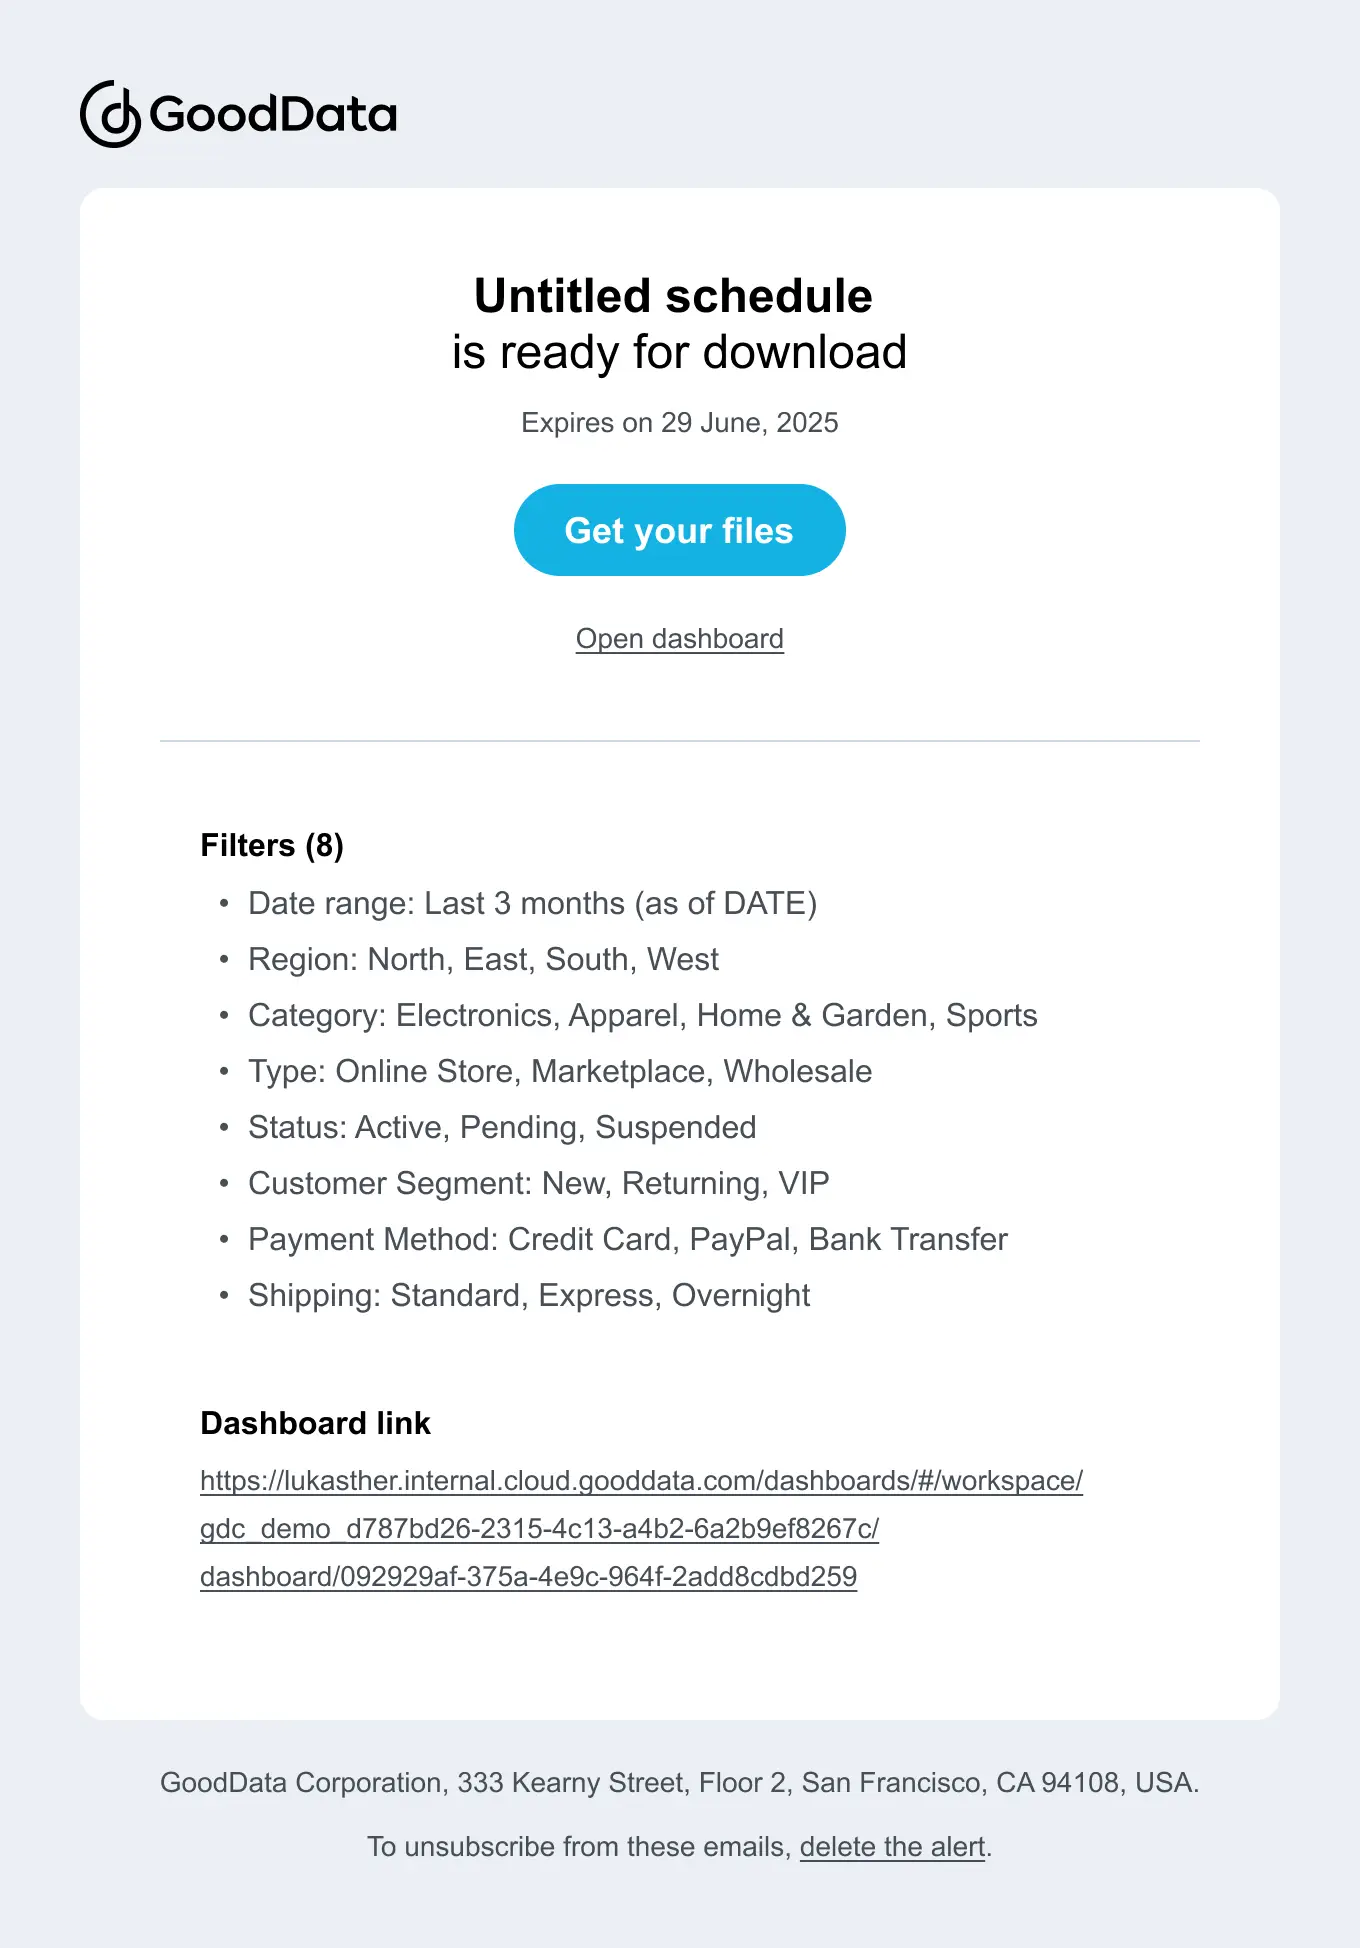
If an email destination is chosen, you’ll receive a structured email linking to the original dashboard and with the exported file attached to the email:
Custom Email Appearance
Your organization’s white-labeling and customization settings may alter the appearance of the email, as defined by your administrator. For more information, see Customize Emails.
Webhook
Alternatively, if a webhook destination is selected, a JSON payload will be sent to the webhook for further processing in external systems, managed by the administrator.
Schedule Export
Scheduled exports can be either of the entire dashboard, or an individual widget.
Dashboard
Follow the steps below to set up a new scheduled export of a dashboard:
Steps:
Open a dashboard.
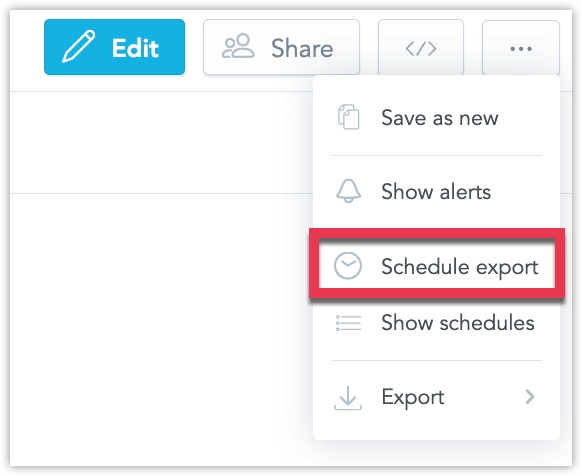
In the top right corner, click the … (ellipsis) button and select Schedule export.
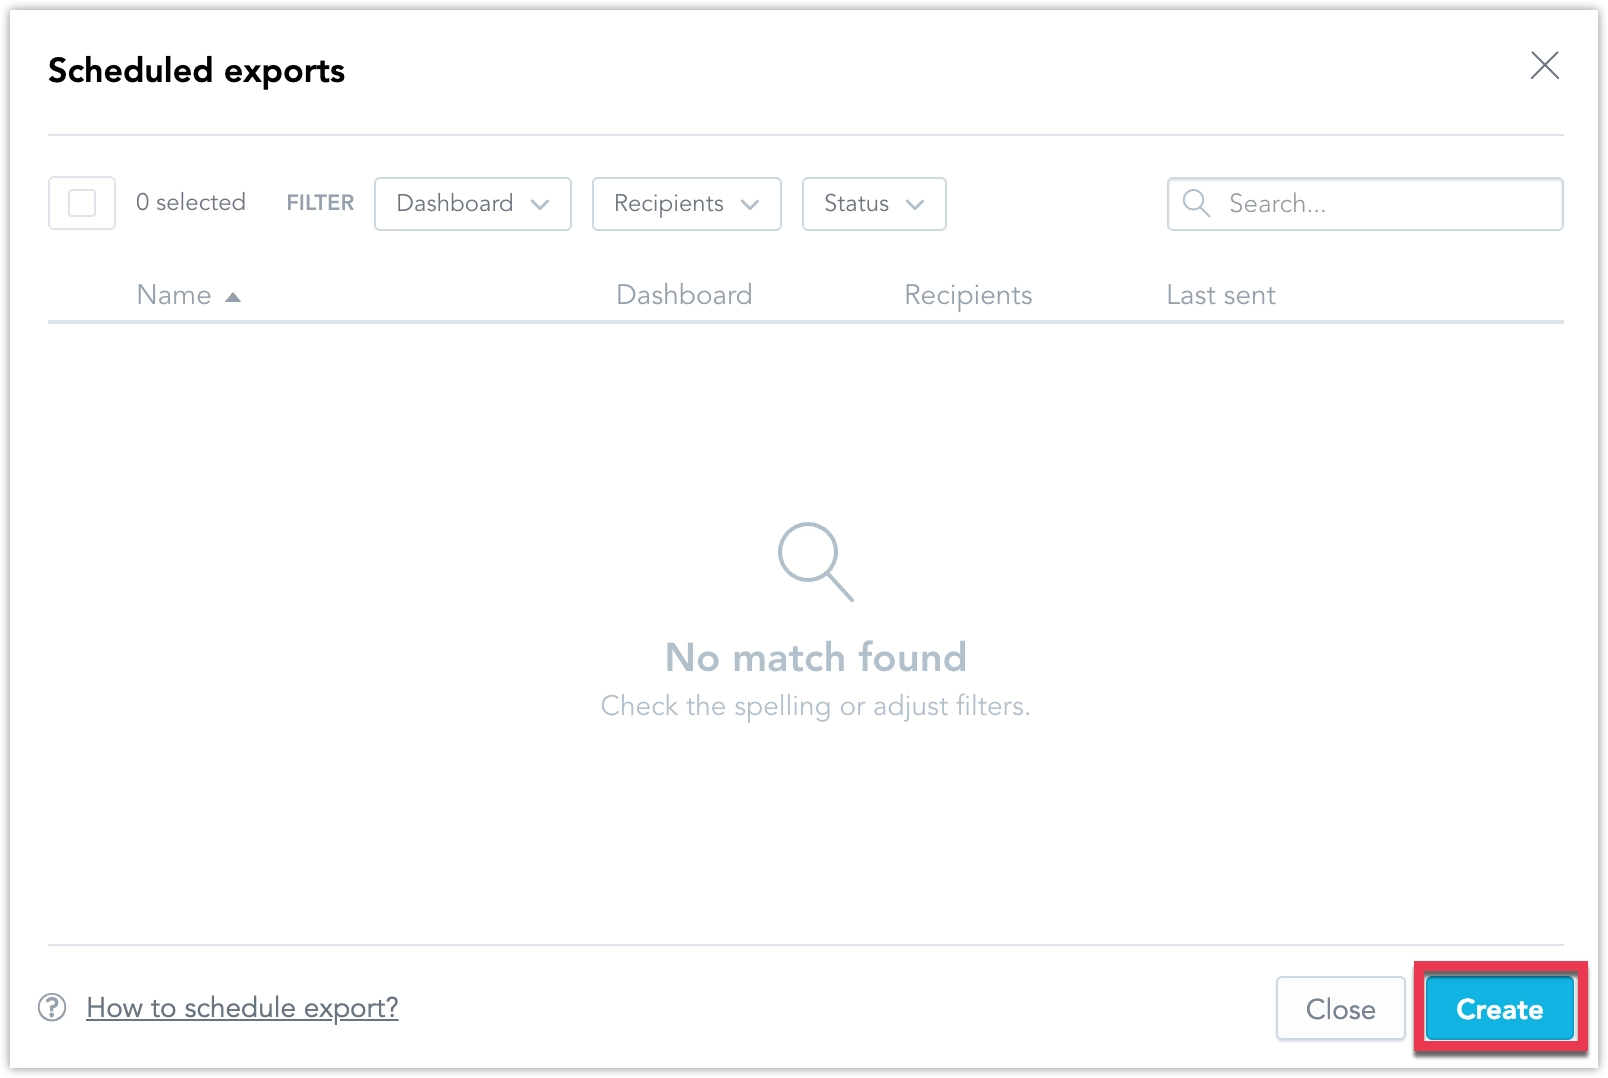
The scheduled exports dialog opens.
Select Create.
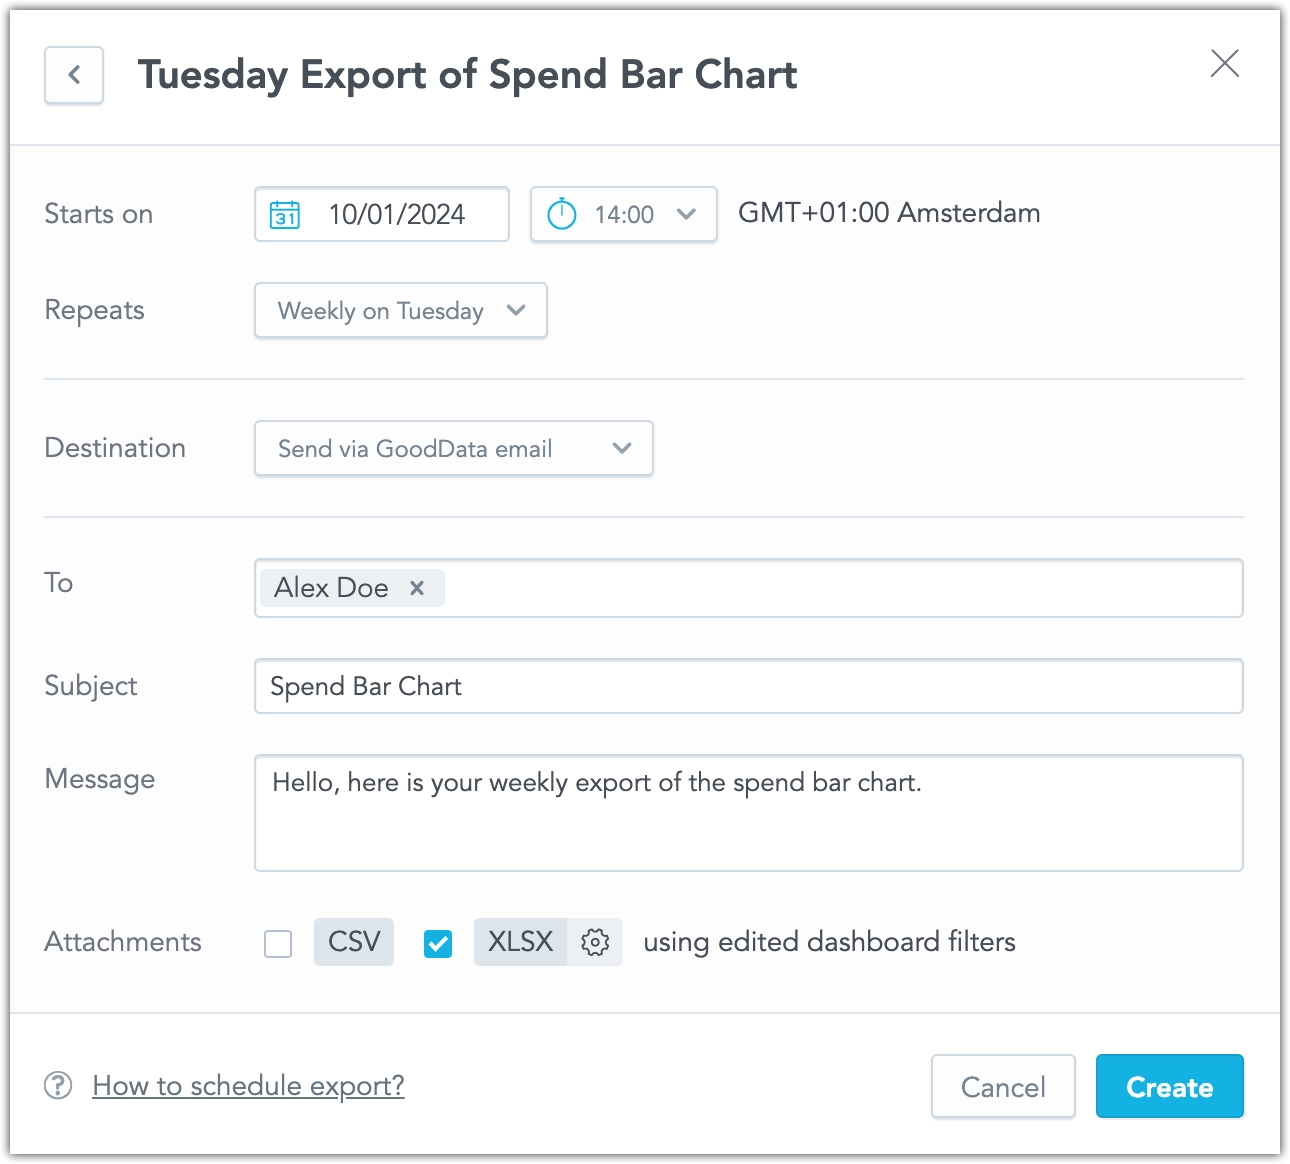
Set the frequency, email recipients, and email content. Note that only you and other users with access to the dashboard can be included in the recipients. Switch to the Filters tab if you want to apply a custom filter to your export.
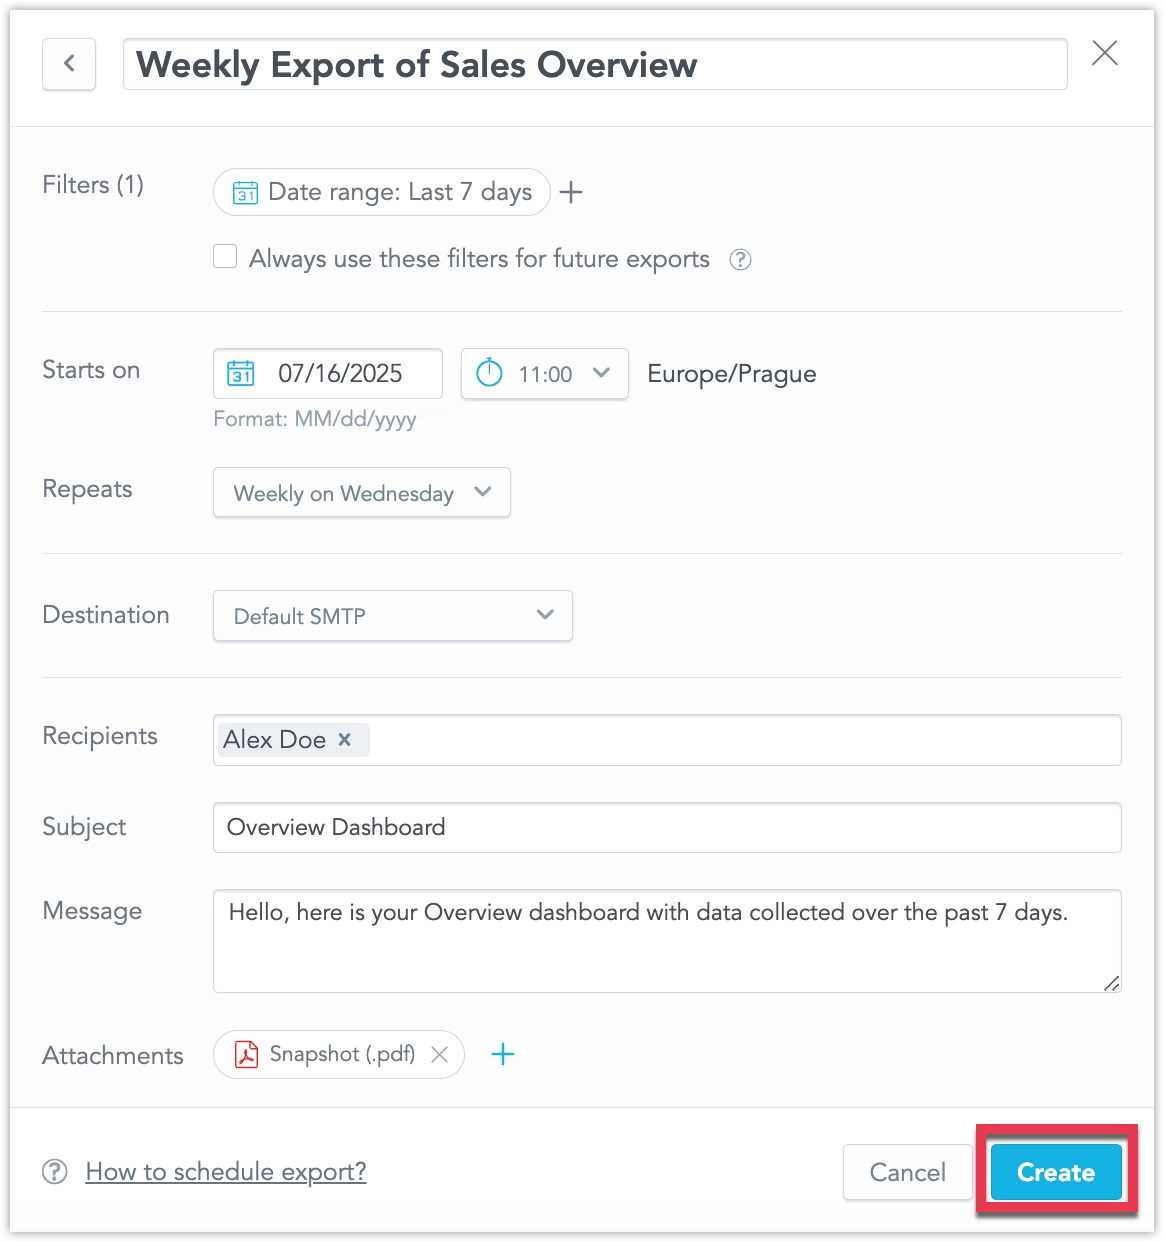
Then click Create.
Your scheduled export is created.
To create and manage scheduled exports via the API, you need to first create an export definition using the API endpoint /api/v1/entities/workspaces/<workspaceId>/exportDefinitions, and then you can call the API endpoint /api/v1/entities/workspaces/<workspaceId>/automations to schedule the export.
Steps:
Create an export definition of the dashboard:
curl $HOST_URL/api/v1/entities/workspaces/<workspace_id>/exportDefinitions \
  -H "Content-Type: application/vnd.gooddata.api+json" \
  -H "Accept: application/vnd.gooddata.api+json" \
  -H "Authorization: Bearer $API_TOKEN" \
  -X POST \
  -d '{
    "data": {
      "type": "exportDefinition",
      "attributes": {
        "title": "<export_definition_title>",
        "requestPayload": {
          "fileName": "<export_definition_filename>",
          "dashboardId": "<dashboard_id>"
        }
      }
    }
  }'
you should receive a
<export_definition_id>.Create the scheduled export using the
<export_definition_id>from previous step:curl $HOST_URL/api/v1/entities/workspaces/<workspace_id>/automations \ -H "Content-Type: application/vnd.gooddata.api+json" \ -H "Accept: application/vnd.gooddata.api+json" \ -H "Authorization: Bearer $API_TOKEN" \ -X POST \ -d '{ "data": { "type": "automation", "id": "<scheduled_export_id>", "attributes": { "title": "<scheduled_export_display_name>", "details": { "message": "<export_body_text>", "subject": "<export_subject>" }, "schedule": { "firstRun": "<timestamp>", "timezone": "<timezone>", "cron": "<cron_expression>" } }, "relationships": { "exportDefinitions": { "data": [ { "type": "exportDefinition", "id": "<export_definition_id>" } ] }, "recipients": { "data": [ { "type": "user", "id": "<user_id>" } ] }, "notificationChannel": { "data": { "type": "notificationChannel", "id": "<destination_id>" } }, "analyticalDashboard": { "data": { "type": "analyticalDashboard", "id": "<dashboard_id>" } } } } }'
A real-life example might look like this:
Creating export definition:
curl https://frosty-cat.trial.cloud.gooddata.com/api/v1/entities/workspaces/e45864d8057f40a09957ba1cdd3b5129/exportDefinitions \
  -H "Content-Type: application/vnd.gooddata.api+json" \
  -H "Accept: application/vnd.gooddata.api+json" \
  -H "Authorization: Bearer YWRtaW46Ym9vdHN0cmFwOkdkY05hczEyMw==" \
  -X POST \
  -d '{
    "data": {
      "type": "exportDefinition",
      "attributes": {
        "title": "Overview",
        "requestPayload": {
          "fileName": "Overview",
          "dashboardId": "2f0b76a1-9e8e-4375-84be-721919e02cb7"
        }
      }
    }
  }'
The export definition ID is returned as
8b857896-9cbc-4f37-8fc3-3b491945b9a2.Scheduling export:
curl https://frosty-cat.trial.cloud.gooddata.com/api/v1/entities/workspaces/e45864d8057f40a09957ba1cdd3b5129/automations \
  -H "Content-Type: application/vnd.gooddata.api+json" \
  -H "Accept: application/vnd.gooddata.api+json" \
  -H "Authorization: Bearer YWRtaW46Ym9vdHN0cmFwOkdkY05hczEyMw==" \
  -X POST \
  -d '{
    "data": {
      "type": "automation",
      "id": "9dab9b5e-a822-4b15-b8db-cd5cdbe73deb",
      "attributes": {
        "title": "Overview dashboard",
        "details": {
          "message": "Hello,\n\nthis is an export of the overview dashboard.",
          "subject": "Overview dashboard"
        },
        "schedule": {
          "firstRun": "2024-10-01T12:00:00Z",
          "timezone": "Europe/Amsterdam",
          "cron": "0 0 14 ? * TUE"
        }
      },
      "relationships": {
        "exportDefinitions": {
          "data": [
            {
              "type": "exportDefinition",
              "id": "8b857896-9cbc-4f37-8fc3-3b491945b9a2"
            }
          ]
        },
        "recipients": {
          "data": [
            {
              "type": "user",
              "id": "alex.doe"
            }
          ]
        },
        "notificationChannel": {
          "data": {
            "type": "notificationChannel",
            "id": "a5b13b1b-4e60-4a6d-bba6-9b2b4ec96988"
          }
        },
        "analyticalDashboard": {
          "data": {
            "type": "analyticalDashboard",
            "id": "2f0b76a1-9e8e-4375-84be-721919e02cb7"
          }
        }
      }
    }
  }'
Widget
Follow the steps below to set up a new scheduled export of an individual widget:
Steps:
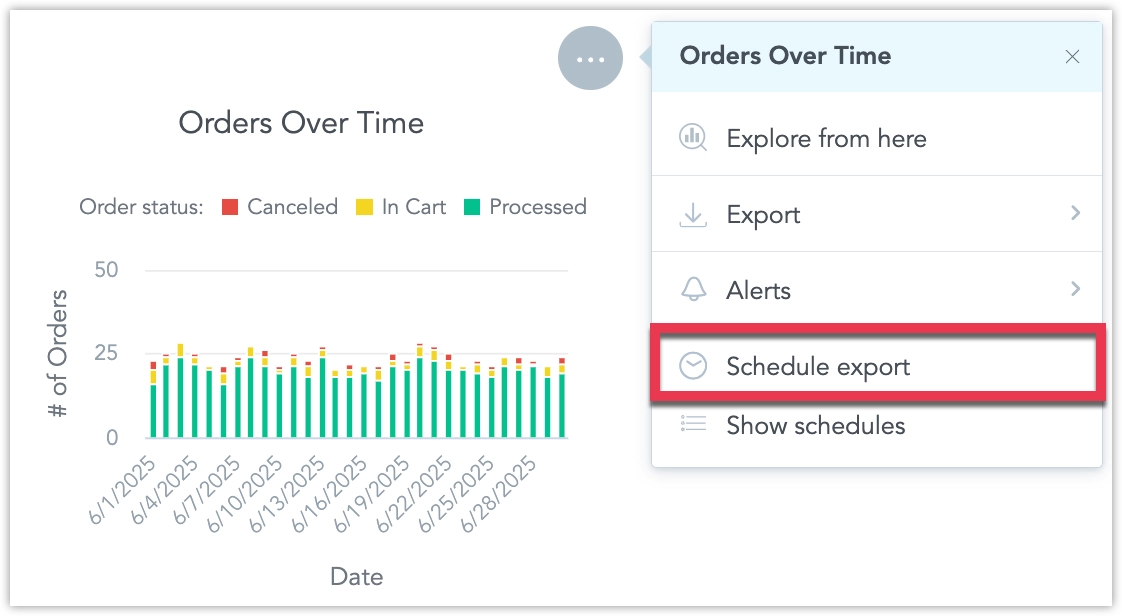
Open a dashboard.
Click the … (ellipsis) menu on a widget and select Schedule export:
The scheduled exports dialog opens.
Select Create.
Set the frequency, email recipients, and email content. Switch to the Filters tab if you want to apply a custom filter to your export.
Note that only you and other users with access to the dashboard can be included in the recipients.
The dialog includes XLSX export options and the ability to disable merged attribute cells in XLSX exports:
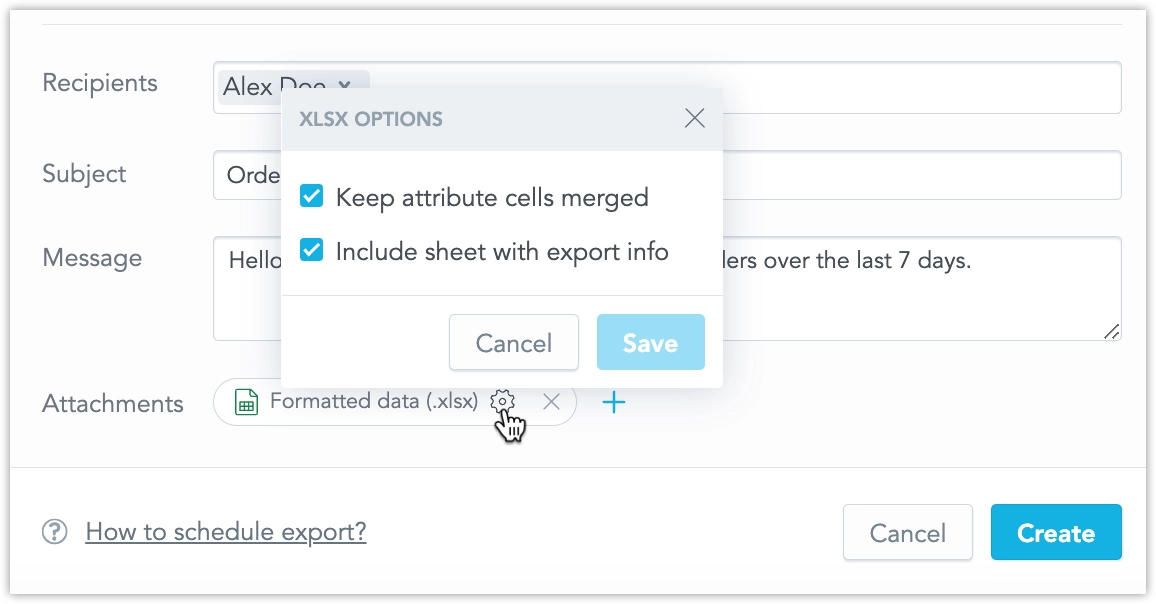
For example, by default, an exported visualization in XLSX format might look like this:
Two columns, Continent and Country. Europe spans two rows in the Continent column, with France in the first row and Germany in the second.
Continent Country Europe France Germany If you disable the Keep attribute cells merged option, the XLSX table will look like this:
Two columns, Continent and Country. Europe is repeated in each row: Europe–France in the first row, Europe–Germany in the second.
Continent Country Europe France Europe Germany Click Create.
To create and manage scheduled exports via the API, you need to first create an export definition using the API endpoint /api/v1/entities/workspaces/<workspaceId>/exportDefinitions, and then you can call the API endpoint /api/v1/entities/workspaces/<workspaceId>/automations to schedule the export.
If you want to export a widget in multiple formats (for example, CSV and XLSX), create a separate export definition for each format.
Steps:
Create a XLSX export definition of the widget:
curl $HOST_URL/api/v1/entities/workspaces/<workspace_id>/exportDefinitions \
      -H "Content-Type: application/vnd.gooddata.api+json" \
      -H "Accept: application/vnd.gooddata.api+json" \
      -H "Authorization: Bearer $API_TOKEN" \
      -X POST \
      -d '{
        "data": {
          "type": "exportDefinition",
          "attributes": {
            "title": "<export_definition_xlsx_title>",
            "requestPayload": {
              "fileName": "<export_definition_xlsx_filename>",
              "format": "XLSX",
              "visualizationObject": "<visualization_id>",
              "visualizationObjectCustomFilters": [
                {
                  "negativeAttributeFilter": {
                    "localIdentifier": "<arbitraty_id>",
                    "displayForm": {
                      "identifier": {
                        "id": "<label_id>",
                        "type": "label"
                      }
                    },
                    "notIn": {
                      "values": [
                        "Direct",
                        "PR"
                      ]
                    }
                  }
                }
              ],
              "relatedDashboardId": "<dashboard_id>",
              "settings": {
                "mergeHeaders": true
              },
              "metadata": {
                "widget": "<widget_id>"
              }
            }
          }
        }
      }'
you should receive a
<export_definition_xlsx_id>.Create a CSV export definition of the widget:
curl $HOST_URL/api/v1/entities/workspaces/<workspace_id>/exportDefinitions \
      -H "Content-Type: application/vnd.gooddata.api+json" \
      -H "Accept: application/vnd.gooddata.api+json" \
      -H "Authorization: Bearer $API_TOKEN" \
      -X POST \
      -d '{
        "data": {
          "type": "exportDefinition",
          "attributes": {
            "title": "<export_definition_csv_title>",
            "requestPayload": {
              "fileName": "<export_definition_csv_filename>",
              "format": "CSV",
              "visualizationObject": "<visualization_id>",
              "visualizationObjectCustomFilters": [
                {
                  "negativeAttributeFilter": {
                    "localIdentifier": "<arbitraty_id>",
                    "displayForm": {
                      "identifier": {
                        "id": "<label_id>",
                        "type": "label"
                      }
                    },
                    "notIn": {
                      "values": [
                        "Direct",
                        "PR"
                      ]
                    }
                  }
                }
              ],
              "relatedDashboardId": "<dashboard_id>",
              "settings": {},
              "metadata": {
                "widget": "<widget_id>"
              }
            }
          }
        }
      }'
you should receive a
<export_definition_csv_id>.Create the scheduled export using the
<export_definition_csv_id>and<export_definition_xlsx_id>from previous steps:curl $HOST_URL/api/v1/entities/workspaces/<workspace_id>/automations \ -H "Content-Type: application/vnd.gooddata.api+json" \ -H "Accept: application/vnd.gooddata.api+json" \ -H "Authorization: Bearer $API_TOKEN" \ -X POST \ -d '{ "data": { "type": "automation", "id": "<scheduled_export_id>", "attributes": { "title": "<scheduled_export_display_name>", "details": { "message": "<export_body_text>", "subject": "<export_subject>" }, "schedule": { "firstRun": "<timestamp>", "timezone": "<timezone>", "cron": "<cron_expression>" } }, "relationships": { "exportDefinitions": { "data": [ { "type": "exportDefinition", "id": "<export_definition_xlsx_id>" }, { "type": "exportDefinition", "id": "<export_definition_csv_id>" } ] }, "recipients": { "data": [ { "type": "user", "id": "<user_id>" } ] }, "notificationChannel": { "data": { "type": "notificationChannel", "id": "<destination_id>" } }, "analyticalDashboard": { "data": { "type": "analyticalDashboard", "id": "<dashboard_id>" } } } } }'
A real-life example might look like this:
Creating XLSX export definition:
curl https://frosty-cat.trial.cloud.gooddata.com/api/v1/entities/workspaces/e45864d8057f40a09957ba1cdd3b5129/exportDefinitions \
      -H "Content-Type: application/vnd.gooddata.api+json" \
      -H "Accept: application/vnd.gooddata.api+json" \
      -H "Authorization: Bearer YWRtaW46Ym9vdHN0cmFwOkdkY05hczEyMw==" \
      -X POST \
      -d '{
        "data": {
          "type": "exportDefinition",
          "attributes": {
            "title": "Spend by Category and Type",
            "requestPayload": {
              "fileName": "Spend by Category and Type",
              "format": "XLSX",
              "visualizationObject": "aba6ab91-b013-4aa0-9b48-aa8cfd33f017",
              "visualizationObjectCustomFilters": [
                {
                  "negativeAttributeFilter": {
                    "localIdentifier": "3fbc2bc2b2ce4cdeaa12ea2f8e67e137",
                    "displayForm": {
                      "identifier": {
                        "id": "campaign_channels.category",
                        "type": "label"
                      }
                    },
                    "notIn": {
                      "values": [
                        "Direct",
                        "PR"
                      ]
                    }
                  }
                }
              ],
              "relatedDashboardId": "2f0b76a1-9e8e-4375-84be-721919e02cb7",
              "settings": {
                "mergeHeaders": true
              },
              "metadata": {
                "widget": "eda05736-faba-4336-8da0-991a79e9862a"
              }
            }
          }
        }
      }
The XLSX export definition ID is returned as
5100cfb0-a486-4023-832b-a667ac70d1d0.Creating CSV export definition:
curl https://frosty-cat.trial.cloud.gooddata.com/api/v1/entities/workspaces/e45864d8057f40a09957ba1cdd3b5129/exportDefinitions \
      -H "Content-Type: application/vnd.gooddata.api+json" \
      -H "Accept: application/vnd.gooddata.api+json" \
      -H "Authorization: Bearer YWRtaW46Ym9vdHN0cmFwOkdkY05hczEyMw==" \
      -X POST \
      -d '{
        "data": {
          "type": "exportDefinition",
          "attributes": {
            "title": "Spend by Category and Type",
            "requestPayload": {
              "fileName": "Spend by Category and Type",
              "format": "CSV",
              "visualizationObject": "aba6ab91-b013-4aa0-9b48-aa8cfd33f017",
              "visualizationObjectCustomFilters": [
                {
                  "negativeAttributeFilter": {
                    "localIdentifier": "3fbc2bc2b2ce4cdeaa12ea2f8e67e137",
                    "displayForm": {
                      "identifier": {
                        "id": "campaign_channels.category",
                        "type": "label"
                      }
                    },
                    "notIn": {
                      "values": [
                        "Direct",
                        "PR"
                      ]
                    }
                  }
                }
              ],
              "relatedDashboardId": "2f0b76a1-9e8e-4375-84be-721919e02cb7",
              "settings": {},
              "metadata": {
                "widget": "eda05736-faba-4336-8da0-991a79e9862a"
              }
            }
          }
        }
      }
The CSV export definition ID is returned as
4e5c77aa-48e1-4398-bd73-c06cdbdaf2d6.Scheduling export:
curl https://frosty-cat.trial.cloud.gooddata.com/api/v1/entities/workspaces/e45864d8057f40a09957ba1cdd3b5129/automations \
-H "Content-Type: application/vnd.gooddata.api+json" \
-H "Accept: application/vnd.gooddata.api+json" \
-H "Authorization: Bearer YWRtaW46Ym9vdHN0cmFwOkdkY05hczEyMw==" \
-X POST \
-d '{
"data": {
"type": "automation",
"id": "829a9370-0555-4050-a6ae-c94fc49ea0ee",
"attributes": {
"title": "Spend Bar Chart",
"details": {
"message": "Hello,\n\nthis is an export of the spend bar chart as CSV and XLSX file.",
"subject": "Spend bar chart"
},
"schedule": {
"firstRun": "2024-10-01T13:00:00Z",
"timezone": "Europe/Amsterdam",
"cron": "0 0 15 ? * *"
}
},
"relationships": {
"exportDefinitions": {
"data": [
{
"type": "exportDefinition",
"id": "5100cfb0-a486-4023-832b-a667ac70d1d0"
},
{
"type": "exportDefinition",
"id": "4e5c77aa-48e1-4398-bd73-c06cdbdaf2d6"
}
]
},
"recipients": {
"data": [
{
"type": "user",
"id": "alex.doe"
}
]
},
"notificationChannel": {
"data": {
"type": "notificationChannel",
"id": "a5b13b1b-4e60-4a6d-bba6-9b2b4ec96988"
}
},
"analyticalDashboard": {
"data": {
"type": "analyticalDashboard",
"id": "2f0b76a1-9e8e-4375-84be-721919e02cb7"
}
}
}
}
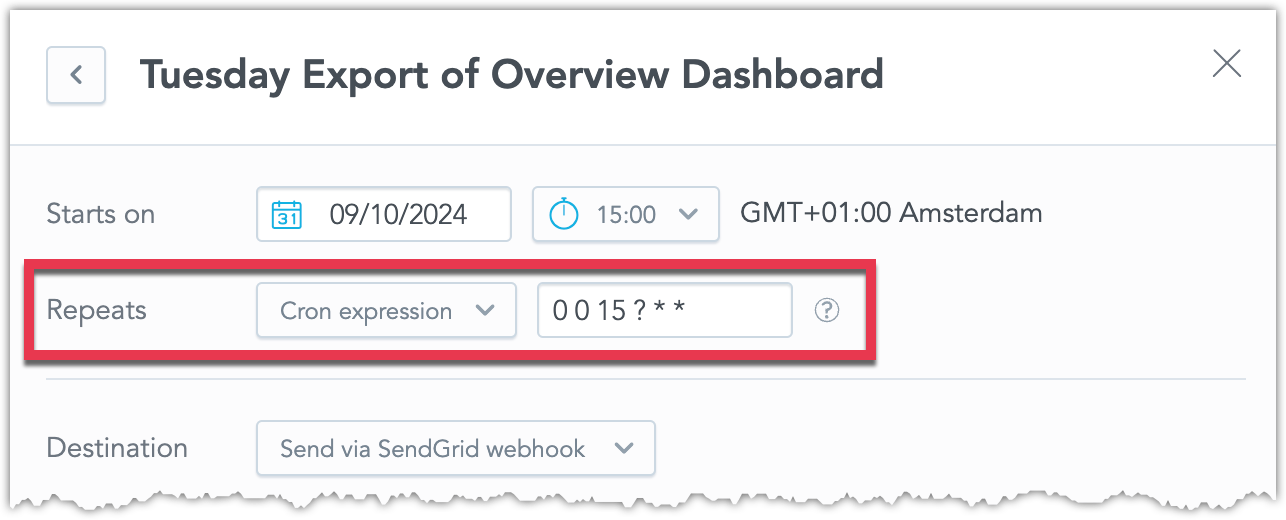
}Cron Expressions
For scheduled exports and alert evaluation frequency, you can use a custom schedule using a cron expression. GoodData supports a Spring 5.3 cron format: second minute hour day month day_of_week. For example, the cron expression 0 0 15 ? * * will trigger the export daily at 15:00.
GoodData supports sending scheduled exports at most once per hour.
Disabling
You can disable the option to create new scheduled exports for a specific visualization by editing it in the Analytical Designer. To do this, go to the Interactions tab while editing the visualization and uncheck the Scheduled exports check box.