Set Up Data Filters for Users
Overview
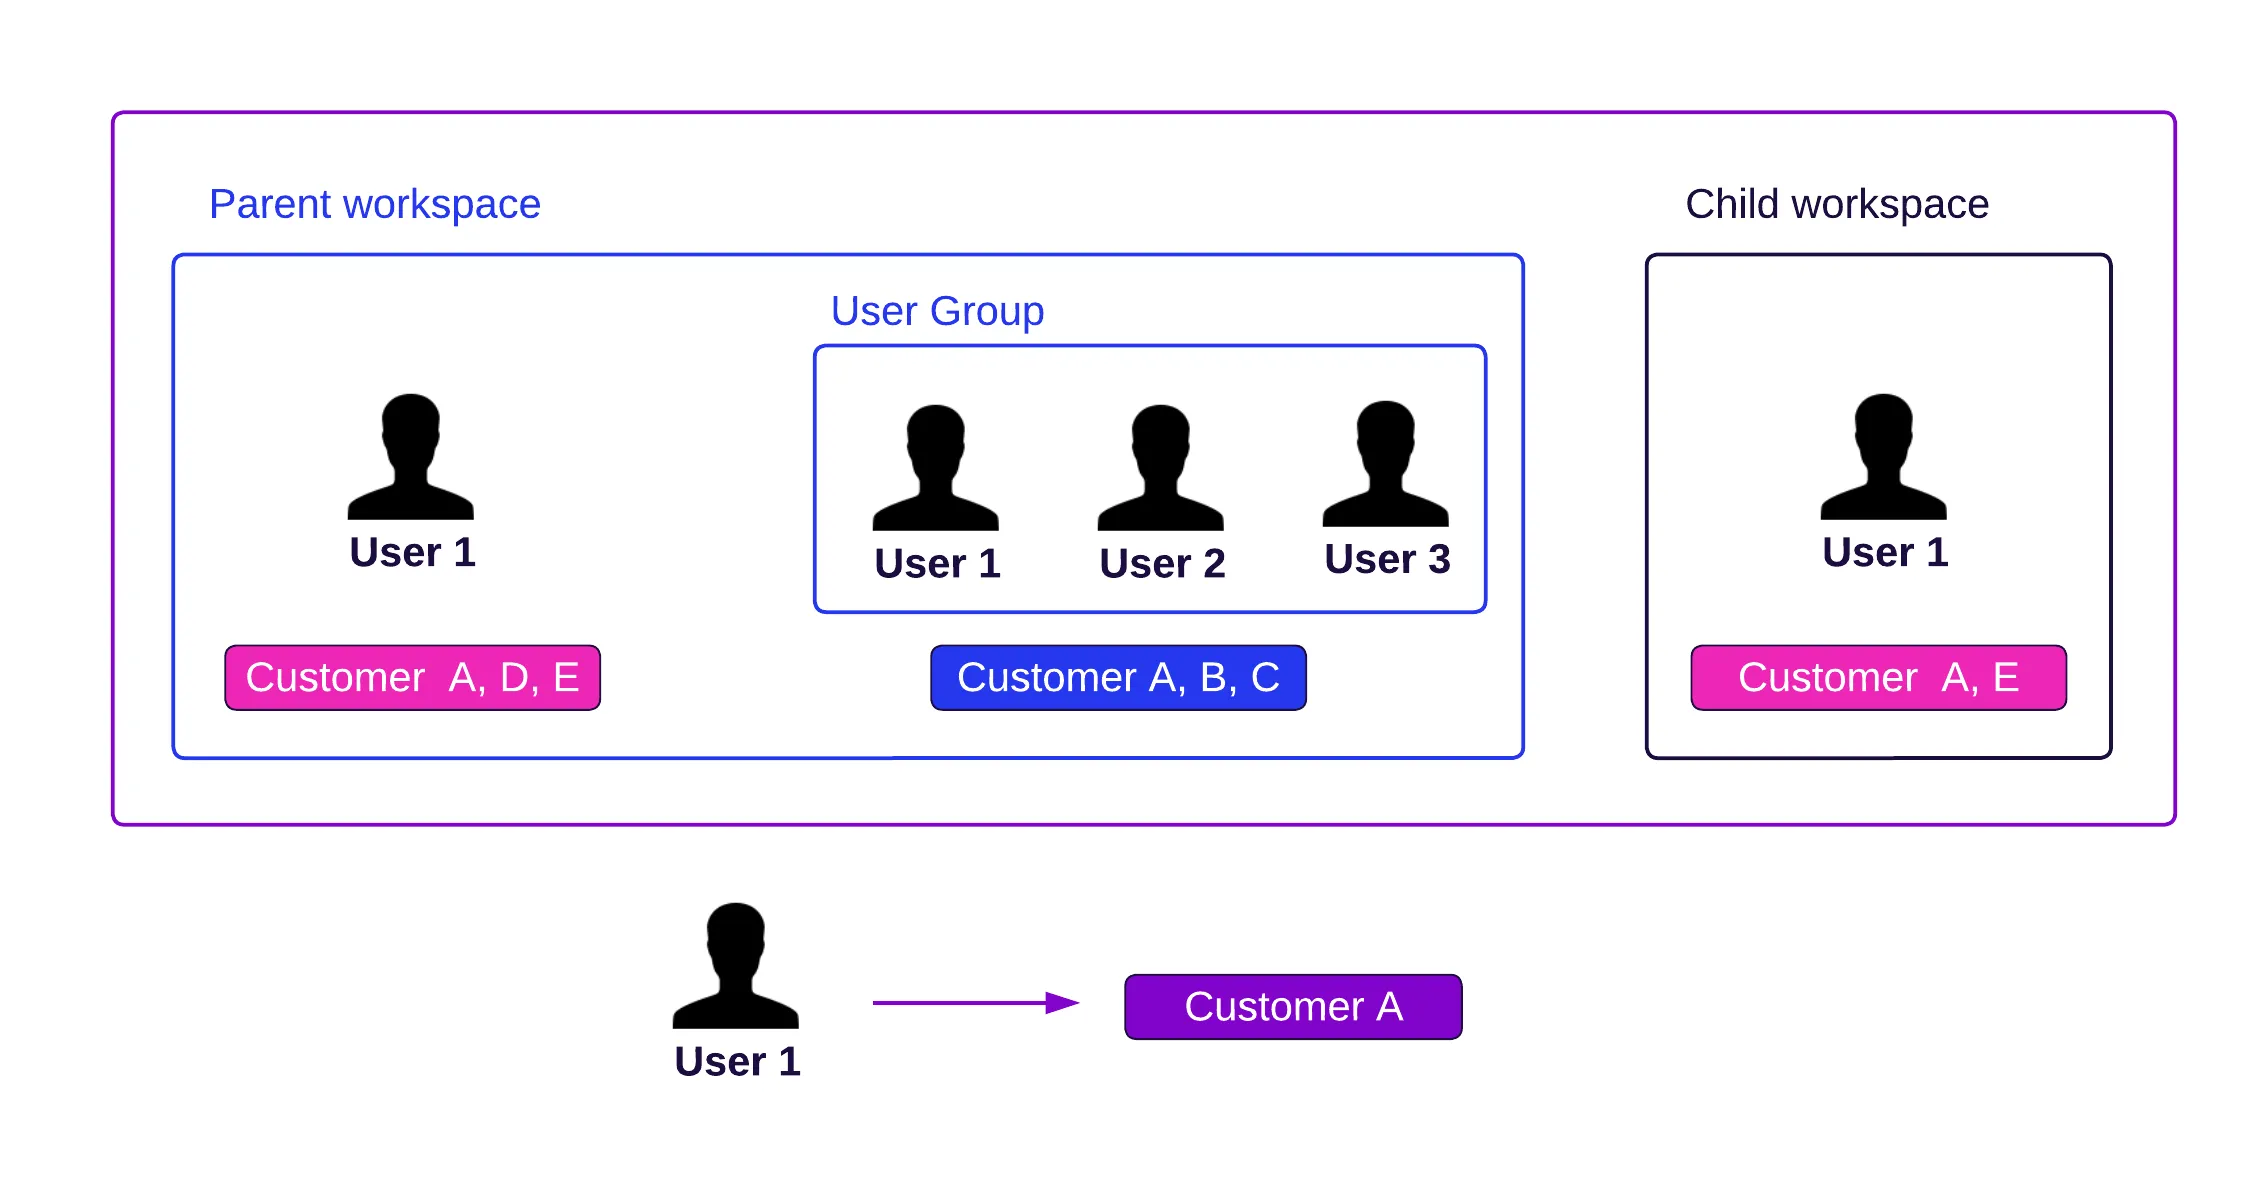
User Data Filters (UDF), also referred to as user data permissions or row-level security, allow you to restrict data that are available for specific users in specific workspaces.
By setting a UDF, you can define what subset of the data in a workspace will be available for individual users or user groups.
As opposed to workspace data filters (that point to a specific column in a specific table), user data filters use MAQL expressions. This offers you more flexibility in creating complex conditions because UDFs are applied to any connected data rather than specific database columns.
UDFs also affect COUNT metrics and listed attribute values along the oriented path from the filter to the selected attribute, as defined by arrows in the Logical Data Model (LDM). Therefore, when counting or listing, a filter set for one attribute will apply to all related attributes across different datasets. Simply put, the UDF will be applied to all dataset attributes that are in the LDM along the direction of the arrows. The filter is not applied against the direction of the arrows in the LDM.
The main differences between Workspace Data Filters (WDF) and User Data Filters (UDF) are the following:
Propagation
- WDFs apply to a specific dataset and affect only that dataset.
- UDFs are distributed across datasets following the relationships defined in the Logical Data Model (LDM).
Default Visibility
- A WDF is automatically enabled for all workspace users if it’s enabled at the workspace level.
- UDFs must be configured explicitly for individual users or groups.
Complexity
- A WDF is a single setting per workspace, affecting all its users.
- UDFs are defined through MAQL and can vary for different users within the same workspace.
Multiple User Data Filters
You can restrict data for individual users and user groups, or combine them.
The effective filters for individual users are inherited from all user groups that the user is a member of throughout the workspace hierarchy.
For example, if a user is a member of any user groups and filters are created for these groups as well, then also all filters from these groups are applied (using the AND operator).
Set Up User Data Filters
You can set up user UDFs via:
Entity API
This enables you to create, replace, update, and delete individual UDFs.
Declarative API
This enables you to update a complete set of UDFs.
To set up UDFs, do the following:
To create UDFs, you must have MANAGE permissions for the organization or workspace. For details about permissions, see Manage Permissions.
Create JSON Document
Use the following template to create a JSON document that describes the UDFs that you want to apply:
{
 "data": {
   "type": "userDataFilter",
   "id": "<data-filter-id>",
   "attributes": {
     "maql": "<maql-expression>",
     "title": "<data-filter-name>"
   },
   "relationships": {
     "user": {
       "data": {
         "id": "<user-id>",
         "type": "user"
       }
     }
   }
 }
}<data-filter-id>is the unique ID of the UDF.<maql-expression>is the definition of the filters using MAQL.<data-filter-name>is the UI-friendly name of the UDF.<user-id>is the ID of the user that the UDF with the specified condition is applied to.
Example: A sample JSON document.
{
 "data": {
   "type": "userDataFilter",
   "id": "country",
   "attributes": {
     "maql": "{label/CUSTOMER_COUNTRY} = \"Canada\"",
     "title": "tenant filtered to Canada Only"
   },
   "relationships": {
     "user": {
       "data": {
         "id": "john.doe_tenant",
         "type": "user"
       }
     }
   }
 }
}
Use the following template to create a JSON document that describes the UDFs that you want to apply:
{
 "userDataFilters": [
   {
     "id": "<data-filter-id>",
     "maql": "<maql-expression>",
     "title": "<data-filter-name>",
     "user": {
       "id": "<user-id>",
       "type": "user"
     }
   }
 ]
}<data-filter-id>is the unique ID of the UDF.<maql-expression>is the definition of the filters using MAQL.<data-filter-name>is the UI-friendly name of the UDF.<user-id>is the ID of the user that the UDF with the specified condition is applied to.
Example: A sample JSON document.
{
    "userDataFilters": [
      {
        "id": "country",
        "maql": "{label/CUSTOMER_COUNTRY} = \"Canada\"",
        "title": "tenant filtered to Canada Only",
        "user": {
          "id": "john.doe_tenant",
          "type": "user"
        }
      }
    ]
   }
You can use userGroup instead of user to apply the filter to all users from a user group.
Creating a UDF with Multiple Values
To define a filter with multiple values, separate them with commas and escape the quotes. The MAQL condition should include a backslash (\) before each quote. For example:
{label/city} IN (\"Vancouver\",\"Halifax\")Make sure the values you define are correct and available. You can also use the LIKE or ILIKE operators in the condition if needed.
Add JSON Document to Workspace
To add the UDF to the workspace, run the following:
curl $HOST_URL/api/v1/entities/workspaces/<workspace-id>/userDataFilters \
-H "Authorization: Bearer $API_TOKEN" \
-H "Content-Type: application/vnd.gooddata.api+json" \
 -d @/path/to/your-filter-definition.json
To list all UDFs that are created in the workspace, run the following:
curl $HOST_URL/api/v1/entities/workspaces/<workspace-id>/userDataFilters/ \
-H "Authorization: Bearer $API_TOKEN"
To update the UDF, run the following:
curl $HOST_URL/api/v1/layout/workspaces/<workspace-id>/userDataFilters \
-H "Authorization: Bearer $API_TOKEN" \
-H "Content-Type: application/json" \
-X PUT \
 -d @/path/to/your-filter-definition.json