OIDC Authorization Code Flow
In this article, we look at the authorization code flow with OpenID Connect (OIDC) for a web app. We break the process into five stages. Each stage explains how the browser, UI app, GoodData backend, and OIDC provider work together. This guide helps you learn about the steps for safely logging in and using an app. We cover everything from the start to the smooth ongoing use of the app. By reading this article, developers and architects can better understand how to create strong login solutions with OIDC.
Initial UI Interaction
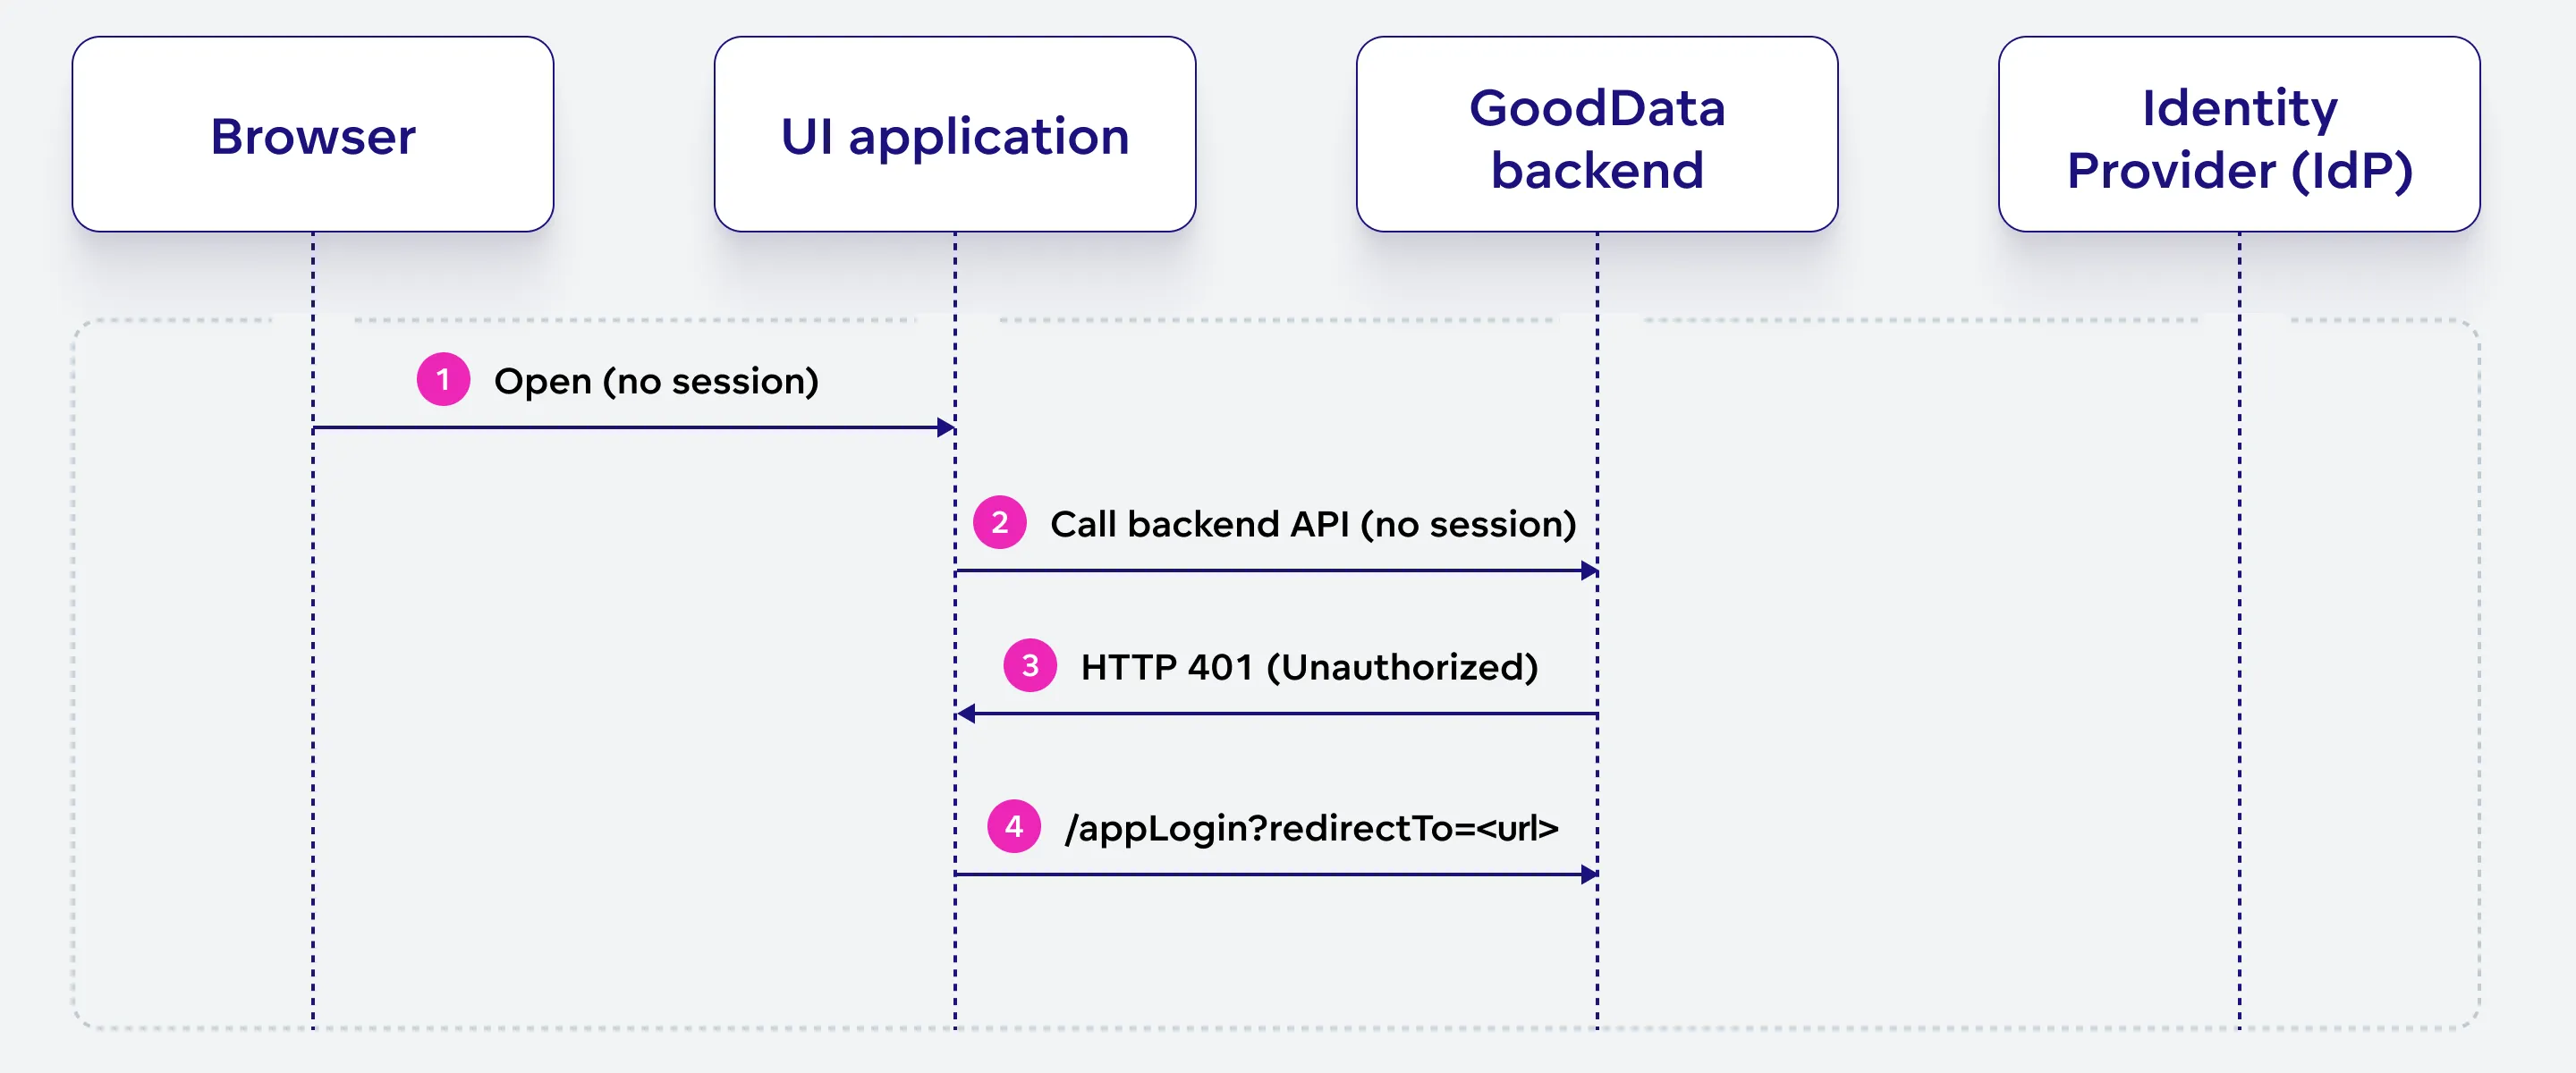
In this stage, the user opens the app in their browser without an active session, and the UI application attempts to access the GoodData backend, which results in an unauthorized response, prompting the app to redirect the user to the login endpoint.
Open (no session)
The user initiates the process by opening the app in their browser. At this point, no session has been established.
Call backend API (no session)
The UI application, running in the browser, sends a request to GoodData backend API without an active session or authentication information.
HTTP 401 (Unauthorized)
GoodData backend API responds to the UI application’s request with an HTTP 401 status code, indicating that the user is not authorized to access the requested resource due to the lack of a valid session.
/appLogin?redirectTo=
The UI application redirects the user to the GoodData backend’s app login endpoint, including a “redirectTo” query parameter that specifies the URL the user should be redirected to after a successful authentication process.
Initialize Authentication
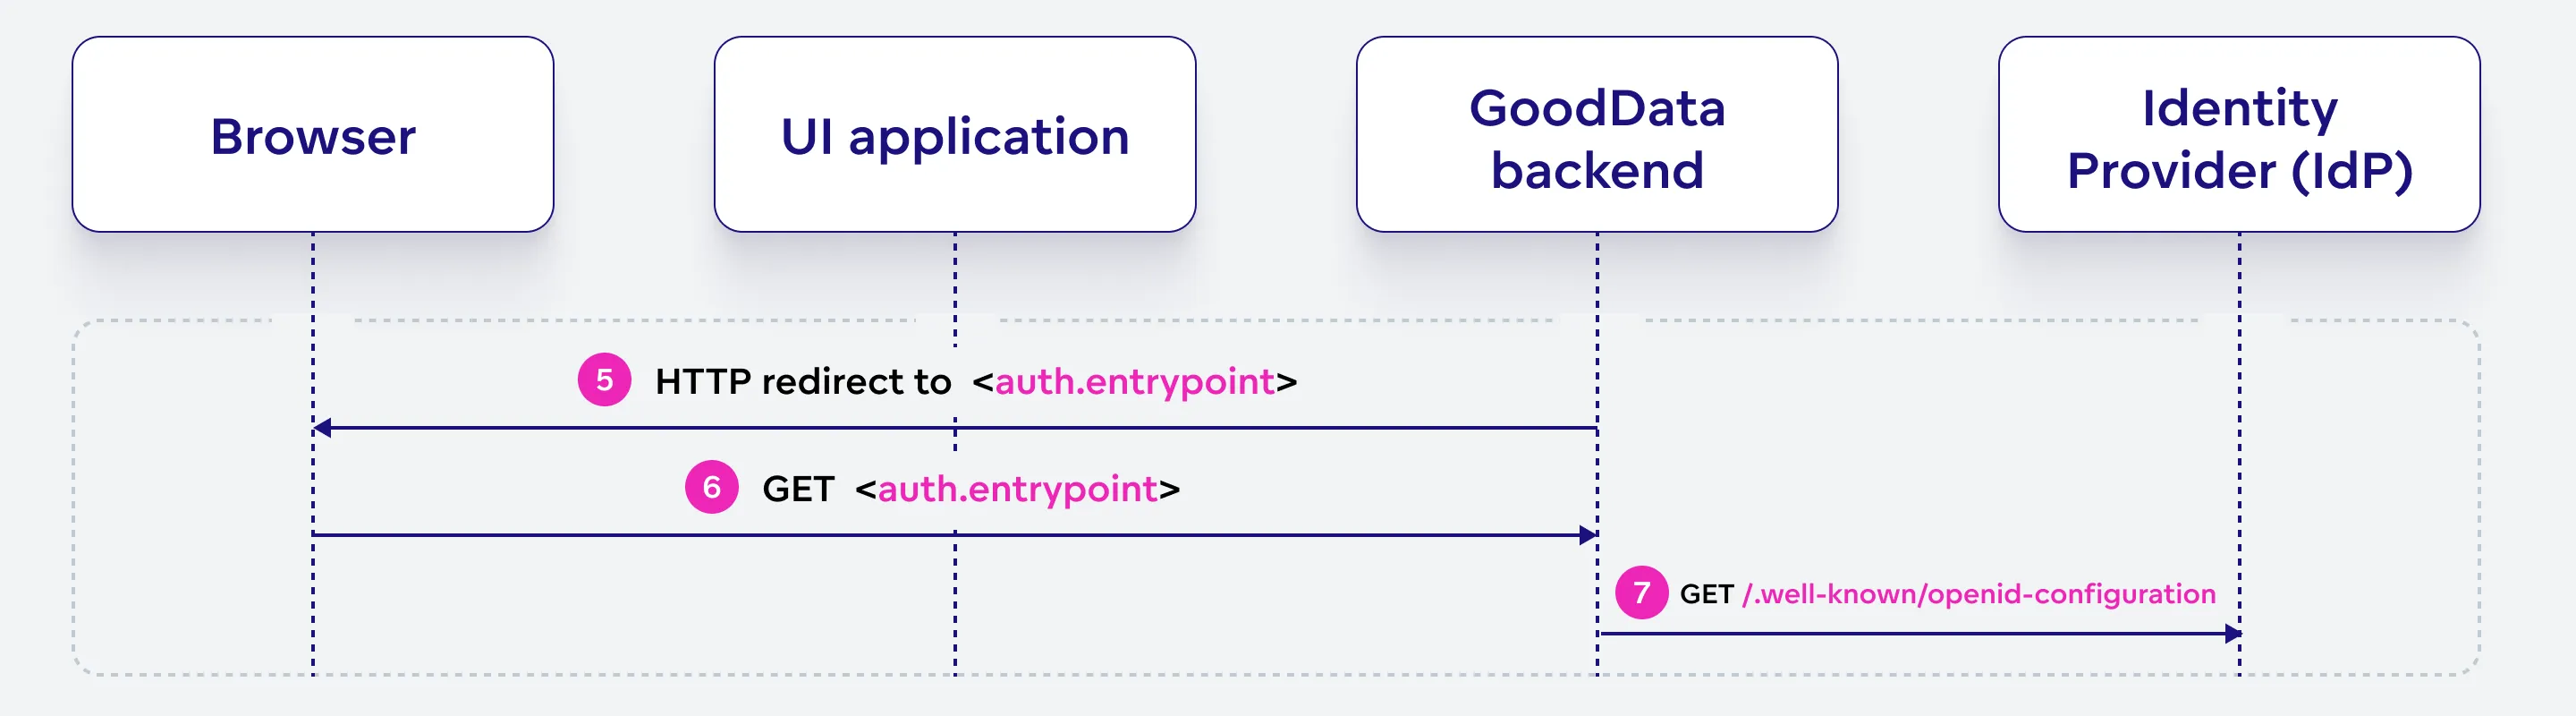
The GoodData backend sends the browser a redirect to the authentication entry point, and retrieves the OIDC identity provider’s configuration. The browser initiates the authentication process by sending a request to the specified entry point.
HTTP redirect to <auth.entrypoint>
GoodData backend sends a HTTP redirect response to the browser, directing it to the OIDC identity provider’s authentication entry point.
Along with the redirect, the backend sets a cookie
SPRING_REDIRECT_URLcontaining the<url>to which the user should be redirected after successful authentication.GET <auth.entrypoint>
Following the redirect received in step 5, the browser sends a GET request to the authentication entry point specified by the GoodData backend.
GET /.well-known/openid-configuration
GoodData backend retrieves the OIDC identity provider’s configuration by sending a GET request to the provider’s
.well-known/openid-configurationendpoint. This configuration contains necessary information about the provider’s endpoints and supported features.
Authenticate With IdP
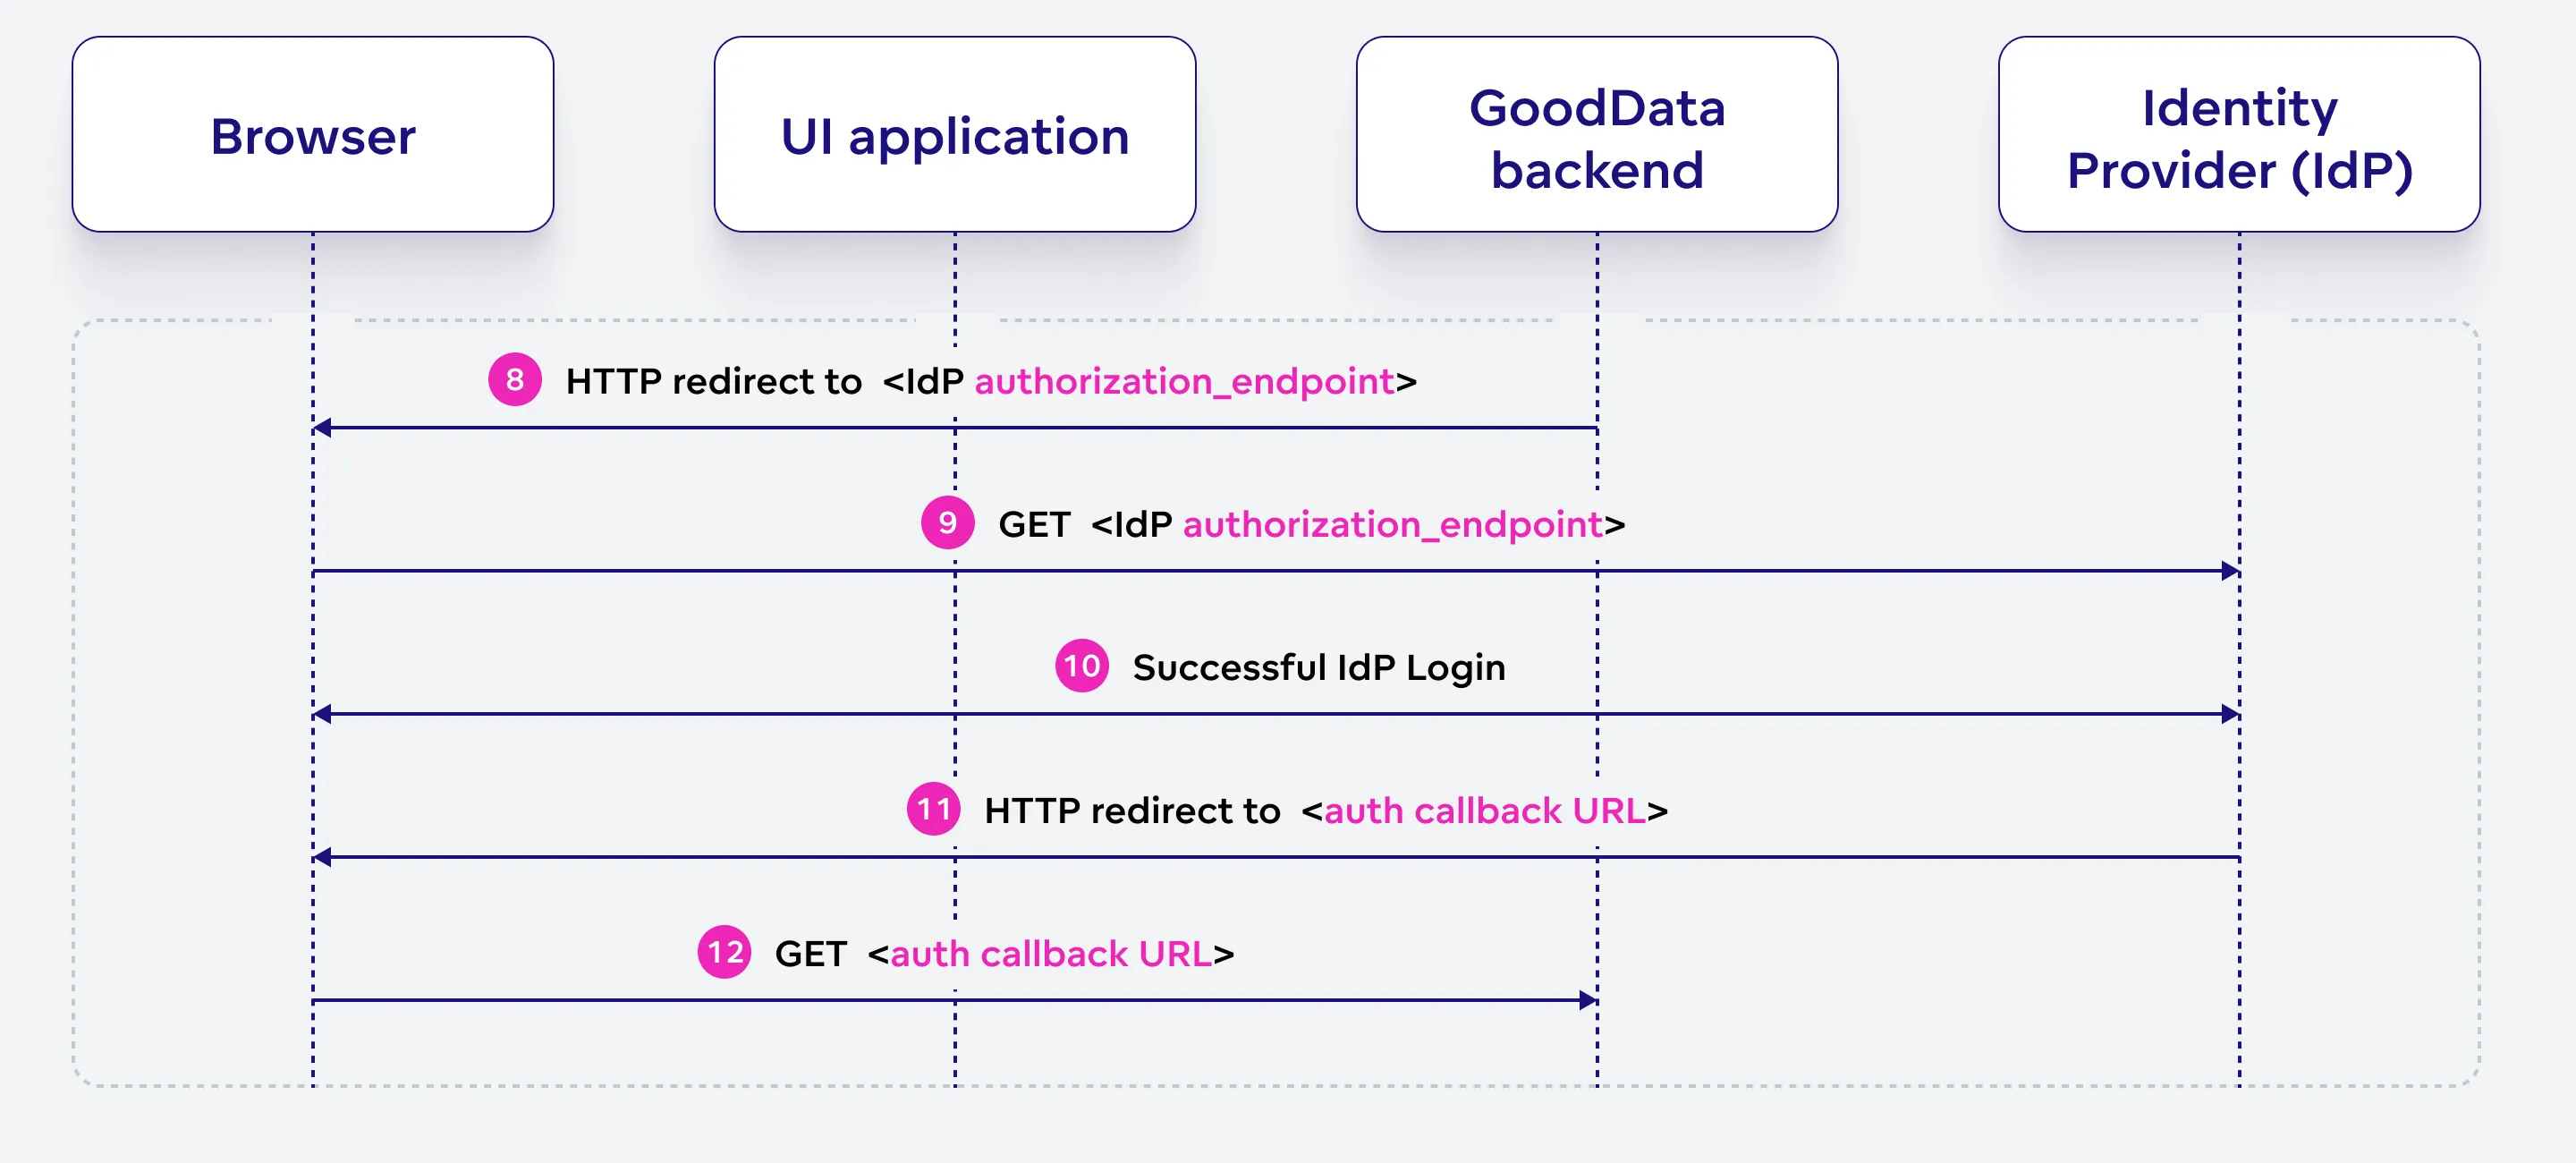
Authenticate With OIDC Identity Provider (IdP) The user authenticates with the OIDC identity provider using a supported authentication method. Upon successful authentication, the provider issues an authorization code and redirects the browser to the GoodData backend’s callback URL.
HTTP redirect to <IdP authorization_endpoint>
GoodData backend sends another HTTP redirect response to the browser, directing it to the OIDC identity provider’s authorization endpoint.
Along with the redirect, the backend sets a cookie
SPRING_SEC_OAUTH2_AUTHZ_RQcontaining encrypted data related to the authentication request.GET <IdP authorization_endpoint>
The browser sends a GET request to the OIDC identity provider’s authorization endpoint, which includes the following query parameters:
response_type = codeclient_id = <IdP client ID>scope = openid.profilestate = <opaque value>nonce = <opaque value>redirect_uri = <callback URL>
Successful IdP Login
The user directly interacts with the OIDC identity provider using any supported authentication method, such as user-password login, social login, identity federation, etc.
HTTP redirect to <auth callback URL>
Upon successful authentication, the OIDC identity provider sends an HTTP redirect response to the browser, directing it to the callback URL specified in the initial authentication request.
GET <auth callback URL>
The browser sends a GET request to the GoodData backend’s callback URL, which includes the following query parameters:
code = <authorization code>state = <value from the request>
Process Successful Authentication
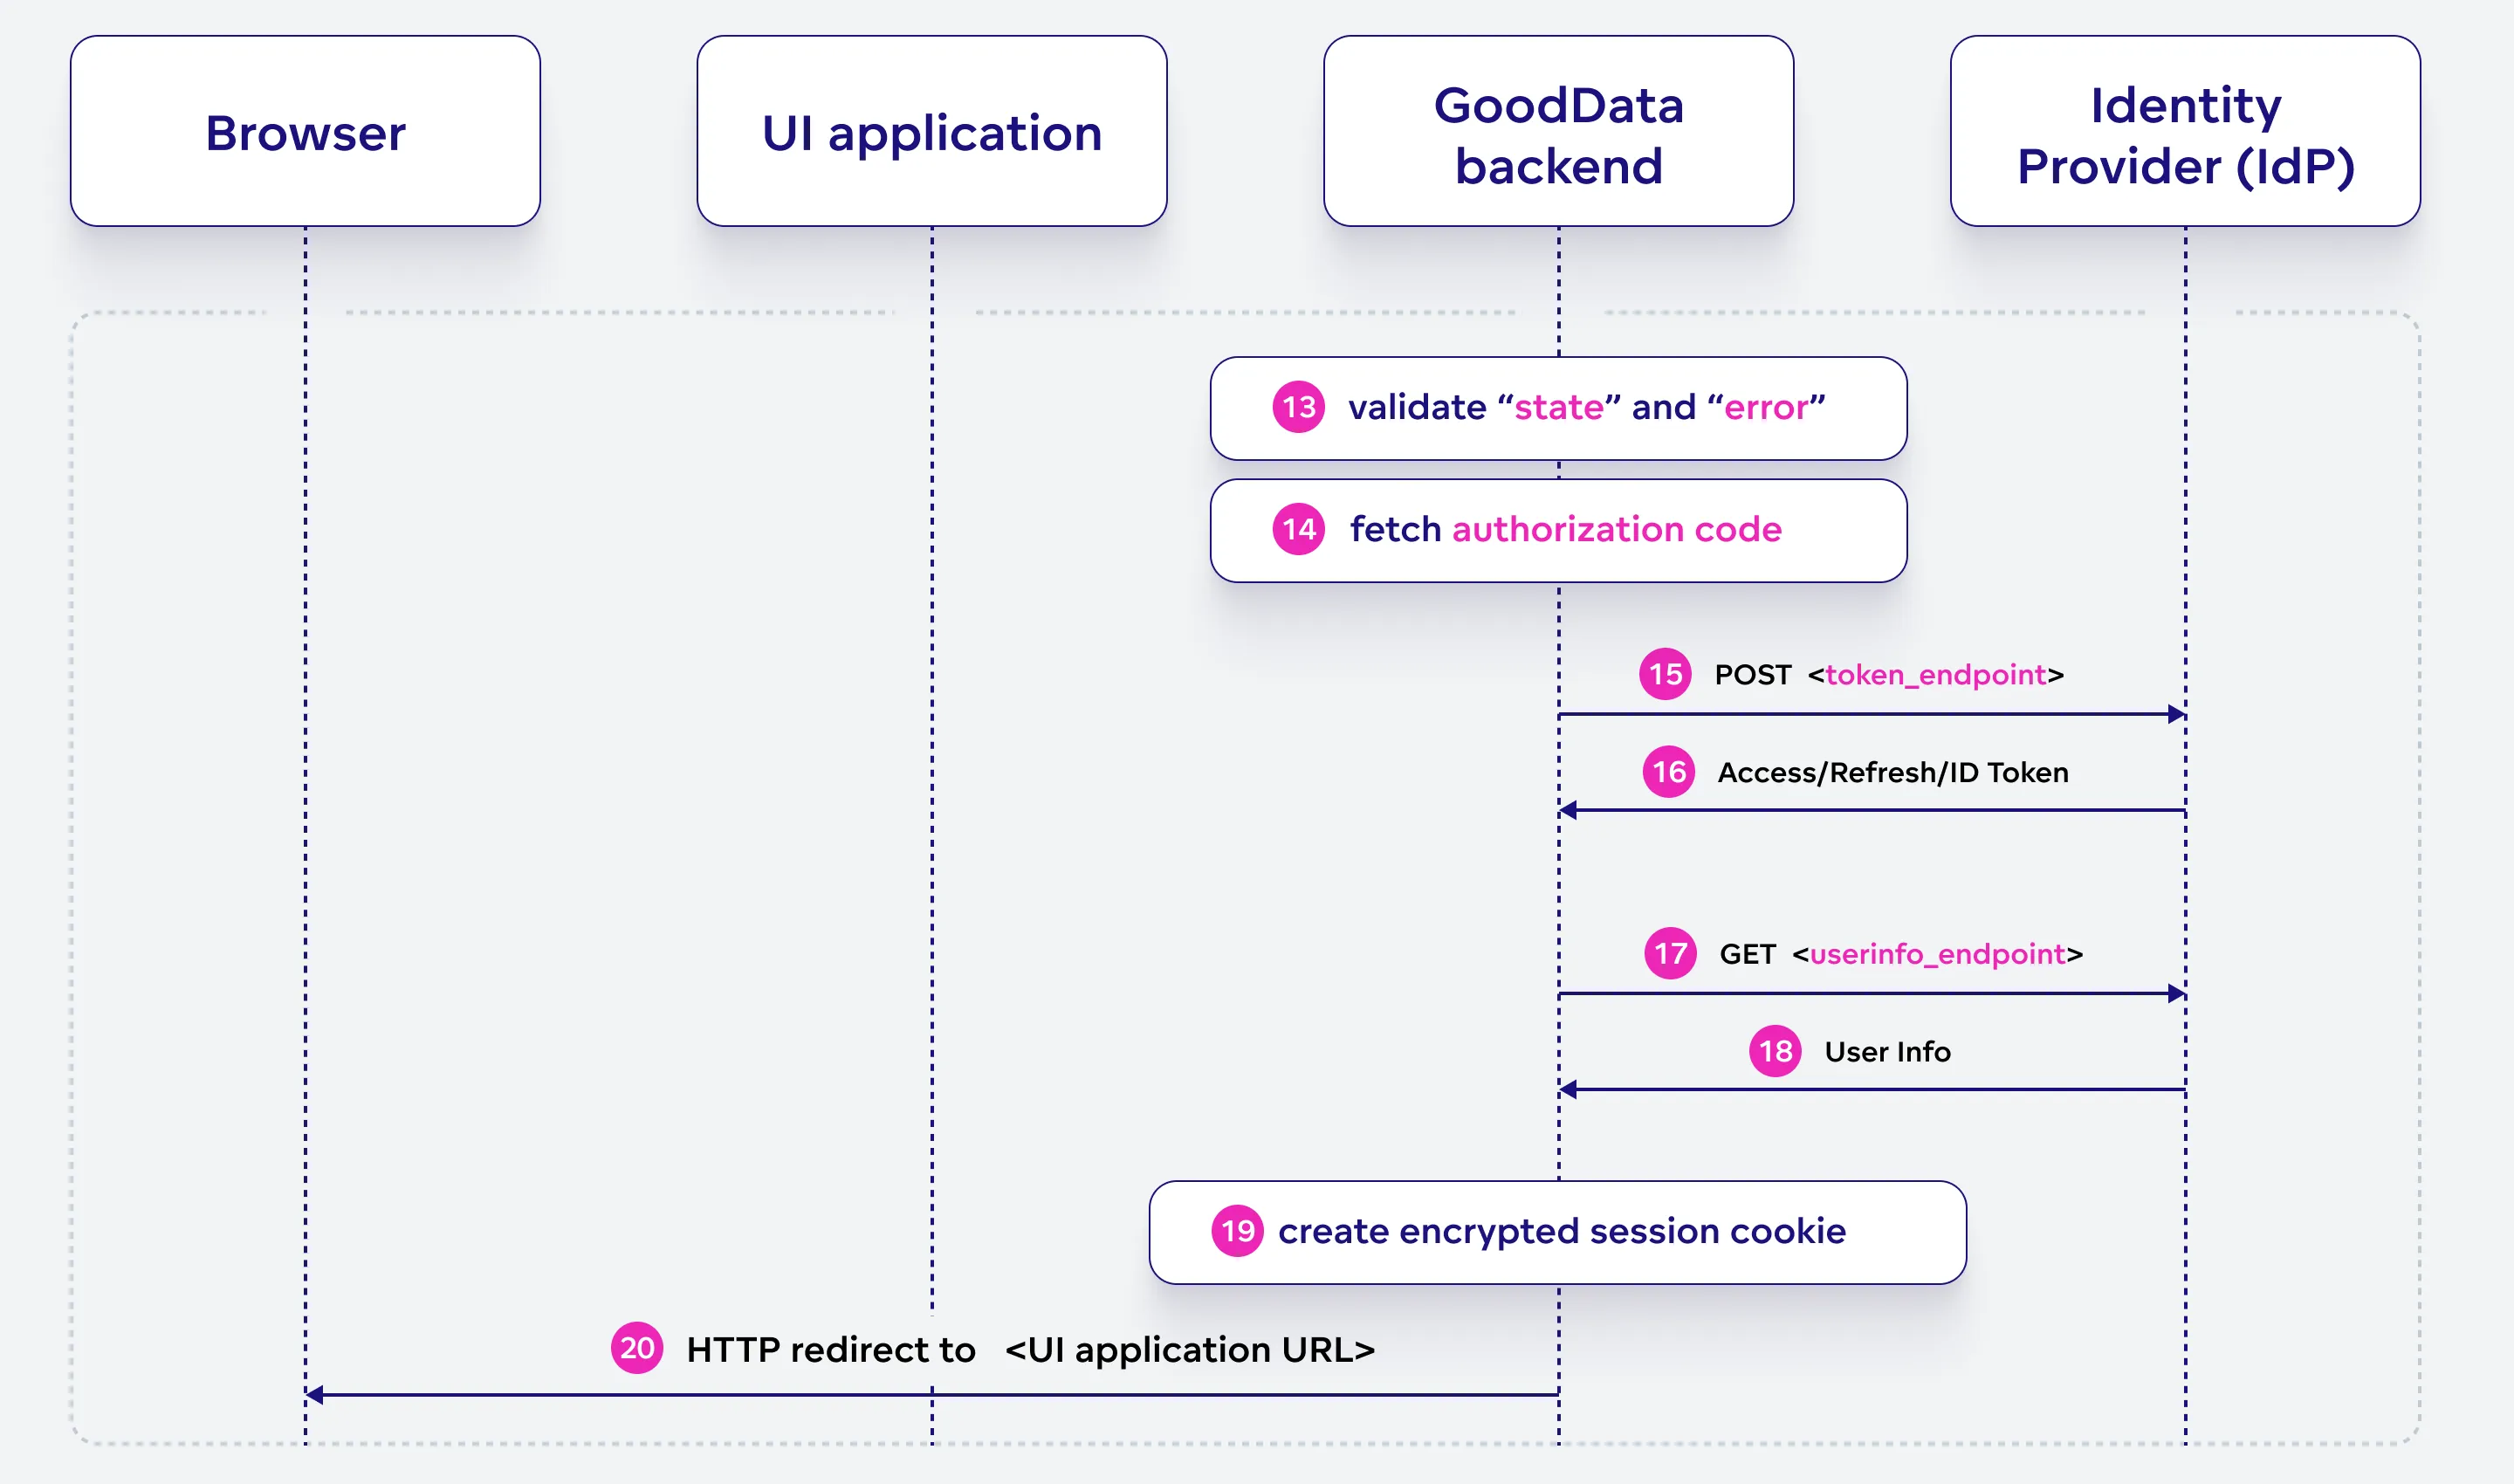
The GoodData backend validates the received parameters, exchanges the authorization code for tokens and user information from the OIDC identity provider. Then, it establishes a secure session by creating encrypted session cookies and redirects the browser to the UI application.
Validate “state” and “error”
GoodData backend validates the “state” and “error” parameters received. If the optional “error” parameter contains an authorization error, it is translated to an HTTP 401 status.
Fetch autorization code
GoodData backend retrieves the authorization code received in the previous stage.
POST <token_endpoint>
GoodData backend sends a POST request to the OIDC identity provider’s token endpoint to exchange the authorization code for access, refresh, and ID tokens.
Access/Refresh ID token
The OIDC identity provider responds with the access, and ID tokens, optionally also refresh tokens, which are sent to the GoodData backend. The user’s name is extracted from this data.
GET <userinfo_endpoint>
The GoodData backend sends a GET request to the OIDC identity provider’s userinfo endpoint to obtain the user’s information.
User info
The OIDC identity provider responds with the user’s information, which is sent to the GoodData backend. This is just to verify the validity of the ID token returned in the previous stage.
Create encrypted session cookies
GoodData backend creates encrypted session cookies for better security, using regularly rotated private keys.
HTTP redirect to
<UI application URL>The GoodData backend sends an HTTP redirect response to the browser, directing it to the UI application URL. The following cookies are set:
SPRING_SEC_OAUTH2_AUTHZ_RQ: Clear this value.SPRING_SEC_OAUTH2_AUTHZ_CLIENT: Contains the access and refresh tokens.SPRING_SEC_SECURITY_CONTEXT: Contains the user’s information.
The redirect goes to the URL fetched from the SPRING_REDIRECT_URL cookie, previously set in stage 2.
Continue UI Interaction
With a secure, authenticated session in place, the user can now interact with the UI application seamlessly. The UI application sends requests to the GoodData backend, which in turn responds with authenticated responses, granting the user access to protected resources and functionalities.
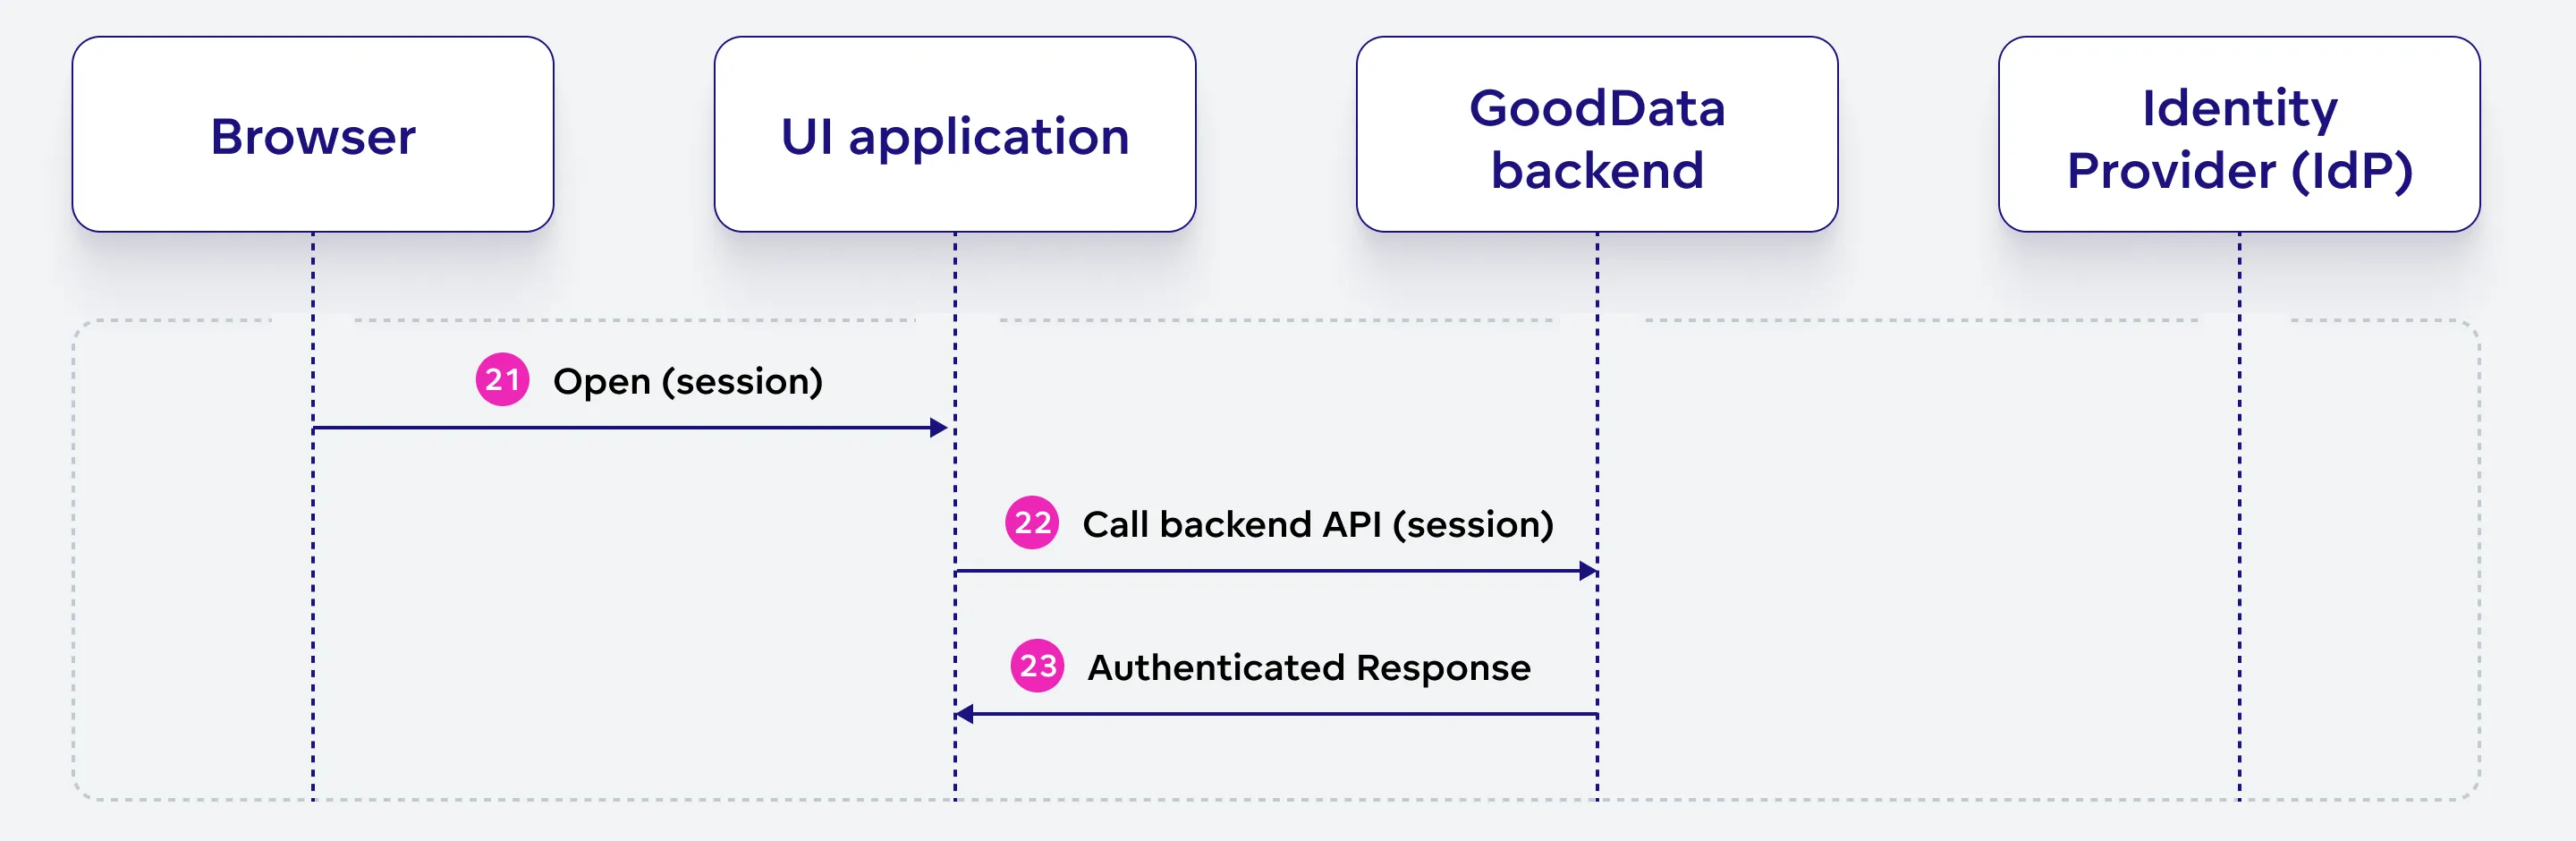
Open (session)
With an active session, the user reopens the app in their browser or continues using it.
Call backend API (session)
The UI application, running in the browser, sends requests to the GoodData backend API using the established session, which includes the necessary authentication information.
Authenticated response
GoodData backend responds to the UI application’s requests with authenticated responses, allowing the user to access the requested resources and interact with the app seamlessly.